Old Guys Simplex moto-peddle bike

GoldenMotor.com

indian22

Well-Known Member
Dec 31, 2014
4,725
7,706
113
Oklahoma
Going into this e-powered V-twin project I knew I'd face some obstacles & I wasn't wrong. The biggest hurdle to overcome was my lack of knowledge concerning all facets of current battery technology, etc. and I'm still working through that, while building on. I've had a lot of e-mail, calls and personal observations from a lot of knowledgeable cycling enthusiasts, not connected with this forum about "how are you going to handle?" questions mainly dealing with heat issues and reaching power goals without burning things to the ground or at least frying components. It all comes back to heat. I thought I'd share some of my thoughts on the topic here, dealing with what I've got rather than why I've got it, chose it etc.

The motors, 2kw, 3kw & 4 kw direct & brushless...running 72 volts. That's where I'm at motor wise. The motor controller 72v 100 amp and the BMS also 72v. 100 amp. the battery pack, yet to be built, 72v. 20s &5p....100 amp plus max potential but dialed back to 80amp bursts. So yes I've been thinking about heat in an air cooled package.

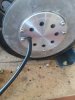
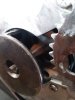
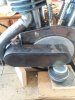
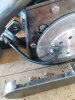
The photos show that I've left the motor case open on both ends of the case, with room around the various case covers to flow fresh air. The bottom of the case is also open for internal air flow as well. I've not drilled the direct drive motor cases for ventilation but that's an option if required. Of course the hardest thing to do is also the easiest to implement and that's just self control in refraining to max out the limits. The 4kw @72v. & 65 amp is 4.68kw which is 6.22hp and that, while not continuous is sustainable for 10 to 15 minutes, and that would drain a 20 amp hr. pack in a hurry. using 80 amp only bumps this to 7.66hp, but an extra 1.4hp required for a few moments could save ones life in traffic situations. Getting hit from behind has always been a big concern in any vehicle. A motor bike stopped and underpowered makes that my biggest concern in traffic. I'll trade speed for torque any day!

Rick C. just trying to stay cool!
 

Attachments

indian22

Well-Known Member
Dec 31, 2014
4,725
7,706
113
Oklahoma
Designing & attaching covers in a manner that allows air flow to the motor while also allowing easy access and removal of internal components & holding all securely in place; was a series of problems that I've sorted.

We've a 7 day forecast of temperate weather and that should find the V twin motor case complete, save the magneto, primary chain tensioner and final cosmetic touches to the case. The cylinder head "bridge" motor mount will get a design after the Sportsman frame & bars arrive this Friday.

I normally put together a roller and then complete it as a functional pedal bike with components on hand so I'll start with wheels, tires and saddle that will eventually go away. I'm hoping not to have to mount the motor more than two or three times in the process of getting everything lined up.

Then I can get back to battery design.

Rick C.
 

PeteMcP

Well-Known Member
Jun 27, 2017
918
2,545
93
68
Rick,
Designing and building something like this is never just a case of assembling pieces together. As a designer/manufacturer of model train kits, I'm really appreciating how you're applying some considerable thought into how your engine must dis-assemble in terms of ease of access, maintenance and swapping-out components if and when required.
You mentioned turning your attention to finishing-up the crankcase details in the coming few days, and this, combined with the heat issue you're concerned about, made me wonder if you're still going to go with adding some raised crankcase lettering we spoke about earlier in the thread? If you're worried about heat being an issue with the Slaters styrene letters, I could always have the sprues of letters cast in brass for you by my lost wax casters here in the UK using the 'lost plastic' process. Very straight forward. Shout up if you need a brief explanation.
 
  • Like
Reactions: Tom from Rubicon

indian22

Well-Known Member
Dec 31, 2014
4,725
7,706
113
Oklahoma
Thanks Pete for your interest in the motor case build up and your input is always valued. The lettering is indeed of interest and no I'd not thought the lettering to be threatened by component heat, but the option of brass to replace plastic is intriguing and an explanation would be welcome.

Final details for me might be weeks or months out as I gaze at what I've wrought.

A side project that I mentioned in earlier posts is an e-motor V twin, side valve style motor case and I've been working on a twin motor design, with a motor located vertically in each of the two cylinders driving through a single helical ring gear with dual pinion output from the two motors. All components housed inside a full scale case. I've got a fellow printing out the helical 90 degree gear set which is a 2:1 reduction in case & I'll decide on additional external reduction, using a reduction sprocket later. A second reduction may not be necessary.

I'll address the heat issue with two high flow fans located in the top of the cylinders which will pull the hot air through the motors and out of the cylinders via functional exhaust pipes.

Several lessons learned already on the current twin case build, with more to follow. Of this I'm quite certain.

Single controller and battery pack or duals? Haven't a clue on that as yet.

If this plays out well then an Anzani style, 4 cylinder half a radial might not be far behind. Or an inline Henderson/Ace/Indian e-bike.

Rick C.
 

PeteMcP

Well-Known Member
Jun 27, 2017
918
2,545
93
68
Rick,
So you're really just getting up to speed on this current V twin project. Future engine plans sound both ambitious and exciting AF. Can't wait to see some of those become a reality.
OK, 'lost plastic' process is pretty much self explanatory. Simply cuts down the amount of steps required when following the normal 'lost wax' casting process. When supplying lost was brass or nickel silver parts in my kits, I needed to make a master pattern from brass, from which a rubber mould would be made. The caster's skill comes into play when hand cutting the mould to release the encapsulated pattern. The resulting two part mould is used to produce multiples of whatever is being replicated by injecting molten wax into the mould cavity. Multiple wax 'castings' are then sprued-up with appropriate 'feeds' so they can most economically be suspended in a 'can' which is then filled with casting plaster. Once the plaster has cured solid, the can and its wax contents are heated in a kiln to a temperature when the wax parts vaporize and disappear, hence the term 'lost wax', leaving mould cavities into which the molten brass (or whatever) may be poured. After the metal cools and solidifies, the can is opened and the plaster broken and hosed away, revealing the sprues of brass components.
The 'lost plastic' process cuts out the need to make patterns, a mould and wax replicas. One simply starts with pre-moulded plastic (styrene in this case) parts and these go straight into the 'can' to be encapsulated in plaster. Once heated in the kiln, plastic parts evaporate same as wax parts, creating a mould from which one-off metal parts can be replicated. I've used this process very successfully on a couple of occasions to obtain brass castings from injection moulded styrene kit parts. Just fancied soldering together a brass Airfix spitfire as a desk ornament.
If you'd prefer metal letters for your twin's crankcase, that's not a problem. I'll buy the Slaters plastic letters here in the UK and send them to my brass casters.
 

indian22

Well-Known Member
Dec 31, 2014
4,725
7,706
113
Oklahoma
Rick,
So you're really just getting up to speed on this current V twin project. Future engine plans sound both ambitious and exciting AF. Can't wait to see some of those become a reality.
OK, 'lost plastic' process is pretty much self explanatory. Simply cuts down the amount of steps required when following the normal 'lost wax' casting process. When supplying lost was brass or nickel silver parts in my kits, I needed to make a master pattern from brass, from which a rubber mould would be made. The caster's skill comes into play when hand cutting the mould to release the encapsulated pattern. The resulting two part mould is used to produce multiples of whatever is being replicated by injecting molten wax into the mould cavity. Multiple wax 'castings' are then sprued-up with appropriate 'feeds' so they can most economically be suspended in a 'can' which is then filled with casting plaster. Once the plaster has cured solid, the can and its wax contents are heated in a kiln to a temperature when the wax parts vaporize and disappear, hence the term 'lost wax', leaving mould cavities into which the molten brass (or whatever) may be poured. After the metal cools and solidifies, the can is opened and the plaster broken and hosed away, revealing the sprues of brass components.
The 'lost plastic' process cuts out the need to make patterns, a mould and wax replicas. One simply starts with pre-moulded plastic (styrene in this case) parts and these go straight into the 'can' to be encapsulated in plaster. Once heated in the kiln, plastic parts evaporate same as wax parts, creating a mould from which one-off metal parts can be replicated. I've used this process very successfully on a couple of occasions to obtain brass castings from injection moulded styrene kit parts. Just fancied soldering together a brass Airfix spitfire as a desk ornament.
If you'd prefer metal letters for your twin's crankcase, that's not a problem. I'll buy the Slaters plastic letters here in the UK and send them to my brass casters.
Thanks Pete for the great explanation of the process & your offer to help out with your vendor. After seeing your success with the styrene I'd think it tough enough when bonded properly, but as I get closer to adding that detail I'll touch base with you.

Rick C.
 
  • Like
Reactions: fasteddy

indian22

Well-Known Member
Dec 31, 2014
4,725
7,706
113
Oklahoma
Your profession so in your wheelhouse Tom. Ancient process, lost wax, that became an obscure if not forgotten art over the centuries...now used extensively. What's old becomes new. Ceramics and Damascus metal work etc. all bringing their own particular advances to the modern age, problem/solution dynamic. New developments in science, have resulted in exponential advances. Want complex shapes with high strength requirements in metal or whatever, just print them out, now that's something ol' Herr Gutenberg never dreamed I'll hazard! Current tech is amazing yet many of us are stuck in time, fascinated by the complexities of yesteryear and I think that's rather special. Coming to grips with and embracing the dynamic tension of melding past and present is, though somewhat challenging, an opportunity as well.

My special dimension Sportsman flyer frame is scheduled for delivery today and a big well done to Pat for interrupting his normal production routine to kick out something special for me. I'll get it up on two as a roller and see where I'm at. I know what the tape measure says but I like to verify the proportions with my eyes. Frame and fork will determine my tire sizing. My vision, at the beginning of a build, always changes when I see parts assembled. So disregard what my intentions are along the way. They are subject to change and I'm just having fun.

I should have the case work completed this week and then disassembled for some internal painting. I'm thinking some cast iron finish grey on the main housing and heads. The rest, patina on brass, copper and aluminum. Steel black and aged. I won't know exactly till I'm finished!

Rick C.
 
  • Like
Reactions: fasteddy and FOG

indian22

Well-Known Member
Dec 31, 2014
4,725
7,706
113
Oklahoma
Tom this Flyer frame uses 135mm wide triangle that's on his larger frames and this allows the use of a large "oil tank" box behind the seat tube or some serious big tire on the rear. I asked for a deeper loop that would house the V-twin case and I know he dropped the loop 2". Pat also changed the geometry of the down tube to create extra horizontal length all the way up the frame for the V-twin. How much room was created? The 2" drop on the loop looks much more...so the added length appears to be even more. I just spelled out my requirements and Pat built the frame I wanted, no drama. If my build sucks it won't be because of the frame and that's for certain!

It came in late this afternoon and I got it out of the box to check for damage and there was none. I hope to get it up on some old wheels and tires this week end and check the wheelbase, but my other Sportsman frame, on my Harley "peashooter" is not as long and it's seen 80mph plus a couple of times and tracked well. I'd think this one will be fine too. I'll post some photos tomorrow.

Rick C.
 
Last edited:

indian22

Well-Known Member
Dec 31, 2014
4,725
7,706
113
Oklahoma
I double checked my recollections of frame dimensions with my correspondence about this frame with Pat, just to verify that the wheel base is longer & it is. How much I'm not certain, but the rear triangle is the same size as the full size "Bonneville" frame both width and length, so I'd think it's several inches longer than his 110mm width standard frame. So when I call this a special frame it denotes not only the custom dimensions of the loop and down tube but also the addition of the wide "Bonneville" stretch triangle with caliper bracket and heavy duty dropouts.

Pat also denoted the "special" nature of this frame by assigning it a new serial number series, of which this is #01 RC (my initials) and that attention to detail surprised and delighted me! Thanks Pat for taking such good care of the Old guy.

Heck of a fine frame.

Rick C.

flyer serial number.jpg
 

PeteMcP

Well-Known Member
Jun 27, 2017
918
2,545
93
68
Glad your SF frame arrived safely Rick. What are your plans, fork wise, for this build's frame? 'Cause this is an out and out boardie racer tribute I'm guessing CNOL's rigid boardtrack forks?
 
  • Like
Reactions: fasteddy

indian22

Well-Known Member
Dec 31, 2014
4,725
7,706
113
Oklahoma
Yes Pete shipping can be an adventure, but all was well. That's the fork, I recall you've used it, and I've had this one awhile, mounted on another bike for a long spell , but just lying about for awhile now, good thing is I know it runs true as an arrow. This is a really heavy duty girder fork that looks the part of early racer, not the pot metal version that's crimped and stamped that's been offered at times.

Rick C

Girder fork.jpg
 

indian22

Well-Known Member
Dec 31, 2014
4,725
7,706
113
Oklahoma
Leap day was in the mid 70's & today low 80's and light wind. It certainly looks like an early Spring here in Indian Territory.

Motor cases completed and mounted both sides of the motor and she runs! No load but very satisfying to see it work in the case. The final look of the motor is a ways off, but the major components are in place.

I'm turning my attention to the frame and getting it fleshed out as a roller with parts on hand and ordering the rest if required. I should have several new bottom brackets in storage and I'll be sorting parts today. I located a base fork race yesterday so if I can spot something that small the rest should be easy. I'll use a couple of wide Worksman chrome wheels to start with till I get the roller bearing hubs laced, same type I used on the rear of my hybrid Grubee, black rims.

The way I've planned this is to easily & quickly transform this frame from convincing racer to daily rider in under an hour. Pure board track for show and disc brakes, mirror etc. for daily riding. Two sets of wheels/tires are the biggest difference, but controls, plugs and cables enter into the changeover as well. I'm not big on participating in shows, but others seem to be and I've obligated three of my bikes again this year and next.

For those who would say this isn't a very good rendition of a Harley Davidson motor I point out that during the engine test. It refused to start, wouldn't hold idle,three bolts vibrated out (check photo below) and a half cup of oil leaked from the electric twin! I rest my "case."

Rick C.

Harley f head 61cubic inch[1742].jpg
 

PeteMcP

Well-Known Member
Jun 27, 2017
918
2,545
93
68
".. those who would say this isn't a very good rendition of a Harley Davidson motor..." just really don't know * * * * .
Even us forumites following along know your twin's true identity and we're all 100% convinced.
Now if you could just rig up a small reservoir to intermittently drip oil below the casing ...
 

indian22

Well-Known Member
Dec 31, 2014
4,725
7,706
113
Oklahoma
Hi Pete, thanks for the props. Great idea that and I've a couple of simple ways to add this humorous detail. My favorite is the Vets brass or nickel over brass hypodermic syringe, that is seen on many vintage tribute bikes as a manual oil pump, for the total loss system, routed through the crank case to drip on demand. It would be a crowd pleaser for certain.

My thought on a Harley style battery tank is to have twin filler caps, originally one was used for gas the other for oil reservoirs, rather than a fake oil tank separate, one of the caps to cover the actual battery charge port the other as a cell phone charge location. High quality motorcycle bungs and O-ring screw on caps would certainly keep them dry.

Rick C. - unabashedly using others fine ideas-
 

Bob53

Member
Jan 8, 2015
31
65
18
Cleveland, OK
Rick, This is a true work of art, love, and attention to detail. That's what makes your projects so cool. Now hurry up and get the rest done where we can see the finished project. Just kidding, there is no hurry to projects of this nature. Most people don't know the countless hours it takes to make it a work of art instead of something that just works. We love this, it's like reading a good book waiting to get to the next chapter. Bob
 

indian22

Well-Known Member
Dec 31, 2014
4,725
7,706
113
Oklahoma
Rick, This is a true work of art, love, and attention to detail. That's what makes your projects so cool. Now hurry up and get the rest done where we can see the finished project. Just kidding, there is no hurry to projects of this nature. Most people don't know the countless hours it takes to make it a work of art instead of something that just works. We love this, it's like reading a good book waiting to get to the next chapter. Bob
Thanks Bob, I'm on it but old! I've enjoyed those hours and have a few more to savor before completion. I'm so pleased to see our Simplex Servi-Cycle forum is back up. Great resource and fine community of owners over there as well.

Rick C.