Following along with interest, Ralph. 170mm dropout measurement is common fat tyre frame width.
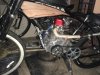
Month or so back I followed up a link for this frame/tank on AliExpress who were listing it as having no minimum order quantity. I identified the frame as being the same one offered as a roller by cnol in their eBay listings. As a satisfied customer of cnol's, I have no issues with the quality of the frame/tank/forks they sell (but we all know they are not the manufacturers). The AE seller emailed me back saying they presently had no inventory but were aiming to have stocks in time for the big China Expo in March. I received an email from them today saying that despite Corona virus pandemic, the Expo was still scheduled to go ahead. Presumably, production is gearing up for this event. AE's listed pricing/shipping from China to me in the UK was very competitive.
Imagine this frame mated with one of those scaled-down 70% vintage looking 350cc v-twin motors...
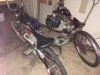