World’s fastest Schwinn cruiser

GoldenMotor.com

indian22

Well-Known Member
Dec 31, 2014
4,722
7,697
113
Oklahoma
Deutz aircraft spiral cam fasteners are a nice touch on panels that require ready access yet hold securely at aviation speeds...look nice too. I've used on fiberglass and thin sheet metals and been very pleased. Bolt with a nut is however less expensive lol.

Rick C.
 

Tony01

Well-Known Member
Nov 28, 2012
1,743
1,749
113
sf bay area
Frame smoothing is DONE. The swingarm escaped bondo this time however I’ll repaint it if I add strength to it.

Pushing through that last 25% of a build and FINISHING it is always tough... I will persevere.

Edit: And of course when I hit reply and proceeded to clean my frame, I noticed a little fracture that probably carried over from this frame’s service in a 212 bike. Gonna put a little bead on it and paint this b*tch finally.

Edit2: bead on there and ready for paint... again.
 

Attachments

Last edited:

Tony01

Well-Known Member
Nov 28, 2012
1,743
1,749
113
sf bay area
Of course I like it in black.

Rick C.
I think this might be my first frame in gloss black. In the past I’ve done matte or semi gloss with satin clear. Always used to think it has to be better prepped for gloss paints. Now I see it isn’t the case as the gloss is a deeper black which seems to hide imperfections much better. I have two runs in places that are visible. Let paint cure a couple days sand and just fix it barely.

Also, I shot the swingarm with some crappy $1 primer can at first to save on the pricier stuff. It was a mistake. I have been using that rust oleum ultra cover stuff for a while, and actually bought a few cans for the project but they all vanished like a fart in the wind, except for one. So then ate through half a can of the cheap stuff. It even got runny way too fast, on the underside. The rustoleum stuff seems to only run when it is completely obvious it will run and does seem to cover more for longer. Cheap stuff be gone.
 

Tony01

Well-Known Member
Nov 28, 2012
1,743
1,749
113
sf bay area
Been busy and not building much. Been looking into level 2 charging. It looks like it’s possible to set up a 6000w charger complete with a J1772 plug and some hardware for under $250. At my eMPG this is about 2mi/min.
 
Last edited:

Tony01

Well-Known Member
Nov 28, 2012
1,743
1,749
113
sf bay area
Did some more research on chargers and such for plugging in at Level 2 car charging stations. The one I could setup cheap is something built from one or two rack mount type units of 3000w each. They would have to be carried encased in foam, in a backpack to prevent getting damaged. Or possibly one or two with lots of foam in the bike. There are some other issues of setup I won’t go into, but that is the gist of it.

There are also large EV batteries. Done some research but not enough. Newer leaf cells look good with better capacities and c-rates.

A true 3kw onboard charger is expensive. $600 or more. An 1800w onboard for $300ish is not even worth it when I already have a crappy 110v, 1250w backpack setup. Without a reliable well priced solution it looks like I will not be doing road trips with this bike anytime soon.

My paint turned out okay. The areas with bondo show through, looking like they are not sanded smooth enough. I was unable to capture it with the bad lighting. I have a choice to sand and paint again, or just leave it like it is. Still haven’t looked at it from 10ft on a sunny day, just up close indoors. One thing is for sure, the gloss black is a win!
 

Attachments

Tony01

Well-Known Member
Nov 28, 2012
1,743
1,749
113
sf bay area
Worked on my headlight. Found these cheap led work lights on eBay for $21/pair. Damn are they bright! 84 watts supposedly. That is two miles of range per hour of light. I started by hacksawing off the mounting on the bottom to get the light to fit in a plastic bucket from a $10 led headlight that did not work out. Modified the bucket to accept the new light. It had some molding flash and sharp edges on the outside so I filed and sanded in prep for painting. The light fits snug in the junky bucket and will eventually get glued in. Just need to cut some holes for air cooling.

I will be using the stock fork side mounts. Need to modify the light and bucket some for that too.

For 12v I have a small step down converter running off the big battery rated for 12v 3a, so I don’t know how badly the light will be running when it is rated for 7 amps at 12v. Maybe overdid it a bit. Worst comes to worst I’ll run a separate lights battery or put another step down converter in parallel, or just run a stronger one. Adjustable output would be nice for hi/low beam.

https://www.ebay.com/itm/2X-5inch-84W-Amber-Halo-Ring-Round-LED-WORK-LIGHT-Flood-OFFROAD-DRIVING-FOG-LAMP/192737990330
 

Attachments

Last edited:

Tony01

Well-Known Member
Nov 28, 2012
1,743
1,749
113
sf bay area
So this is the worst of the bondo and paint. The other side looks a lot better. Definitely gonna sand and paint again. I haven’t come this far just to halfass the last of it.

Figured out what I’m gonna do about the tank. Gonna finish it by glassing in the gap and fitting the back of it to the seat. Ordered more resin. At least I will now have enough to make fenders, although I think I will pass on that for now.

I actually started drawing a new gas tank in solidworks. It would probably be better to just start fresh. I might still do that. The curved shaped tank doesn’t jive too well with the boxy battery box and seat. Just not trying to make this project any bigger than it needs to be.

Also decided on a handlebar. My last one got bent pretty bad in the crash. Also gonna have to do a new pedal crank set as the spindle got bent and a crank broken in half as well. Going with a bmx bar with a 4.5” rise. Comfort is everything and I don’t need to tuck for highway speeds anyway...
 

Attachments

Last edited:

FOG

Well-Known Member
Mar 3, 2019
282
617
93
72
Paint and or primer will fill that area between the metal and the bondo. Bondo's softer than the metal, goes away faster when sanding, and I get those all the time! Primer's your friend. Fills better.
 

Tony01

Well-Known Member
Nov 28, 2012
1,743
1,749
113
sf bay area
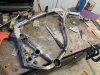
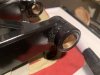
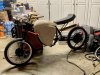
Did a lot of work on it this weekend. Repainted the frame and got started on the box sanding. Thanks 
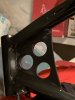
@FOG I wet sanded the existing paint, used filler primer then shot it with be black again. Some spots are rough which is probably cause of the filler primer going on kind of heavy. Shoulda sanded it. I think I’m going to wet sand it once lightly, and just shoot black again. It is already super smooth and shiny just like I want it in several areas. The end is in sight.

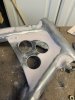
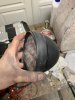
The box, the work is going faster than I expected with the orbital sander. I bought a 50 pack of 150g discs for $22. It seems fiberglass in 150g powder form does not irritate the skin like the microscopic shards from cutting cloth for a layup. I got it real smooth and painted it with the cheap primer to find the empty spots, and filled them all in last night. Some work ahead. Both box halves are extremely smooth already. Need to block everything too, but I feel it will go fast, as I have enough fiberglass thickness all around to dig in and not necessarily have to add bondo wherever there is a low spot. On the larger box piece it varies between 1/8” to 3/16”.

Also I am not finishing the top surface and some upper corner areas of the box, as it will be covered by the fake tank.

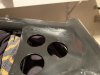
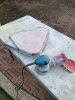
I have new resin coming on Thursday and will most likely make a new fake tank. I am thinking of making the shape from slices of thin cardboard paper, joined with tape. I have it drawn in 3d and will print and transfer to the thick paper. Curving the paper accurately and joining it will be tough. I have just enough time to figure it out and set it up. I’ll glass in the mounts as well, along with all the small hardware needed on the inside of the box to bolt in the side cover.

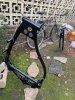
Another thing before I take the final step of fabricating the kickstand, is i would like to use the original seatstays rotated forward from their stock position 90 degrees, as the new seat struts. The current struts just give too much of a sportbike look.

After doing some calculations for gear ratio and weight reduction I estimate the bike to be 18% faster off the line. I will be taking it to a drag strip in a few months. Easy to setup, just move the shock back 3 holes on the swing arm for a stiffer and lower geometry, and possibly add in another 1s3p for 22s and disconnect the ebrake.
 

Attachments

Tony01

Well-Known Member
Nov 28, 2012
1,743
1,749
113
sf bay area
Well I haven’t had much time lately or energy though I’ve spent some time in 3d. Been drawing other stuff I want to build as well. Trying out different tank shapes. I can’t decide on the 3d shape but I’m down with this silhouette... the wheels here are 27”OD and mine are 23”. Seat support is the shape of the original schwinn seat stays. I really like how that looks.
 

Attachments

Ralph hop

Well-Known Member
Nov 14, 2019
255
734
93
Well I haven’t had much time lately or energy though I’ve spent some time in 3d. Been drawing other stuff I want to build as well. Trying out different tank shapes. I can’t decide on the 3d shape but I’m down with this silhouette... the wheels here are 27”OD and mine are 23”. Seat support is the shape of the original schwinn seat stays. I really like how that looks.
Looks fun and taller tires mean more speeed? Ahhh noooo.... lol.
 

Tony01

Well-Known Member
Nov 28, 2012
1,743
1,749
113
sf bay area
First real life mockup with the small wheels. I already knew it was gonna look like a starved Venezuelan dog but fell in love as soon as I sat on it with the raised bars and light front wheel. I think the 80 rear should go on the front with a 100 rear, and the swing arm can be shortened about two inches. I looked and sat on this thing and suddenly realized I don’t like long and low so much anymore. I want to be able to lean in hard and have the ground clearance to do so. With the 19s it was perfect on the look, maybe slightly too big of tires, wheelbase a little long too. Also I could not get the damn 70 on the front to seat up properly. Will be trying the strap trick soon.
 

Attachments

  • Like
Reactions: indian22 and FOG

Ralph hop

Well-Known Member
Nov 14, 2019
255
734
93
Just my opinion but I'd say keep the front and go the same size rim on the rear and build a body panel for the seat sides. It would add some leg protection too. I bet it looks great how it is with the aggressive rider attached with whatever tire feels best.
 
Last edited:
  • Like
Reactions: Tony01 and indian22

indian22

Well-Known Member
Dec 31, 2014
4,722
7,697
113
Oklahoma
Yeah Tony you've got to feel right on it or it's never going to suit you no, matter how great it looks. Plus it's not finished yet so it may look killer and feel right. Who's to say?

Rick C.