Electric Start Hidden Wire Build On a Cranbrook.

GoldenMotor.com

ZipTie

Active Member
Jan 8, 2016
750
82
28
Mpls Mn
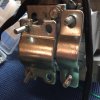
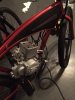
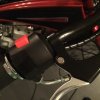
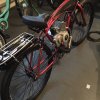
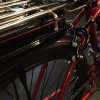
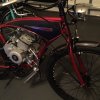
Cannonball, Awesome info because as much as I try different positions for the engine I can only get the rear mount to flush up on a Cranbrook frame, so ill have too use the bottom two front studs only with a flat plate and a U bolt style mount. Ugly as all get out but will have to do I guess. Take note: any future Cranbrook - BT 80 builders.

Thanks for the engine for the batteries. All battery compositions except the old LA or SLA batteries and dangers of new battery tech are confusing to my gas minded brain. LOL

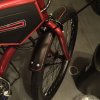
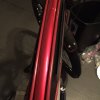
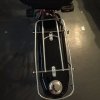
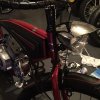
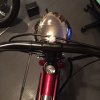
Ill post some pictures if I get this engine mounted with the hardware I have here
zip
 

ZipTie

Active Member
Jan 8, 2016
750
82
28
Mpls Mn
Ok I have the engine mounted, hardest one to figure out yet as the starter is in the way to use a u bolt unless one wants to chop off the threads so far nuts wont grab. So i did a hybrid way using the flat plate but utilizing the two studs so ill end up with 3 studs on each side if I add a long bolt in the middle row. Its already solid with 2 of the studs on each side holding and I so can add one more set in that middle row with some work anytime. Either way the rear engine mount is lined up flush and engine seems solid as a drum.

1 now wiring and insulate that exposed metal starter solenoid
2 add a wide crank set
3 install sprocket
4 install battery
5 fill clutch with oil
6 cut fenders short and install
7 add front and rear brakes
8 add headlight and taillight
9 add gas and air
10 hold breath and start and take a ride.
 

Attachments

cannonball2

Well-Known Member
Oct 28, 2010
3,682
221
63
Colonial Coast USA.
Hey Zip

Cant you use one of the adjustable CNC front mounts that the CG uses? If so will make a nice neat installation.

Like this.
http://www.ebay.com/itm/CNC-Univers...ash=item3d31ebd3d6:g:SZMAAOSwImRYj9~a&vxp=mtr


I started with common motor oil in the gear case, but later switched to 80/90wt gear oil with no issues. This oil has EP(extreme pressure) additives which should extend gear life. Also made the gears a bit quieter. They were about as noisy as a CG. Clutch is totally fine with the gear oil.
 
Last edited:

ZipTie

Active Member
Jan 8, 2016
750
82
28
Mpls Mn
cannonball I like those but I believe what I have is stronger than just 2 studs as I am using all 4. I've seen those just wish they would have a pull down menu so I guy could pick his size needed for the frame.

Engine is now fully mounted and wired, Fenders are cut small and reinstalled. I added color matched pin strip that I think looks good. Installed both front and rear brakes today
also and about to install the gas tank on a bracket less rear Schwinn rack that is so much cleaner than the rack that came with the tank.

I also added spiral loom to the big control cable. 3rd pict. I really recommend this spiral wrap as it can surround more than one wire and it really protects the wires big-time. comes in 3/8" ID and 1/4" Id. Ill be using it on the rest of the wires that are exposed that wont be many.

I am really loving this build so far for many reasons. Has a real custom look to it and is one of my favorites so far. Love all those wires hidden have less wires than any build so far as even the CDI is gone. Just look at all the wires behind the panel in the first pict...yowie... Lots of steps yet, but getting there slowly.
 

Attachments

ZipTie

Active Member
Jan 8, 2016
750
82
28
Mpls Mn
Thanks Curtis and Cannonball. I am now struggling with the rear tank as the brackets don't line up and the rack is blocking one of the screw holes.The battle never ends with this build the rack is made out of some tough steel so it wont bend out of the way either.
I do like the look with the rear tank though as its pretty hidden.
zip-
 

Kartooo

Member
Nov 18, 2016
178
3
18
MA
on my 2 37 columbia builds i reversed the tanks on the rack so the petcocks ended up in the frt. you might have to get the dremel out and remove a strut in there like i did. also the 2 struts that mount to the seat were off making the tank end up not level. i had to take the angle out of them to make it level. just used a vice. watch your cap too. when you reposition the tank there is not enough room in there to grasp the cap from the sides with your fingers. you have to buy another cap that can be grasped from the top to twist it off. pay attention to your seat position, allow access to fill the tank.
you will sort it out.
it's the challenge that keeps it interesting !!

post #10
http://motorbicycling.com/showthread.php?t=62393
 
Last edited:

ZipTie

Active Member
Jan 8, 2016
750
82
28
Mpls Mn
I didnt see your post Kartooo on the rear gas tank flip so I sent you a PM asking if you could share a photo or two of the tank so I can see what you did.

I just installed my tank the normal way, took lots of time as the brackets did not fit on one end. This tank is badly designed as the petcock should be on the seat side otherwise the petcock as it sits now is way in the back and exposed big-time to possible damage and danger of a snapped off petcock as you know. The petcock is a very restrictive also. Plus now your gas line needs to be 3 ft long that id hard to hide on this build.

I will for sure change mine once I figure the best way or use your method Kartooo of fixing it. Other than that the bike is close to done except for wide crank install and battery. Lot of hours in this build.
Brakes cabled up as is throttle and carb.
 

Attachments

cannonball2

Well-Known Member
Oct 28, 2010
3,682
221
63
Colonial Coast USA.
I got the same tank/rack with the mismatched bolt holes. Seems like the sellers would make that known but guess the want to get rid of em. I gave a rating on ebay noting this and they wouldnt let it be posted. So much for honesty.
 

Kartooo

Member
Nov 18, 2016
178
3
18
MA
I got the same tank/rack with the mismatched bolt holes. Seems like the sellers would make that known but guess the want to get rid of em. I gave a rating on ebay noting this and they wouldnt let it be posted. So much for honesty.
i have 3 from different vendors.
they are all built that way...
 

ZipTie

Active Member
Jan 8, 2016
750
82
28
Mpls Mn
Kartooo, Thanks much for the PM photos and the link on the better gas cap. I’ll probably take my angle grinder and flip my tank the same way. Ill have to check seat clearance first as the Cranbrook frame is super short, the Columbia frame is 2 inches longer I believe.

Too bad cap isn't in the middle. Ill buy more red plastic trim at the auto parts store and redo my "Fank" trim and get the miter joints right this time too as I like the look and will trim.

I may try some on the engine as it is very heat resistant plastic and I could add one strip to the top of head area to finish off the engine, I bend it by heating it where I want a corner and hold it till it cools. Its cheap enough to experiment with.
 

Attachments

ZipTie

Active Member
Jan 8, 2016
750
82
28
Mpls Mn
Anyone know what length spindle shaft is needed for the wide crank so it just clears the engine. I have the wide angled out 3 pc pedal arms set and the sprocket but Bikeberry didn't send me the spindle shaft as I have a one piece crank on the bike. All I need is the correct spindle shaft to clear.
 

ZipTie

Active Member
Jan 8, 2016
750
82
28
Mpls Mn
FLOATING SUICIDE HEADLIGHT ADDED LAST NIGHT
Its the first thing one sees you look at your bike. The headlights for bikes sorely lack in looks as do the brackets to hold them on. Heck most are rubber clip bands or cheap stamped steel.

Well I worked all night just to figure out, build and install a (FLOATING) headlight of the exact shape and just the right size and I wanted and in the exact place on the steer tube. Plus I wanted a high quality chrome solid bracket....hmmm...which isn't so easy on a bicycle based on what's available.

I built the headlight as a custom using a old chrome shell I had laying around and converted it into a 4 LED light. The challenge was to get it mounted midway on the steer tube. After playing with brackets for 2 hours I used only one chrome fork bracket I had in my bin and whala...it fit the steer tube! Then I customized another bracket to connect the headlight to the single fork bracket. I made it adjustable up or down, using real high quality rubber washers sandwiched in the spacers. It all worked out to my liking.

I call it a floating suicide Headlight as its fixed to the steer tube and wont turn with the handlebars. I will have a hidden COB LED light that does most of lighting during turns.
Hard for me to believe this started as a 74.00 bike at this point.
Battery problem next...
 

Attachments

Kartooo

Member
Nov 18, 2016
178
3
18
MA
looks grrrreat !
one of a kind like all your builds.
don't forget to put some decent pads on that frt brake to stop that thing....