Hello everyone, I have a vintage chrome headlight that I am having trouble with. The light will not stay on when i ride it. I would like to rebuild the interior of the light and install some new bulbs, possibly install an LED bulb to help with wear from vibration. Any suggestions would be totally appreciated. Thanks everyone.

You are using an out of date browser. It may not display this or other websites correctly.
You should upgrade or use an alternative browser.
You should upgrade or use an alternative browser.
Building a vintage look lighting system
- Thread starter anthrokid
- Start date
Bikeguy Joe
Godfather of Motorized Bicycles
Re: Vintage Bullet Headlight Rebuild
The grounding parts are probably bad if it won't stay on...a little sandpaper and checking connections id called for.
Can't help with the LED part, I am a looser when it comes to electronics...
The grounding parts are probably bad if it won't stay on...a little sandpaper and checking connections id called for.
Can't help with the LED part, I am a looser when it comes to electronics...
Bikeguy Joe
Godfather of Motorized Bicycles
Re: Vintage Bullet Headlight Rebuild
Come on now, I know there are lighting experts out there that can help this guy!
Anyone?
Come on now, I know there are lighting experts out there that can help this guy!
Anyone?
Re: Vintage Bullet Headlight Rebuild
Ok RC....here it comes. This is a vintage light with a high/low function with one bulb for each function. My goal is to power a tail light off of the power from the front light as well as each front light. The power source now is two D cell batteries but there is plenty of space in the shell of the front light for a retrofit for more power. I would like to retain the hi/low function as well as have the taillight come on through both of those cycles and go off when the headlight goes off. A new switch is mandatory because the old one is not able to withstand the vibrations of the motor bike. I was thinking a three way push button switch that would cycle through the three modes.(hi+tail, low+tail, off) New, bright, vibration resistant bulbs would be cool too. I know that is a lot but suggestions on any facet from somebody with a little electronics experience would be great. Thanks
Ok RC....here it comes. This is a vintage light with a high/low function with one bulb for each function. My goal is to power a tail light off of the power from the front light as well as each front light. The power source now is two D cell batteries but there is plenty of space in the shell of the front light for a retrofit for more power. I would like to retain the hi/low function as well as have the taillight come on through both of those cycles and go off when the headlight goes off. A new switch is mandatory because the old one is not able to withstand the vibrations of the motor bike. I was thinking a three way push button switch that would cycle through the three modes.(hi+tail, low+tail, off) New, bright, vibration resistant bulbs would be cool too. I know that is a lot but suggestions on any facet from somebody with a little electronics experience would be great. Thanks
HoughMade
New Member
As you can see, my bike does not have what you would call a "modern" look. No commercially made lighting system I have seen fulfills my performance or cosmetic requirements. Even so-called "vintage" look lights are more '50s style than 1910 style. therefore, as always, i am building my own.
My system will have front and rear turn signals, a motorcycle bright headlight and a stop/tail light. All are bright enough to meet motorcycle requirements.
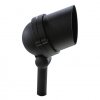
I have gathered some parts. As for the headlight, see the first pic below. It is a $17, cast aluminum lanscape spot from menards. It comes with a 50 watt halogen spot which is exactly what I want. In the display, it is on all day, but you can still touch it without getting burned. I have a 7.2 ah SLA battery ti run the whole system. That will run the headlight well over an hour and the tail and brake lights indefinitely.
I am looking into a charging system that will work when riding. No decisions on that yet.
My system will have front and rear turn signals, a motorcycle bright headlight and a stop/tail light. All are bright enough to meet motorcycle requirements.
I have gathered some parts. As for the headlight, see the first pic below. It is a $17, cast aluminum lanscape spot from menards. It comes with a 50 watt halogen spot which is exactly what I want. In the display, it is on all day, but you can still touch it without getting burned. I have a 7.2 ah SLA battery ti run the whole system. That will run the headlight well over an hour and the tail and brake lights indefinitely.
I am looking into a charging system that will work when riding. No decisions on that yet.
Attachments
HoughMade
New Member
tail light
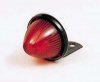
As for the tail light, I am using a clearance lamp I got at an auto parts store- pic below.
This light (as is standard on clearance lights) had a base for a single filament bulb. I cut it out (which held the bracket to the light housing). I then brazed a base for a dual filament lamp inside the housing and brazed the bracket back on. I am going to use a 1157 red LED replacement bulb for the stop/tail.
The second pic shows where the light will mount. It will replace the Bell bicycle light that is there now.
Attachments

HoughMade
New Member
The turn signals are the real fun. These first two pics show where I will mount the turn signals. They will go on the ends of the round tube that is brazed to the leaf springs. The third diagram shows how they will mount.
Attachments
HoughMade
New Member
And now the construction of the turn signals.
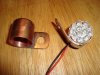
The first pic shows the raw materials. An end cap for 3/4" copper plumbing pipe, a copper plated steel hanger for 3/4" copper pipe, and an LED replacement bulb for a 3157 bulb in amber (red for rear).
I removed the circuit board and LEDs from the bulb mount. The plan is to mount just the board with LEDs inside the end cap. A 3/4" copper pipe end cap is very, very close to fitting the LEDs. I wanted something as compact as I could because I thought that a compact tail light would look more in proportion and turn signals had to be smaller than the tail light for the right aesthetic. I removed the LED assembly from the bulb body. Even with the LEDs removed, they didn’t quite fit in the end cap (moving up to a 1 inch cap would have worked, but didn’t look right to me). I used my Dremel with a medium sanding drum to trim the edge of the circuit board around the LEDs down- that was what was too big. I also used the Dremel to grind out the inside of the end cap and got plenty of clearance- why this is important in a minute.
I found some copper coated pipe hangers that are used for copper pipe. It is a “U” shaped piece that has a 1/4” hole at the top of the “U” for hanging. I spilt the “U” at the bottom so that I am left with 2 “J” shaped pieces. This will provide a hanger for 2 lights. I then rounded of the corners of the “J”s and the “J” fits around the end cap and leaves a tab sticking out the top to bolt to the strut identified in a previous post. I attached the “J” tab to the cap by soldering...which is a nice advantage to using copper.
Back to the LEDs- I soldered a wire lead onto each lead. I then coated the back with silicone...because, after all, the case is copper. Now, back to the clearance issue around the edge of the circuit board. As you may know, there is a thin copper layer in there and if that touches the copper, the LEDs will not work due to a short. I coated the edge of board with a skim of silicone and also did that inside the end cap- works fine.
I really like the look- these things are very small and elegant...if I do say so myself....fit the look of the bike, and will get the job done.
Attachments

HoughMade
New Member
Because I am using LEDs, a thermal flasher will not work. Some internet searching led me to try a "552" flasher, but the LEDs did not even draw enough with that to flash. I bought a "universal motorcycle" flasher from Superbrightleds.com. It works just fine with the front and rear turn signal and a small neon indicator light attached- works with just the LEDs, but I will use an indicator.
Here is a link:
LFS-1-PIN Flasher Specifications
Here is a link:
LFS-1-PIN Flasher Specifications
Attachments
HoughMade
New Member
Last post for today because now the thread will be up to date-
I am in the process of painting the housings "Ford Tractor Gray" to match the bike. Hopefully I will be able to do some assembly Saturday.
Also, I just picked up an old Polaroid camera case on ebay that will be a saddle bag to house the battery (pic below). I plan on picking up a second when I can for the other side.
Attachments


HoughMade
New Member
Getting there...
I have the whole thing wired up and have one task to complete.
I now have front amber and rear red turn signals. They are very bright and easily, easily visible fron well over 50 feet away. In fact, they grab your attention...which is the point. Since self-canceling turn signals are a little much for me, I have indicator lamps on the turn signal switch housing.
I also have a working brake/tail lamp. When I turn the headlight on, the tail light comes on as well. The brake light works off of the brake handle (there is another post that describes how that works.
All of the lights are LED except the headlight, but maybe in the future. For now, I am using a 12v, 5 watt headlamp, but I do not ride at night. When it came down to it, I could not bring myself to ditch my speedometer housing/headlight.
The last thing to do is to mount they leather cases, one of which is the battery box. Other than that, everything is done, wired up and wired stowed as much out of sight as possible. I will have pics when the cases are in place (this week?...but no bold predictions).
Remember that the bulb in the original headlight is only about 3 watts. Let's face it, a night light is 4 watts. Not nearly enough to see with when traveling close to 30 mph. So....
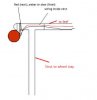
I got a bullet style light on ebay, cut the reflector shell (carefully) to fit a 20W 12v halogen lamp/reflector combo. I made 2 small clips and screwed them into predrilled holes in the right spots on each side of the halogen reflector to hold it into the original (now cut out) reflector. You can't see the difference unless you get real close to the front cover of the light. I bought four 6V lithium packs (2400 mAh) from All-Battery.com - Rechargeable batteries & Chargers and wired them in pairs to make two 12V packs in parallel. It gives off tons of light and lasts for up to 3.5 hours. Use a 14v charger to recharge the batteries. You need that much voltage because the float voltage of these cells are very close to 7 volts each (times 2 when wired in series to make a 12v cell). They only get drawn down to 6 volts (each) when they are being used.
I got a bullet style light on ebay, cut the reflector shell (carefully) to fit a 20W 12v halogen lamp/reflector combo. I made 2 small clips and screwed them into predrilled holes in the right spots on each side of the halogen reflector to hold it into the original (now cut out) reflector. You can't see the difference unless you get real close to the front cover of the light. I bought four 6V lithium packs (2400 mAh) from All-Battery.com - Rechargeable batteries & Chargers and wired them in pairs to make two 12V packs in parallel. It gives off tons of light and lasts for up to 3.5 hours. Use a 14v charger to recharge the batteries. You need that much voltage because the float voltage of these cells are very close to 7 volts each (times 2 when wired in series to make a 12v cell). They only get drawn down to 6 volts (each) when they are being used.
Emerica
New Member
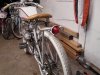
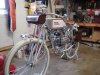
Running a 12V system now, it's not really pretty but it works until I get a new bike going.
55wH3 Halogen Headlight, amber blinkers front and back brake light using a switch in the brake lever and a 128db horn.
Runs on a BB battery, now really sure how long that head light has a chance of running but it'll go to the store and back.
55wH3 Halogen Headlight, amber blinkers front and back brake light using a switch in the brake lever and a 128db horn.
Runs on a BB battery, now really sure how long that head light has a chance of running but it'll go to the store and back.
Attachments


HoughMade
New Member
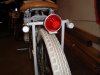
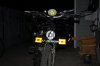
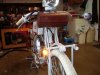
The finished product
First, the turn signals...do you know how hard it is to get a pics of a flashing light when it it on? Took 7 tries on the back.
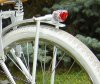
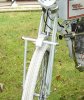
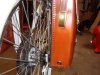
The first is the back of the bike, left turn signal. This pic also shows the tail light and my cases. The right case holds the battery and some of the lighting connections. All the wires in the case have plugs so if I need to remove the wiring harness or case, I can unplug the wiring.
The second pic is the turn signal switch and indicator.
The third pic is the front (amber) turn signal. It also shows my new tool bag, replacing the roll that used to be under the seat.
First, the turn signals...do you know how hard it is to get a pics of a flashing light when it it on? Took 7 tries on the back.
The first is the back of the bike, left turn signal. This pic also shows the tail light and my cases. The right case holds the battery and some of the lighting connections. All the wires in the case have plugs so if I need to remove the wiring harness or case, I can unplug the wiring.
The second pic is the turn signal switch and indicator.
The third pic is the front (amber) turn signal. It also shows my new tool bag, replacing the roll that used to be under the seat.
Attachments

HoughMade
New Member
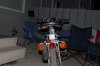
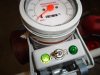
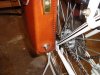
Thie first pic shows the back of the battery case. At the bottom is a jack where I can plug in the charger without removing the battery.
The second pic shows the front of the battery case. At the bottom there is a cutoff switch which shuts down the electrical system. I can still charge the battery with the switch off. There is also a fuse (currently 5A) in the case.
The third pic shows an overall view with the headlight on...but I will have to take some better composed pics after I clean the bike up.
")