Motorized Bicycle: Engine Kit Forum  

Sponsors


Go Back   Motorized Bicycle: Engine Kit Forum > Motorized Bicycle > Motorized Bicycle General Discussion

Motorized Bicycle General Discussion Topics on bicycle engine kits, help articles, repair and modifications for your motorized bicycles

Reply
 
Thread Tools Display Modes
  #1  
Old 10-10-2009, 04:25 PM
soccerrj88 soccerrj88 is offline
Motorized Bicycle Member
 
Join Date: Sep 2009
Location: Florida
Posts: 23
Default Finally get to post success with first build!!!

Well after having to post questions, and browse old threads for hours looking for the best way to make a chain tensioner, mount to a big frame, and other misc things I finally got it workin... for now. Before it was too unreliable for me to trust it for a mile or less, but now that i got it fairly well replaced with custom made parts, it feels pretty sturdy. Here's my ideas for big motor mounts and chain tensioner if anybody is looking for a tip.

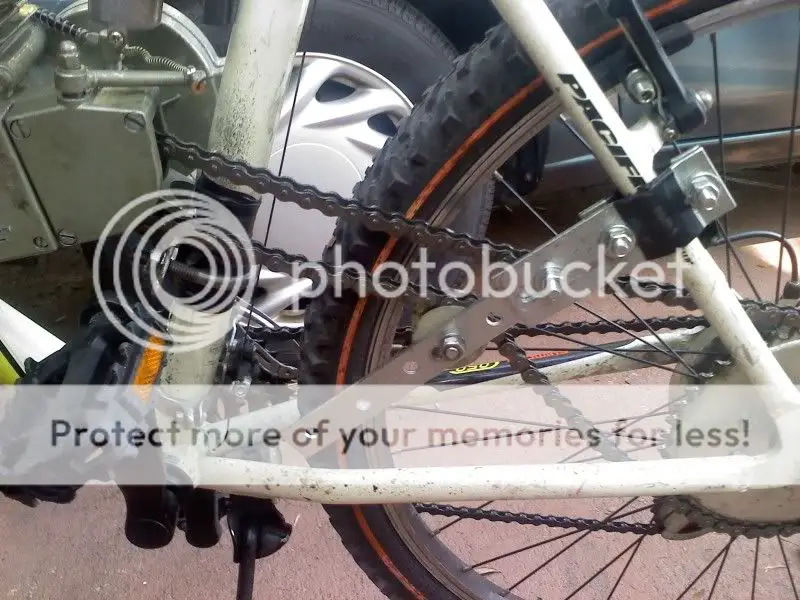
P.S. I couldn't find the spring tensioner at tractor supply that everyone is talking about... but instead I got a piece of 3/15" flat stock with holes already drilled into it. and extended the stock tensioner to hang from the top chainstay and it's long enough with out cutting it so that if it does get kicked in, it will hit the tire before it rips the spokes out.


Overall pic. It's a Pacific Elite 3.5 Aluminum frame with front suspension.


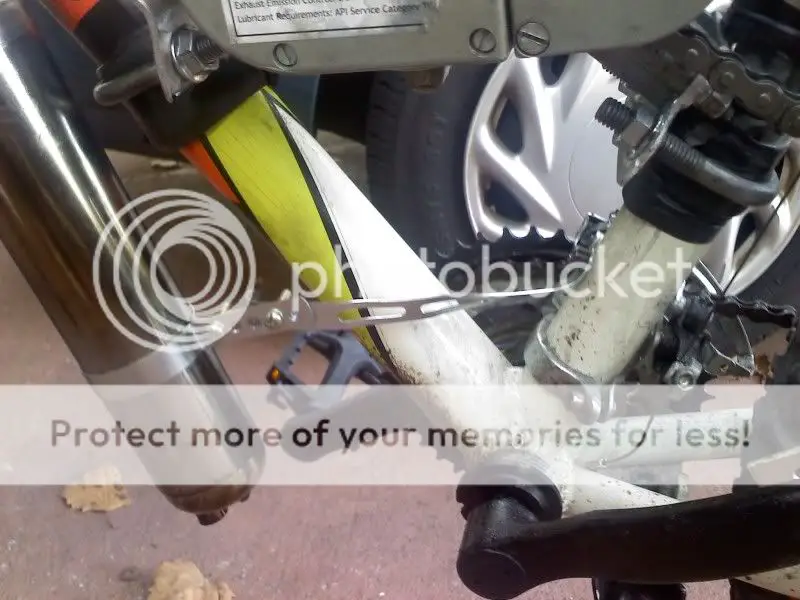
Pain in the butt to build! everything was too big and needed fabricated. Luckily i hate a long strip of 2" aluminum flat stock... And muffler clamps


The muffler clamp that i screwed into the water bottle holder screw..


Any suggestions or questions are welcome. Especially from the more seasoned MBer's. This is my first China build that i hope lasts a while for the work I had to do...


Also there is a lot of excess oil coming out. I only have 30miles on it so I'm still breakin it in so thats a good thing but it seams like a lot. Im at a 16:1 ratio like the "instructions" said for break in... Im not using synthetic tho... Does that matter. I haven't really found any here.

Last edited by soccerrj88; 10-10-2009 at 04:28 PM.
Reply With Quote
Sponsored Links
  #2  
Old 10-10-2009, 05:05 PM
silverbear's Avatar
silverbear silverbear is offline
EZ Motorbikes Dealer
 
Join Date: Jul 2009
Location: northeastern Minnesota
Posts: 4,096
Default Re: Finally get to post success with first build!!!

Congratulations for getting so far along in your build. Regarding the mix, it may be a little rich. If regular 2 stroke oil others here recommend 24 to one. I use either synthetic Amsoil or Opti-2 so the mix ratios for those are different. Mostly I'd like to comment on the tensioner. I would find a way to secure the lower end of that extension you made so that it can's pivot, which I think it is going to want to do. It shouldn't take much.. a conduit clamp or piece of plumbers strapping should do it.
Silverbear
__________________
Someday when I grow up I will probably lose interest in toys with wheels, but until then...
Reply With Quote
  #3  
Old 10-10-2009, 10:06 PM
george_n_texas george_n_texas is offline
Motorized Bicycle Elite Member
 
Join Date: Sep 2009
Location: Texas
Posts: 540
Default Re: Finally get to post success with first build!!!

Is there any reason you couldn't mount the tensioner like I did in this pic?
Attached Thumbnails
Click image for larger version

Name:	Pic_1010_002.jpg
Views:	48
Size:	60.4 KB
ID:	14401  
Reply With Quote
  #4  
Old 10-10-2009, 10:18 PM
starrunner starrunner is offline
Motorized Bicycle Senior Member
 
Join Date: May 2008
Posts: 77
Default Re: Finally get to post success with first build!!!

Quote:
Originally Posted by george_n_texas View Post
Is there any reason you couldn't mount the tensioner like I did in this pic?
So you're talking about two bikes, right? One, you modified the tensioner and the other one you didn't? Regardless, people generally drill a small hole through it and secure it to the frame. This prevents it from the dastardly deeds you mentioned earlier. Otherwise, no matter how tight you get it, it will still move with the force of the chain on it.
Reply With Quote
  #5  
Old 10-10-2009, 10:43 PM
zaviii zaviii is offline
Motorized Bicycle Senior Member
 
Join Date: Oct 2008
Location: Chico, Ca
Posts: 62
Default Re: Finally get to post success with first build!!!

It feels good to complete a bike with success huh? Good job.
Reply With Quote
  #6  
Old 10-11-2009, 12:29 AM
2door's Avatar
2door 2door is offline
Super Moderator
 
Join Date: Sep 2008
Location: Littleton, Colorado
Posts: 6,754
Default Re: Finally get to post success with first build!!!

Quote:
Originally Posted by george_n_texas View Post
Is there any reason you couldn't mount the tensioner like I did in this pic?
George,
Your tensioner mounting is correct as far as the kit instructions go but If I may suggest one improvement; secure the tensioner to the bike frame with a small bolt to assure that it can not loosen and rotate into your spokes. That particular failure is not only one of the most common but also dangerous and expensive. Drilling a 3/16 or even a 1/8" hole through the bracket and frame WILL NOT compromise the strength of the frame and will keep your tensioner in place.
Tom
Attached Thumbnails
Click image for larger version

Name:	Tensioner Bracket copy.jpg
Views:	28
Size:	134.9 KB
ID:	14409  
__________________
Age and Treachery Will Always Triumph
Over Youth and Skill & "Charlie Don't Ride"
Reply With Quote
  #7  
Old 10-11-2009, 12:33 AM
2door's Avatar
2door 2door is offline
Super Moderator
 
Join Date: Sep 2008
Location: Littleton, Colorado
Posts: 6,754
Default Re: Finally get to post success with first build!!!

Soccerr,
Silver Bear speaks true. Secure the lower end of your bracket to the chainstay. Almost anything will work; but don't rely on it hitting the tire as a way to keep it out of the spokes. Secure that puppy and you've got a winner.
Tom
__________________
Age and Treachery Will Always Triumph
Over Youth and Skill & "Charlie Don't Ride"
Reply With Quote
  #8  
Old 10-11-2009, 01:13 AM
starrunner starrunner is offline
Motorized Bicycle Senior Member
 
Join Date: May 2008
Posts: 77
Default Re: Finally get to post success with first build!!!

Quote:
Originally Posted by 2door View Post
George,
Your tensioner mounting is correct as far as the kit instructions go but If I may suggest one improvement; secure the tensioner to the bike frame with a small bolt to assure that it can not loosen and rotate into your spokes. That particular failure is not only one of the most common but also dangerous and expensive. Drilling a 3/16 or even a 1/8" hole through the bracket and frame WILL NOT compromise the strength of the frame and will keep your tensioner in place.
Tom
Yeah, I believe that's what I said.
Reply With Quote
  #9  
Old 10-11-2009, 05:02 AM
BarelyAWake's Avatar
BarelyAWake BarelyAWake is online now
Super Moderator
 
Join Date: Jul 2009
Location: Maine
Posts: 5,323
Default Re: Finally get to post success with first build!!!

A few thoughts...

Folks may or may not have noticed you have an aluminum frame, not to worry - I too have one lol but I did want to say that while it seems like a great idea, lining the motor mounts with rubber can actually increase the amount your engine vibrates - although you will feel it less as its dampened a bit between the motor and frame.

On a steel bike... *shrug* perhaps people can get away with it tho I had fuel frothing problems - the big problem is that with using exhaust clamps as motor mounts you stand a good chance of crushing your frame tubes if you torque them down on a aluminum frame, add to this the problem of cutting/wearing through the rubber due to vibration & time and the chafe of the steel on aluminum and you might have some cutting issues...

Yet exhaust clamps make great mounts! Somewhere on the forum someone made a perfect and cheap mod that alleviated the above problems - but bedanged if I can find the pics... It was easy enough tho - they simply took flat stock prolly 1/16" - 1/8" thick, cut 1 - 1 1/2" strips outa it and bent them into U-shaped plates to go between the clamp and the frame and welded them to the U-bolt to keep 'em in place.

This spread out the clamp's compression, allowing the clamp to be tightened enough to stop the motor's wiggling (and the chafe prob) without risk of kinking the aluminum frame.

Aluminum bikes are awesome and I like yer build - but be so very careful about drilling holes and any movement at all, I've had some chafe/cut issues with mine, even a rattling chain guard had nefarious thoughts, keep an eye on yer bike and all should be well though

Some additional tensioner ideas;
http://motorbicycling.com/f11/chain-...ons-11815.html

Last edited by BarelyAWake; 10-11-2009 at 05:05 AM.
Reply With Quote
  #10  
Old 10-11-2009, 05:29 PM
soccerrj88 soccerrj88 is offline
Motorized Bicycle Member
 
Join Date: Sep 2009
Location: Florida
Posts: 23
Default Re: Finally get to post success with first build!!!

Thank you all and yes it feels great to get a job, especially of this undertaking, completed. It looked simple enough in all the pics but once I started it def took some work for oversized frames!
It's all one bike. i put it together the first time the way it was supposed to just to see it run then I read a whole bunch on here and started fixing things I felt necassary especially the chain tensioner due to the horror stories on the forum and the lack of money i wanted to spend on this project... Plus my dad said this couldn't be done... so i hade to prove him wrong. lol
As it was said the reason i didn't drill the chainstay is b/c it is aluminum and i didn't want to weaken it even more after drilling the other hole to mount the engine. (I took the bolt out and went to the muffler clamp idea... thats why you cant see the hole...)
And FYI if you do drill a hole in your bike make sure you measure 2 and drill once so your bottom hole is aligned with your top hole... DOH!!! lol I though the drill was straight but the alignment of the motor proved me wrong! oh well live and learn and then ride!
Reply With Quote
Reply

Thread Tools
Display Modes

Posting Rules
You may not post new threads
You may not post replies
You may not post attachments
You may not edit your posts

BB code is On
Smilies are On
[IMG] code is On
HTML code is Off


All times are GMT -5. The time now is 12:20 AM.


Sponsors

Powered by vBulletin® Version 3.8.7
Copyright ©2000 - 2012, vBulletin Solutions, Inc.
Motorized Bicycle Engine Kit Forum