

Weed Eater Friction Drive Bicycle
- Thread starter landuse
- Start date

Okay, here's some pics. The lighting is bad in the garage and the flash really makes things look scratchy and rusty and weird.Could you maybe tell me what you used to lift the engine off your back wheel. Somepics would be nice if you have. Thanks!
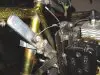
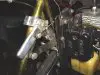
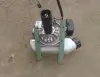
The lifting lever bolts around my seat tube and has a short piece of bare cable going to the plate the motor is mounted to. When the lever is up, springs pull the roller down on the tire (like your setup). As lever goes down, cable makes motor pivot up, lifting roller about a half inch. I made the lever so it will lock in the down (roller lifted) position.
It's really simpler than it looks in the pictures. I made it so the cable can pivot freely at both ends to prevent wear. It is a piece of brake cable with the metal "slug" at the lever side. At the motor-plate end it goes around a sort of pulley.
You can't see the drive roller in these pics because I made a guard that goes around it - for safety and keeps dirt from flying around.
You can sorta see part of the bearing on the outside end of the shaft [see arrow].
Attachments
-
 125.8 KB Views: 272
 -
 101.9 KB Views: 259
 -
 108.3 KB Views: 248
Thanks a_dam. That is a really neat and simple setup that you have there. I was just wondering what you did to lock it down when the roller is lifted?
I was also wondering how you managed to get the bearing diameter and inner diameter of your roller the same. Was it just by chance?
I was also wondering how you managed to get the bearing diameter and inner diameter of your roller the same. Was it just by chance?
As the lever goes down, the cable pulls on the motor plate. Since the motor and plate are pulled down by the tension springs, the lever overcomes that tension and the tension wants to pull the lever up.
But once the lever passes the "midway" point, the tension is wanting to pull the lever down (and the motor is starting to go back down). The lever has a "hook" on it that prevents it from going down any further [see drawing].
My motor is from a leaf blower. The shaft was 3/8 inch by about 3 inches long. It now has a sleeve over it so the O.D. is 5/8 inch.
My rollers are made by cutting out a donut from a hockey puck. The donut is glued over a steel spacer (sleeve) with an inner diameter of 5/8, of course.
The bearings are 5/8 inner.
Nothing is by chance!
Attachments
-
 70.4 KB Views: 186
 -
 18.4 KB Views: 162
Thanks A_dam. So...this weekend I figured out what the problem was with my engine not working so well. One of my engine mounts was pressing againsst the flywheel, so it was getting jammed up and overheating. I had to take the engine off and grind down some of the mount to get some clearance for the flywheel. After taking the bike for a test run again, I was still dissapointed. It hardly moves on the uphills, but flies nicely on the downs.
I am going to replace the 1.5" roller with a 1" roller. I am just not too sure yet where I am going to get one.
I am going to replace the 1.5" roller with a 1" roller. I am just not too sure yet where I am going to get one.
Yeah, 1.5 inches is big for a weedeater motor. My rollers start at about 1.25 inch. After a few months when it gets a concave shape, I will use the disc sander to "square" it up again and the diameter goes down to about 1.125 in. That seems to be about optimal for me. Top speed about 25mph; decent torque.
I still pedal going up hills or into the wind. You need to keep the rpms up for these little engines to have any torque.
I weigh 180 lbs; the bike weighs 55 lbs (these '70s steel Schwinns are heavy for road bikes).
One inch should work. Don't expect more than 20 mph, and you might still have to help it up hills.
That roller looks black in your pictures. Is that a bmx peg?
Oh, yeah. Make sure everything is working properly first with the roller you have. Check that everything is spinning freely. Make sure there is no roller slippage. Too much roller "friction" on the tire would be bad, too.
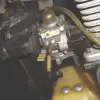
And, my Homelite motor NEEDS carb screw adjustment to run its best, especially due to the outside temperature. Thirty degrees F. is about the coldest I ride in. In the summer when its about 100 degrees, the carb screw (the one closest to the carb) will be open at least half a turn more than the "coldest" position. When the fuel is too rich the sound changes noticably, like its only firing every other stroke. When the mix is a little too lean, it's harder to tell by sound. It runs OK, just weak. Opening the screw acts like you're giving it more throttle.
In the picture you can see I soldered a brass tab into the slot in that carb screw so it can be adjusted while driving.
I still pedal going up hills or into the wind. You need to keep the rpms up for these little engines to have any torque.
I weigh 180 lbs; the bike weighs 55 lbs (these '70s steel Schwinns are heavy for road bikes).
One inch should work. Don't expect more than 20 mph, and you might still have to help it up hills.
That roller looks black in your pictures. Is that a bmx peg?
Oh, yeah. Make sure everything is working properly first with the roller you have. Check that everything is spinning freely. Make sure there is no roller slippage. Too much roller "friction" on the tire would be bad, too.
And, my Homelite motor NEEDS carb screw adjustment to run its best, especially due to the outside temperature. Thirty degrees F. is about the coldest I ride in. In the summer when its about 100 degrees, the carb screw (the one closest to the carb) will be open at least half a turn more than the "coldest" position. When the fuel is too rich the sound changes noticably, like its only firing every other stroke. When the mix is a little too lean, it's harder to tell by sound. It runs OK, just weak. Opening the screw acts like you're giving it more throttle.
In the picture you can see I soldered a brass tab into the slot in that carb screw so it can be adjusted while driving.
Attachments
-
 45.2 KB Views: 264
I hope the magneto magnet didn't get chewed up while rubbing. Make sure to clean up any shavings that will want to cling to the magnet and the iron part of the spark module.One of my engine mounts was pressing againsst the flywheel, so it was getting jammed up and overheating
I must try and play with my carb settings a little bit. Our temperatures vary between 68-100 F. Is it the high speed screw that you are adjusting? I think it is the one closest to the air filter. Maybe it will give me a little bit more power.
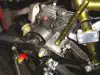
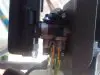
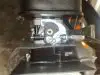
About the flywheel magnet. It didn't seem to get messed up in any way. Looking at it, it still looks good, with no scoring along the flywheel. If you look at the pic, you can see where it was sticking.
Oh, and yes....it is a BMX peg. I am not too sure what elso to use (with a smaller diameter) that is easy to make and attach to the flywheel.
Attachments
-
 140.3 KB Views: 163
Last edited:
Sorry to keep adding to this. Waited too long to edit last post:
Your motor looks pretty fresh. I'm going on my fifth year with this motor and I bought it used. I've had it apart a few times and never had a problem with the exhaust screen clogging up - until 2011. Kept running weaker and getting a little leaky around the gaskets. I thought that the motor was just finally dying from old age. After cleaning the screen it runs like new - like well used, anyway.
The clogging was probably my fault; was experimenting with some silicone fuel additive like a dummy.
Yours might not even have a screen. But its one more possible cause for lack of power that many others here have discovered.
Yup, the motor is brand new. I got it from someone at work. He had maybe run half a tank through it. The exhaust screen on this engine is probably still perfect. It is something to keep in mind though if power does dip a bit
My original roller was a 3/4" deep socket, which was almost exactly 1" OD. The only reason that I ditched it was that it was JB Welded to my clutch bell housing, which died, lol. I cut some grooves into it with my dremel to help with slippage, but ended up covering it with vinyl tubing instead (I did not realize my tire pressure was too high and my spring tension was too low).
Adjusting my mixture screws gave me a little more giddyup. A_dam, I love the on-the-fly mixture screw tabs!
Adjusting my mixture screws gave me a little more giddyup. A_dam, I love the on-the-fly mixture screw tabs!
Nice/compact forward mount on your engine, adam!
I like that part.
Looks btr than the common hi-mount that we see most the time.
I'll need to look over your pics a few times.
...it seems to me that 1" to 1 1/8" seems to be the optimal roller size for the small trimmer motors. ..and a wider tire that is not crowned...
Best
rc
I like that part.
Looks btr than the common hi-mount that we see most the time.
I'll need to look over your pics a few times.
...it seems to me that 1" to 1 1/8" seems to be the optimal roller size for the small trimmer motors. ..and a wider tire that is not crowned...
Best
rc
I had a look at my weed eater yesterday, trying to find the high and low mixture screws. And guess what....This motor of mine has no adjusting screws!!! It seems like it is preadjusted at the factory, and that is it. I was going to take some pics this morning, but I forgot. Has anyone ever heard of this? I was hoping to do some tweaking
Thanks, Maurtis.A_dam, I love the on-the-fly mixture screw tabs!
I just thought of that last year after three years of getting off the bike to adjust, sometimes more than once. I was used to reaching down there for the choke lever, so the hand goes right to the carb screw just as easy.
Thanks, Rustycase.Nice/compact forward mount on your engine, adam! I like that part.
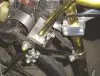
I like the motor there because it's "incognito"; probably not as noticable as a typical frame mount. And I bet I would be kicking the motor often in the typical position.
My Continental's seat stays are pretty skinny, so I had to brace them [see pic].
Yeah, Landuse, seems like these newer tools are doing more of that. My brother has a brand new leaf blower that we were going to use to clean his driveway. I forget what brand; it was yellow.This motor of mine has no adjusting screws!!!
It had what looked like carb screws that couldn't be turned. Weird. Half-choke was too rich and no-choke too lean. But the choke lever had a strong detent and wouldn't stay between positions. Would have been nice to have a carb adjustment, but we had to leave it on half-choke to run. They probably think that it's more fuel efficient and environmentally friendly to take away the user's ability to mess with things. So now the blower is on half-choke, wasting fuel and blowing smoke to run at not quite top-speed.
Since leaf blowers and weed eaters typically need to run at just idle or wide-open speed, with no real change in load, I can understand why they think you don't need to be able to adjust the carb. But when it doesn't run right out of the box, are you supposed to take it back to the store and get another one?
Let us know if you figure out how to adjust that carb.
Attachments
-
 74.5 KB Views: 151
We have the same problem, LU...
Regulations force mfg's to set up the little engines very lean for emissions, and they remove or cap off the adjustment screws so we can not make improvements for proper running, and power.
Possibly the best think to do is go to a small engine repair shop and buy an older, used carb that will fit in place of the one you have.
Plenty of otherwise good trimmers are scrapped because they will not run after a bit of debris gets clogged up in the jets. The labor fee is too much to fix them.
I've got half a dozen trimmer/weed-eaters here now, and the pile is growing.
None of them are actually 'blown up', they just fail to start and people scrap them... very wasteful.
Best
rc
...Bonus on the 'stealth', adam... I wish my mab to appear as a bicycle, NOT a motorcycle! must work on a quiet muffler that does not rob a lot of hp...
.
The carb adjustment "screws" on mine were not screws, but more like hex bits?
This is a pic I found online that has the "pac man" style adjusters, mine were the "double d" kind, but the pic gives you an idea:

If yours looks like that, the screw on the left is low speed mixture and the one on the right is high speed mixture. Some people slot them with a dremel to use a screw driver to adjust them, I just bought the "double d" adjustment tool online for about $9 shipped.
Hopefully yours is adjustable...
This is a pic I found online that has the "pac man" style adjusters, mine were the "double d" kind, but the pic gives you an idea:
If yours looks like that, the screw on the left is low speed mixture and the one on the right is high speed mixture. Some people slot them with a dremel to use a screw driver to adjust them, I just bought the "double d" adjustment tool online for about $9 shipped.
Hopefully yours is adjustable...
I am going to have a look again and see if I missed something. I will take some pics for you guys
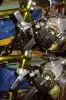
I took some pics of the little carb. Maybe there is something you guys can see that I cannot.
Attachments
-
 81.5 KB Views: 165
 -
 104.2 KB Views: 190
 -
 88.8 KB Views: 172
 -
 87 KB Views: 163
Thats a rotary carb. If you look in the second pic the small hole in the rotary barrel is where the needle is installed. They are adjusted to a given spec at manufacture then locked with epoxy. Earlier versions and some replacements were not locked and the needle could be adjusted. I have never been able to free one up to adjust it. What you got is it mixture wise. You can replace it with an earlier 2 needle Walbro as used on the earlier Homelites, but a redo of the throttle linkage(no big deal) would be required.