Art Fish Mobile Motor Bike prior Motor Bike DIY'er build to add side car maybe?

GoldenMotor.com

MEASURE TWICE

Well-Known Member
Jul 13, 2010
2,742
1,214
113
CA
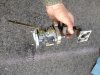
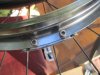
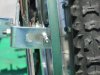
I looked at using the threads on the clamps that came with the replica Whizzer sheave part, but after trying to clean up the ends of the threads with a tap, it still seemed not very good. I don't want weak threads due to the way they were made.

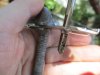
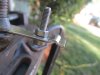
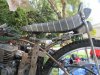
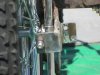
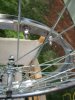
I am using all stainless steel hardware I bought to replace all but the sheave and the clamps. I had drilled out clearance holes through the existing threads on the clamps to allow my hardware to be used with it.

I also Dremel grinded away the bottom of the threads so that the flat washer and split lock washers and nut work well. I may also add nylon locking nut to the end as I did before with my washing machine pulley attachment which never loosened at all.

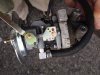
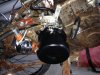
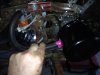
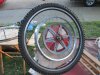
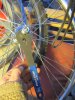
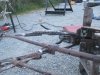
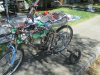
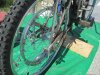
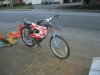
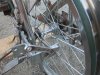
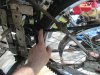
The new wheel I will use the sheave on, but temporarily with nuts just finger tight wanted to see how the modified replica Whizzer clamps work on the old wheel. So you see both pulleys on it but it just a test.

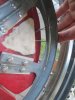
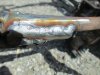
You can see also the crack on the cast aluminum pulley and that it really has to be made of steel. Pressed steel is what I had available in a similar looking washing machine pulley 40 years ago, but today everything for that style arm type large 10 inch pulley is cast aluminum cheap.

More pics in the next reply....

MT
 

Attachments

Last edited:

MEASURE TWICE

Well-Known Member
Jul 13, 2010
2,742
1,214
113
CA
I took time to sand smooth and some areas also use file and sandpaper to smooth out the rough of the weld seam on both the shave and my new wheel 12 gauge spoker.

The inside edge of the rolled metal on the rim of the new wheel was a bit sharp and sanding it just did not really do much as you can't get in at the angle very well.

I am using a new protector for the spokes nipples, but though maybe I would also use something that covers the rolled metal edge to protect the tube in that area if I can't smooth it perfect.

I may just get a wider tape that is for the spoke nipple cover. If that won't work, just some friction tape cut in a number of sections to make the radius curve and cover it up.

The better of the two Park Tools brand of a cone wrench that was for the size of my new wheel. I figure the time with the angle grinder doing a perfectly good wrench was not worth the effort. At REI I bought the cone wrench tool for only $8.50 and it has a cushioned handle to boot.

Now as soon as I get the new longer axle I'll swap into the new wheel and then put the replica Whizzer sheave on it too, I'll see if I need to cut and weld wider the drop outs.

The way it is was with my old pulley, it was just a bit smaller width and if it stresses spreading it too much to clear the sheave, I'll have to resort to doing the zig zag cut and re-weld thing.

The larger diameter sheave means lots of great torque and I still have yet to use the 8 tooth gear in between the top and bottom jack shafts to connect with a 28 tooth gear for ratio reduction. It still is with the 13 tooth gear and the 28 tooth gear between the two jack shafts.

I'll try it like that first and see how much slower it is for trail riding, but in exchange have much more torque. I can mix and match 28, 13, 10, & 8 tooth gears between top and bottom jack shafts so whatever I need I'll try.

MT
 

Attachments

Last edited:

MEASURE TWICE

Well-Known Member
Jul 13, 2010
2,742
1,214
113
CA
I got to widening just two places on my back rear stays, now no rubbing on the Whizzer type clone sheave or the knob of the knobby tire on the right side.

I'll post pics later, but it is darn strong and I can grind and sand smooth better the weld and cuts I made. I will probably also go back and fill weld to even add a little more strength.

Both lower left and upper right rear stays I welded more metal in the areas where I later cut a notch for the extra clearance. This way I actually only cut half way through the existing tube and the frame never had actually been cut through and through.

MT

PS Now I have more china girl parts on my bike. The rear wheel and the sheave, major stuff still the Briggs and the JC Penny Foremost Frame.
 

MEASURE TWICE

Well-Known Member
Jul 13, 2010
2,742
1,214
113
CA
I'll be grinding and sanding smooth the beefed up and notched out sections I made in two places left/right rear stays to allow use of knobby tire and sheave.

I've always added metal to the frame and felt a bit intimidated by actually resorting to cutting it, if not even all the way through the original frame. But since I just partially cut through the stays half way and added so much extra solid steel that I feel it is fine.

Getting the larger length belt to fit the sheave now.

I have though recently about the split on just the Outer edge of the weaker aluminum alloy cast pulley I had on the older wheel that just broke.

It seems that without the notch the belt was probably at slight angle to clear the nobby sections on the left side of the tire. A regular tire in use when I designed the pulley was fine, but the Whizzer clone sheave spaces out sideways much more so it clears the tire. The belt will also then be allowed to be exactly straight and true so no sideways forces are pulling on the outer sheave wall.

Steel is stronger, but the clone sheave is much lighter weight steel than the washing machine pulleys back 40 years ago. I expect it will do OK, but I've also noticed that it is not exactly perfect round. After spinning it and thinking maybe it was not centered right.

I checked and it is centered, and further I saw two blips before it rotated around once which also signifies that that is not caused by not being centered.

The amount out of round can be taken up by the belt, and will not be felt while riding, but of course who wants something not perfect.

Such for trying to do the best, parts is parts!?

MT
 

Attachments

MEASURE TWICE

Well-Known Member
Jul 13, 2010
2,742
1,214
113
CA
So my notching of the frame and welding extra metal has worked and I have clearance for the Whizzer Clone Sheave, Belt, & Tire!

Next to make a compact, integral to the rear dropouts tensioner.

Some washers or metal tube that has a diameter on the inside just slightly larger than the diameter of the rear axle, I'll weld threaded rod to. The brackets that will be welded to the rear drop outs need to be slightly off set to the sides so that it clears the metal tubes from the dropout going upward to hold the back of the banana seat.

MT

PS, I found that I get my first welds better than after a while. Now I know I need a bigger 100 percent duty cycle welder. I have 120 volt single phase only. 130 amps DC output maybe is setting 4 of 4, but on setting 3 of 4 for amps it is still like you only get 2 minutes and then I suppose you must stop welding for 8 minutes (20 percent duty cycle).
 

Attachments

Last edited:

MEASURE TWICE

Well-Known Member
Jul 13, 2010
2,742
1,214
113
CA
After removing the engine an fuel tank I got the drop out wheel tighteners finished.

Also the left side I finished the beefed up brackets to hold the 10 inch inflatable tire training wheels for the Fish Mobile so that they support at slow speed under 5 mph.

I also got the Whizzer replica sheave on and the modification to the rear stays in two places make sufficient clearance. I got a regular and a notched belt for the rear wheel drive. The A section regular and the AX from Gates, Powerated and Tri-power types.

Off roading is awaiting again as it runs great. The sheave is a bit out of round, but not too bad. Was wondering if I buy an actual sheave from Whizzer how that would fair in comparison. As long as what I have holds up the belt can take a little bit of out of round, but it is on my mind.

The gears from top to bottom jackshaft connection needed to be changed from the 18 to 28 tooth to a no reduction connection. Before I did that I had 40:1 ratio and it was too slow.

I swapped out the 28 tooth for an 18 tooth and so it goes from 18 tooth to 18 tooth doing no reduction. It lowers the ration just about the same as the gain from the 10.5 inch to the 15 inch sheave change. 20.25 : 1 rather than 21:1 is essentially the same speed and torque as before.

MT
 

Attachments

Last edited:

curtisfox

Well-Known Member
Dec 29, 2008
6,046
3,949
113
minesota
Maybe you could use a pipe clamp and bring it to more rounded state. Just losen the bolts and do it right on the bike...........Curt
 

MEASURE TWICE

Well-Known Member
Jul 13, 2010
2,742
1,214
113
CA
The clamping thing I would probably do that if I had not paid for the pulley If it broke trying and I could not get warranty it would be a loss.

I felt there is nothing much else available and the time to order or make something custom like I did before just is not to my liking.

Like you said about loosening and readjusting, I did find that a very small amount of adjustment to get it centered better was attained with some effort. I did this before going trail riding. I mean just before and I had my tools handy to do this so the trip was a success.

What I did with the 2nd reduction small and large pulley was replace with gears and chain a while back. This reduced slippage under high load and torque on that really small 1.7 inch diameter pulley since a gear does not slip.

Now that the 3rd reduction smaller pulley seems to grab OK with the AX (ribbed) vs the prior A belt, I'm again thinking to try something with the 1st reduction belt.

I wish I could get the AX belt in 1/2 inch increment to fit my 1st reduction pulley as it the next thing I could do besides also replacing with a chain, but if it means ordering a minimum of $100 from an internet vendor I am not really needing that many spare extra belts. It was only costing $10.00 at the place I went to for the third reduction belt and the Gates AX belt fits the bill.

The larger rear pulley from 10.5 inch diameter to 15 inch diameter now in place on the rear wheel means that the gears I would have to buy, or even already have would be smaller and cheaper. I was astounded at seeing a 5/8 shaft keyed gear in 7 inch or greater diameter costing over 200 dollars when a similar 10.5 inch pulley was only 27 dollars.

If I go to a slightly smaller size of the larger of the two 1st reduction driven pulley I could adjust the back idler pulley over a bit and get more tensioning adjustment to use with 1 inch increment AX belts.

It means cutting and welding, or cutting and slotting for a bolt connection for the idler pulley bracket to move on the X axis to center the back idler with a smaller pulley.

I will look at the gears I have for 5/8 bore and also see if the rusted gear type centrifugal clutch I freed up is workable. I will do the math and find if I can get around 21:1 ratio again I'll have a top speed as I now have on the flat at 19 mph and 18 mph average. Trail average speed I got 7 mph, I am not sure and did not check top speed on the trail, but maybe I can figure if I look at the raw data from the GPS and find it out.

MT

Mendicino National Forest Trail Riding

http://motorbicycling.com/showthread.php?p=554156#post554

(p)
 

Attachments

Last edited:

MEASURE TWICE

Well-Known Member
Jul 13, 2010
2,742
1,214
113
CA
New Tecumseh Clone carb and air filter housing to swap in now that the Briggs 3hp 4 stroke engine (80202 0430) has had the intake valve adjusted. No more gas shooting the wrong way from the venturi out toward the air filter and wetting it which slowly clogs and starves for air eventually after a few month riding.

The new carb was needed so that I can idle the engine. Some how the non-adjustable Briggs clone carb was able to idle when the intake valve timing was off.

For years I was not going to know this as first I was using the original Briggs Vacu-Jet carb which worked well with the oil bath air filter. There is no clogging that with gas fuel spray miss directed due to intake valve timing being off. It just probably messes with the oil bath to some degree by mixing a little gas.

For more years with the Briggs clone carb, I though the wetting was oil from the breather return to the intake by the air filter. Nope it was gas spray the wrong way out the throat of the carb at the filter.

Hey with at least 1/2 the compression stroke having the intake valve opened gas was spraying the wrong way at the air filter. This also reduced the compression and although it threw gas at the air filter, I suspect some of it was recovered on the portion of the intake stroke where the intake valve was open as well as it should be.

I have a main jet and idle jet needle valve on this Tecumseh clone carb and the whole thing was about $40 for carb and filter housing.

I may see about hooking the breather back up as I have seen done on a modified air filter housing like this one I got.

Getting the twist grip throttle set up on this is not going to be too big a deal, but wouldn't you know even though the carbs a very similar, the throttle butterfly valve goes the opposite turn direction (cw verses ccw) from the two different brand to open the throttle. I'll put the return spring on the opposite side and also do the same for the cable from the twist grip throttle.

The cover I made with the recoil starter cord coming out the top is still going to work fine and the carb and air filter housing still fits underneath it for protection.

I just did not yet have time to re-attach the gas tank and start it up to test it to idle, but very soon now. Then the new adjustable diameter pulley that I got is going to be swapped in place of the worn out one for the belt drive to the back tire drive pulley.

The adjustable diameter pulley probably was mostly worn down as a result of having the rear drive pulley prior made of cast white metal cracking, and it slipping a lot. It slipped intermittently with every 1/2 turn of the rear wheel as the belt recessed in to the pulley more since it cracked. I had not noticed the crack till the end of a 4 day outing trail riding. The Whizzer clone sheave in place I like, but I did some mods to it so that it works smooth and has extra stainless steel fasteners to hold it well.

Even with the problems that I have had, I never got stuck out there with the engine not starting. Briggs engine are something I know about and like. Now with the greater compression I'll see how it goes!

MT
 

Attachments

Last edited:

MEASURE TWICE

Well-Known Member
Jul 13, 2010
2,742
1,214
113
CA
I put the New Clone Tecumseh Carb on the Briggs Engine and it worked fine and goes to high speed and idles well. It does need to have the spark timing retarded a bit as it sometimes tries to run in reverse when starting.

The new carb leaked at first even without pulling the recoil starter. I shut off the gas valve. I took off the air filter and housing and saw that gas was coming up through the main jet into the throat when I turned the gas valve back on. I tightened the main needle valve at the bottom of the bowl and it stopped leaking. I know you can run the engine with the needle valve closed, but it told me the float and float valve may be at fault.

This all done prior to putting it on the engine and filling the gas tank. I thought I had checked the float bowl, as I took it off and looked to see if foreign matter was inside as it was brand new, and you know what you might get. I put it all back as it looked good and blew into the gas inlet and notice my breath coming out the main jet into the carb throat. I also then turned the carb upside down and did the same and nothing heard and by mouth cheeks budged as the float valve apparently seemed to be working fine.

When I opened it after seeing it leak gas, I found that the float valve needle had a good rubber point for seal, but the needle was not going to seat all the way if the float was not at a very steep angle past level.

I thought I would bend the spring a little bit to have the needle that muck closer to closed position so that the fuel level in the bowl might work and not leak.

That is what it was and it stopped leaking.

When I get the next chance to set the spark back a bit, I bet it will be really great. I already can tell even without any load on the engine the higher compression and it has more power. No mist of gas into the air filter with wrong intake valve timing either.

I have video and pics and will see about posting.

MT

The after picture where I bent the spring to get the leak to stop. Prior the float not pointy end was touching the clip that holds the spring. What I mean there was no space as there is now between the two parts. You can see the gap now. This effectively makes it less fuel level needed in height to close the float needle valve in its seat.
 

Attachments

Last edited:

MEASURE TWICE

Well-Known Member
Jul 13, 2010
2,742
1,214
113
CA
I was searching the internet to find if I was right in the need to retard the spark timing some as now the engine has greater compression.

Not only did I verify that but from back in 1882 the Atkinson Cycle Engine was a design with 4 strokes but turned two revolutions if I understand correctly. That it had two revolutions withing the 4 stroke cycle with special parts to enable it to do this and be more efficient than the normally known Otto Engine.

5 years ago newer design in the hybrid shown uses "livic" -- late intake valve closure." This is an easier way of recent to get better fuel efficiency but not as complicated a construction as the Atkinson Cycle Engine.

With late intake valve closure mentioned and leaking out pressure from the compression stroke I wonder how the hybrid engine deals with the issues: Gas mixture vapor going back out the air intake where the paper air filter (if that is what is used). The wetting of the paper filter, as I got tired of on my Briggs and Stratton engine and set the intake valve not to leak any compression stroke travel.

And what ever was the reason my Briggs engine ended up having me replacing the air filter too often, I have now greater compression and no longer filter problems. Easy-Spin Start or Fuel Efficiency, I just know wasting paper filters is no longer an issue.


===

http://www.automotiveforums.com/t708048-timing_vs_compression.html

http://auto.howstuffworks.com/atkinson-cycle-engine2.htm See 3rd page and part way down " In engineer-speak, the modern method is known as "livic" -- late intake valve closure. "
 
Last edited:

Ludwig II

Well-Known Member
Jul 17, 2012
5,071
783
113
UK
The Atkinson Engine Cycle is really a clever way of making a long stroke engine with short stroke parts, so you get the maximum work from the bang. It wasn't a practical idea until widespread fuel infection became available.
 

MEASURE TWICE

Well-Known Member
Jul 13, 2010
2,742
1,214
113
CA
https://vimeo.com/103665228?utm_sou...4NWYyMmU4NTc4fDQ3NzgyODJ8MTQwODMxNzg2M3w3NzAx

This was also a link from the thread I wrote: http://motorbicycling.com/showthread.php?t=55860 Page 1 post #6 Oil leaking from air filter? (actually not oil gas mist wrong way out the throat of the carb at the air filter)

Here is a link to a video I made before adjusting the intake valve. Spray of gas mist out the intake the wrong way. How does the late intake valve closure on Hybrid motor vehicle avoid having the gas mist get back to the paper air filter in the car? I know I had found it was OK with an oil bath air filter on the Briggs, but that was not the carb an air filter that was for the 70's era 80202 0430 Briggs engine. In the 70's and later they used foam and paper filters. The foam filters also might clog up with too much gas mist going the wrong way momentarily for the late intake valve closure. I searched the internet without finding an answer, but I maybe will stop by a dealer an pick a car salesmen's brain about the hybrids using this valve tweek rather than the full Atkinson Engine Cycle as it is simpler.

MT
 
Last edited:

MEASURE TWICE

Well-Known Member
Jul 13, 2010
2,742
1,214
113
CA
I adjusted the spark timing and only had a little time to try it out. The carb started to leak again. I opened and adjusted the float spring to clip again and think it is OK now. Anyway I always shut off the the tank valve. I'm hoping this carb does not have to be replaced and deal with some kind of warranty.

I'll see soon how it runs at speed and idles. Now it does not try to run backward occasionally when starting pulling the recoil. I set as close to 0.020" setting for the point gap.
 

Ludwig II

Well-Known Member
Jul 17, 2012
5,071
783
113
UK
MT, modern engines use injectors and I think they spray fuel in quite late in the valve opening duration, so mist isn't a problem. Also, some engines are optimised to run best at one speed, like most 2 strokes, and outside of the zone, they can blow back like yours is doing.
 

cannonball2

Well-Known Member
Oct 28, 2010
3,682
221
63
Colonial Coast USA.
Your clone carb differs from the original in that the Tecumseh carb had a pressed in seat for the needle and no Viton tip like the one you have. Doubt it makes a difference design wise, but certain materials react and swell to the ethanol in our fuel that the manufacturer may not have taken into account when choosing them. Or it could just be trash in the system.
On magnetos with fixed points, DONT change the point setting! Its all timed to produce the hottest timed spark at the spec setting, almost always .020. If the engine has a moveable backing plate or entire mag, then yes experiment with the timing.
The old B&S engines with points could displace the flywheel key on sudden stoppage only half the keys width and not make spark.
 

curtisfox

Well-Known Member
Dec 29, 2008
6,046
3,949
113
minesota
Yes enthanol fuel does a lot of damage. my son went to collage small engines.and was told to run none enthanol fuel in all small engines.

Am thinking also if you went to Tecumseh manual and got the proper settings for the carb float?

In all the older engines the valve settings were 8 and 10 was a ruel of thumb for many years ( some of the bigger engines still use 8 and 10 )and then they changed to closer tollerances 7 and 9 i think and i find that most will not last to long unless you regap them. Had a snow blower for a guy that just wouldn't run (start and die ) ajusted the gap and run fine.............Curt
 

MEASURE TWICE

Well-Known Member
Jul 13, 2010
2,742
1,214
113
CA
I saw that blow back wetting the air filter before I adjusted the intake valve. So when I saw adjusting the valve to have more gap would stop that intake valve staying open too long and losing more than 1/2 the compression stroke and keep filter dry, I just did not go by the specification. More compression and idles OK. It ran at speed also. It was after it comes back to idle and was to throttle back up to speed it died. I had to leave without time to see adjusting the carb needle valves and checking stuff out. That will be later.

I have a new intake valve and can set it to spec if necessary, but then I am back to wetting a fouling up paper air filters and that is just non-sense. I can use the foam filter as an option like I had created on my Briggs carb. It would wet but I was thinking periodically I would just clean the special oil off the foam with the cleaner for it and re oil again. Since the Tecumseh air filter housing comes with the foam filter and mentions using just motor oil, but paper filters also fit in it, I can do the same for it using the foam and periodically cleaning so I am not stuck somewhere with a clogged filter and the engine won't run.

I suspect I can take the new intake valve and set it maybe to a point at which it may still be losing compression, but not as much as per spec and have a happy medium so that times between cleaning air filter foam would be less.

The engine did seem to have enough power even with like 2/3 the compression stroke valve opened, just I can imagine what it would be not losing any compression.

The trouble if I do decide to use the intake valve I was saving, adjusting it means grinding it and you can't put the metal back. If I had an inexpensive way to cut the seat if it can be cut any further as it was done already once, I could adjust it back as I try increment adjusting to a point where I would like to back off a bit when the engine does not respond well past a point.

Anyway no yanking my arm with the engine trying to run in reverse now with spark point gap set to specification. The spark is real bright too.

MT