

The Yellow Jacket build thread
- Thread starter datz510
- Start date

Hi Datz,
Make sure the spark plug [if C7E] has an extra washer, because the exhaust valve can hit the tip on certain versions of the head. The most common failure is the ignition sensor. As long as the green wire from the coil is ground and the green wire from the CDI is not grounded the ignition should be ready to fire. Never assume the spark plug is good, as many have spent hours looking for a problem and it was the plug. A good sub for the plug is an Autolite #4303.
When I designed the vent system the PVC valve needs to be level to work best. The PVC valve is gravity contolled.
Have fun,
Quenton
Last edited:
Quenton, that info was great! I found a couple problems that I've corrected.
This NE5 has your machined head on it (used to be Lennyharp's bike), so it is set up for the shorter plug. I pulled the plug out and found that the insulator was cracked and dangling against the electrode. I think that was my fault when I regapped the plug. At least I found it. I found an NGK at the autoparts store that cross referenced with it, so that went back in the bike.
Next up, I was looking around at the connections at the coil. Found the female spade plugs on the wires at the coil were VERY loose on the coil spade terminals. So, I pulled those off and slightly crimped them with pliers so that they fit snugly.
Next up, when I pulled the replacement plug, I found that the plug was soaked with fuel. So, I pulled the carb out and I think I just may have found the source of the main problem.. I pulled apart the float bowl and found that the soldered brass floats were half full of fuel. This flooded the bowl and thus flooded the engine.
So, I guess i get to build the custom manifold and install the new dellorto carb sooner than I had thought.
So, Quenton, what length intake runner would you recommend for this engine? I am thinking a 3-4" runner from the port on the head to the carb would give me a bit more low end torque. (at least thats how it works on 4 stroke automobiles)
The carb is a 24mm Dellorto PHBL. Intake runner material is 25mm ID. The manifold to head port flange will be portmatched to transition as smooth as possible. I could also use the aluminum intake block as a smoother and longer transition between the 25mm intake and the smaller head port.
Last edited:
") Can't wait to ride this thing now that its going to finally run right.
Can't wait to ride this thing now that its going to finally run right.Hi Datz510,
The actual length should be 1/2" to 9/16" long for best all around performance.
You are on the right track by tapering the intake manifold to fit the carburetor on one end and the intake port on the other.
Have fun,
Quenton
Get YOUR EZmotorbike TODAY!
The actual length should be 1/2" to 9/16" long for best all around performance.
You are on the right track by tapering the intake manifold to fit the carburetor on one end and the intake port on the other.
Have fun,
Quenton
Get YOUR EZmotorbike TODAY!
Last edited:
Thanks for the info! I'll see how short I can get it, but I'm going to have to work around the constraints of the cantilever frame with respect to the throttle cable.
I picked up a 90 degree bend for the throttle cable for use with this carb, so it should make the throttle run a little cleaner.
I picked up a 90 degree bend for the throttle cable for use with this carb, so it should make the throttle run a little cleaner.
Made some rather drastic changes to the Yellow Jacket today.
I restored and fitted an original 1950's schwinn springer frontend on it. I also fabricated the parts for the new intake manifold. Just need to go over to Lenny's to see if he can braze it up for me.
Here are photos from today:
Here are the fork peices after sandblasting and painting:

I welded a nut onto the inner side of the left front fork arm for the drum brake mount

Spring with new bumper bushing fitted:

Original AS hardware.. this stuff is rare:

I restored and fitted an original 1950's schwinn springer frontend on it. I also fabricated the parts for the new intake manifold. Just need to go over to Lenny's to see if he can braze it up for me.
Here are photos from today:
Here are the fork peices after sandblasting and painting:
I welded a nut onto the inner side of the left front fork arm for the drum brake mount
Spring with new bumper bushing fitted:
Original AS hardware.. this stuff is rare:
Last edited:


Here she is all put together (except for the frontmost fender braces):

You can see the fender deformed a bit when I had to bend it to fit it between the springer arms, so I'll find an original 50s Schwinn front fender for it. I think a Black Phantom frontend would be sweet!

The brake mount worked really well:

Detail of the spring:

You can see the fender deformed a bit when I had to bend it to fit it between the springer arms, so I'll find an original 50s Schwinn front fender for it. I think a Black Phantom frontend would be sweet!
The brake mount worked really well:
Detail of the spring:
Last edited:


we can do it. you need to get a brother married every month or 2. glad you got more done here as the other projects threatened this one. bring that intake over and it will get brazed up asap. call again.
Ya Datz, The Springer On My Stretch Is Scary Floppy. They Just Drill A Hole Thru The Fork Tube And Run A Bolt Thru. It Gets Compressed. I Hope To Get Some Stainless Sleeves And Drill Large Hole And Weld Them In. Yellow Is Beautifull. My Tree Trks Are A Darker Yellow. Its A Good Safety Color Also. Ron
Last edited:
Hi Guys,
There is a lot of difference between the "vintage" springer and the repo. The vintage has a solid area in the forks to support the bolt as opposed to a simple hole in the repo version. Good move on using the heavy spring it will help.
I am using the same vintage Schwinn front end and it works great!
Have fun,
Quenton
EZ MOTORBIKE COMPANY
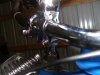
A few new pics.. Got the new carb installed. I taper reamed the aluminum carb spacer which portmatched the 1" intake to the head pretty closely. I figure this will work OK until I can pull the cylinder to portmatch it to my intake manifold.

I set up the manifold so it can be used either with or without the spacer. without the spacer, it'll tuck the carb in a lot better, but its OK for now.
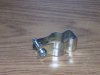
Carb closeup:

I set up the manifold so it can be used either with or without the spacer. without the spacer, it'll tuck the carb in a lot better, but its OK for now.
Carb closeup:
I was able to get the engine to fire yesterday on the new carb. Its running extremely rich, so it just barely runs with throttle halfway open until it peters out and dies. So, now I have to wait until I get the jet set from Dellorto. I got a call from Dellorto this morning saying the order I put in was delayed due to a problem with their order software, so they are shipping it out to me via 3 day delivery for free.
I wont be able to run the bike until I get the jets to get the carb dialed in, so I'm going to concentrate on cleaning up the wiring, fitting the headlight, and mabye working on the other project bikes in the meantime. I have a 3 day weekend with nothing planned, so this is going to be great!
I wont be able to run the bike until I get the jets to get the carb dialed in, so I'm going to concentrate on cleaning up the wiring, fitting the headlight, and mabye working on the other project bikes in the meantime. I have a 3 day weekend with nothing planned, so this is going to be great!
Did you mount a headlight on your springer yet? I have a springer on 2 of my bikes & am trying to find the best mount for the light. Here's one I'm using right now. It's a 3/4 inch conduit clamp.
Jay
Jay
Attachments
-
 143.2 KB Views: 164
 -
 96 KB Views: 182
"I set up the manifold so it can be used either with or without the spacer. without the spacer, it'll tuck the carb in a lot better, but its OK for now."
Datz: Congrats for the job; it´s a nice set up.
If you use the spacer in the carb, the engine will have more torque and less RPM; If you do not use the spacer the engine will increase RPM and lower torque. (Not more than 3 - 5 %)
Good luck and best regards.
See you in the Road !!!
Datz: Congrats for the job; it´s a nice set up.
If you use the spacer in the carb, the engine will have more torque and less RPM; If you do not use the spacer the engine will increase RPM and lower torque. (Not more than 3 - 5 %)
Good luck and best regards.
See you in the Road !!!