skyhawk gt2as

GoldenMotor.com

ZipTie

Active Member
Jan 8, 2016
750
82
28
Mpls Mn
Looking good! So just to clarify...you are not going to be able to have a rear disc brake due to clearance issue because the disc rotor would hit the chain stay? But the new redesigned KC GT2A frame would have the clearance for the rotor. That sprocket with the disc brake adapter is pretty sweet though.
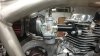
Did you get your crank to clear the tranny? looked pretty close.
Anyhow looking really .flg.good!
 

sissytrikerider

New Member
Jun 25, 2011
68
0
0
buffalo
Correct zt the new frame available is the one kc uses an hes running a 3speed with a disc brake, but he drives via jackshaft similar to a sbp shift kit.. my frame isnt as wide and the rotor wont clear the frame. I like the drive to the hub, and hoping its less wear to the gearing, as your driving the hub similar to a clamshell but witout the possibality of any slipage period.
no the crank arms dont clear yet but i have another set from the standard wide crank set on the way and i still have yet to either plastic dip (that crap to put new rubber handles on your tools) the muffler clamps for the motor mount to reduce vibration hopefully and stop the paint from getting buggered up.or i may just use nylon spacer between the two. I also use nylon washers between the motor and mount which i believe a combo of some of that will give me my clarence annd maybe a slight reshape of taking a little material off the crank arms. Its that darn close
 

sissytrikerider

New Member
Jun 25, 2011
68
0
0
buffalo
Just an update everything is in for powdercoat as we speak so hopefully assembley will start in the coming weeks. No luck with choppers us as they still werent taking orders so i went a different route instead of the dual front disc brake. I also changed my rear wheel drive set up to a sbp shift kit and will use my motor mount and disc brake drive on a future build. I also now have disc brake on the rear now due to this switch and simply low temp welded a tab on to the frame for the caliper i will show.
I still have the fuel bong to the carb issue to deal with i believe i have an answer for.
 

ZipTie

Active Member
Jan 8, 2016
750
82
28
Mpls Mn
Call Mz Miami they have the petcock with a course thread to fit the fuel bung on that old style GT2 Frame... call them and ask for the petcock for the old style gt2a frame. its the only place I could find one and it fit perfect.
Bet your excited to wrap it up, that's gonna be a great build/ What color did you go with on the powder coat?

My new GT2 A frame has the dual height rear brake cantilever pegs and don't work at all, as the lower one is blocked by the higher welded lever peg made for the bigger 700 mm wheels... I have 26" wheels so the brake lever hits the welded part and it and has me scratching my head as to why they did that. Now Ill have 4 rear bare brake pegs staring at me for eternity. LOL. So the new frame has issues also and isn't perfect either. Plus the pedestal mount holes do not match the engine I have... Id rather have the old one actually at this point.
 
Last edited:

ZipTie

Active Member
Jan 8, 2016
750
82
28
Mpls Mn
Go figure this out on the new GT2A frame. Using the lower squeeze brake pegs wont work for anyone using 26" tires, at least, its what I have concluded. So If they wont work for anyone why go to all the trouble of putting them on at the factory. If I had the bigger 700 mm wheels the top ones would work. Maybe I am missing something? I could use a Disc but its too late wheels have been invested and installed.
 

Attachments

sissytrikerider

New Member
Jun 25, 2011
68
0
0
buffalo
Test fit test fit and re test fit, complete the entire build even if you think awww that will work its self out test fit. Then paint lol. The only thing i didnt figure was the petcock but i cant change the thread hole position as its in the lowest part of the tank. At worst i might have to rethread which wont affect paint. And i did a mock up which im confident will work. I removed my cantilever studs to stuff as large as a tire as possible and i was going with black wheels and didnt want the color to wear on the sides from the brake pads. Also wanted disc brakes. Well once removed the rims i ended up ordering had machined sides when the came. Then after bondoing the spots where i ground the studs off to perfection i realized would nt work with powder coat. I went frame maroon and black bars, forks and sbp shift kit to mix with the other black and silver touches. Im going to figure out some custom decails once i have the frame back. I have some ideas with a indianhead nickle to rep the buffalo ny thing lol .

Back to that Fuel petcock ..... who is this mz miami you speak of and does anyone know the thread size of the tank petcock for the gt2a frames. 1/8 npt seams pretty close.
 

sissytrikerider

New Member
Jun 25, 2011
68
0
0
buffalo
I also have a custom muffler for this project . I bought a kit 50cc gy6 scooter iwas hoping would work. Well there was a problem with ebay and paypal so needless to say i ended up with a free $69 exhaust. Well it was 3in round and looked to big so i gutted it and took the internals which consisted of a 1in inner tube drilled with holes and white fiberglass packing insolation and rest to the scrap pile. Autozone for a 18in piece of 2in id stainless exsaust pipe for $20 . Fit some washers for the ends and welding er up. The stainless i did a test section with some 800 /1200 GRIT paper and it cleaned up nice and i bet will polish out on the wheel. The exhaust i will bend up some tubing and getting some black wrap. Forgot to take progress pics of that process. It was just one of those one thing lead to another and bamm muffler lol.
 
Last edited:

ZipTie

Active Member
Jan 8, 2016
750
82
28
Mpls Mn
Thanks for the update and the additional details on your build. First off The bung on your frame is not NPT or a tapered thread. It is a straight course thread, I do not know the size. I called them and specifically asked for the GT2A old style petcock and it fit perfect, threaded in like butter was like 6.50 so its not an expensive. My worry is that you will get the wrong petcock as they only now sell the new style GT2a frame and that bung was changed yet again. I don't know if you have the room as you said for a standard Petcock though. With your building skills you wont have a problem rethreading it to suit your needs. I don't want to cut the brake peg holders as the bike is already factory painted and I cant find touch up paint anywhere to fix the damage I will do. Ill figure something out hopefully. Post a bunch of picts when you get time.
 

sissytrikerider

New Member
Jun 25, 2011
68
0
0
buffalo
after 1/2 hr of figuring out how to screenshot my phone and then get it to my computer its to large to upload:-||
I have that petcock already, ebay $1.38 china direct lol (ordered 4). problem is the barb from the petcock is lower then the barb on the carb. if I 90 it from the tank I can get a happy loop around the seat tube and should aid in and flow fine as these motors consume very little gas even on wot. so anyone reading who would like to chime in with the threadsize would be greatly appreciated dance1
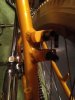
. its the same as the tank that comes with the motor kits (or as least use to with the older ones)
 

Attachments

Last edited:

sissytrikerider

New Member
Jun 25, 2011
68
0
0
buffalo
Just a update. I hav'nt givin up on this project. Still waiting on powdercoat.my guy doesnt do a lot of aluminum nor has seprete blasting abilities. I must say being patient sucks.