Nirve Switchblade complete!

GoldenMotor.com

Fang

New Member
May 4, 2013
90
0
0
35
San Diego
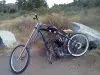
I finished installing my 80cc chinese engine on the ol nirve switchblade last night but not without a handful of headaches.

The standard "fat ass" tire (24x3.0) was a big issue due to chain clearance so I had to downgrade to a 24x2.125 white wall but not having to worry about the chain nearly as much made everything much easier and it actually doesn't looks bad at all
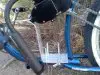
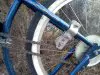
The original chain tensioner mount that came with the kit would have worked perfectly and did for the first run but I soon realized it angled it in a way that made the chain hit the bolt housing on the sprocket cover so I had to mount it on the seat stay since the stock tensioner wasn't long enough to reach the chain on the chain stay
The front motor mount had to be fabricated, I used some aluminum flatbar that worked great
The carb fell off after riding it a few times, when i tried to tighten it the damn thing would not grip onto there!
My friends brother broke one of the 4 lips i guess I'll call em that sit under the mounting clamp on the carb after trying to open them up a bit but the metal was really brittle and just snapped, we ended up shimming a slim piece of metal between the mounting clamp and it has stayed put since
Right after putting gas in it I went to take it out for a test run, went to push the kickstand up and realized it hit the muffler, needless to say i pulled it out as quickly as possible

I think that's it
But I must say, as a first time rider and avid biking fanatic I haven't been this satisfied in quite a long time, It didn't matter how frustrated I was while trying to figure out the engine mount, It didn't matter how irritated I was when then carb broke, nothing mattered and I didn't care about a thing and the smile on my face proved it
.shft.
pics coming tomorrow!
 
Mar 31, 2013
295
8
0
RI
...a picture is worth a thousand words, ...and a lot easier on the eyes too.

...imagine if Playboy only described the pictorials, ...not the same, is it?

peace, bozo
 

Fang

New Member
May 4, 2013
90
0
0
35
San Diego
so heres a few pics but the picture quality I have on my phone isnt the greatest
The seat is very torn up :/

you can see how I mounted the idler pulley on the top

and the motor mount we made out of flat bar


you can also see where the crank arm is hitting the muffler a bit :[

Got a new idler pulley today since I ate some gravel the other morning, Im still extremely pleased with the outcome and I can't wait to get my license so I don't have to dart my head around for officers
.bf.
 

Attachments

2door

Moderator
Staff member
Sep 15, 2008
16,302
175
63
Littleton, Colorado
Fang,
Thanks for posting the pix. You've taken on a challenge for your first bike with the Nirve Switchblade. It can present some issues to builders but makes a great motorized bike if done right. You're well on your way. Congratulations.

If I may I'd like to make some suggestions that you might find helpful.
The Switchblade has long horizontal drop outs which will allow a lot of adjustment for chain tension. You really don't need the tensioner. Remove it completely. Yours is mounted wrong too. The tension needs to be applied to the lower chain run, not the top. This is because when the bike is under engine power the top chain run is tight due to being driven by the engine sprocket. The slack will be in the lower chain run and that's where you want a tensioner. But, with the adjustment you have in the drop outs you can get that tension by your chain length instead of the tensioner.

Remove the tensioner and slide the rear wheel as far forward as it will go in the drop outs then cut your chain to give you 1/2 to 3/4" of slack. This might result in the pedal chain being too loose. You can use the tensioner on the pedal chain to take up the slack there. I fabricate pedal chain tensioners for the Switchblade using an alloy derailer sprocket but your kit tensioner will work too. It needs to go on the top chain run so it isn't under stress when you apply the brakes. You do not want to loose the chain with coaster brakes.

You really, really need to explore some way to install front brakes. Relying only on coaster brakes is not the safest thing to do.

You can easily bend the exhaust pipe to get pedal clearance. You don't need heat but a bench vice helps. Clamp the flange in the vice and start bending carefully, checking as you go to see if you bent enough. You might also try enlarging the holes in the flange to allow it to swivel slightly on the cylinder. Often just enlarging those holes will give you enough adjustment to clear the crank.

Another hint: If those rubber bumpers on the front fork keep slipping down, a drop of super glue wicked down in them will keep them in place so your fork doesn't turn too far inward.

Good luck and let me know if I can offer any help.

Tom
 
Last edited:

Fang

New Member
May 4, 2013
90
0
0
35
San Diego
Thanks for the suggestions! I removed a link from the chain since it had stretched a bit and removed the tensioner like you said, those drop outs are in fact perfect and it makes the bike look a lot cleaner!

As for the front brakes Nirve sells the forks from the newer model switchblades which come with disc brakes with the appropriate mounting tabs for the calipers as seen in this link
http://www.nirve.com/nirve-accessories.asp?id=1596

or a front drum brake although I've never used them and I heard they are quite heavy


I was planning on bending the muffler but the frame is in the way :/ I'm thinking some wider cranks might fix the problem since my grinding a "small chunk" out of the pedal idea greatly decreased the strength of the metal which is forcing me to be easy on my left foot while pedaling, but pedaling is left to just starting it up at this point .trk

Thanks for the rubber super glue tip also! It worked great and my tank thanks you too for not being smacked by the handlebars anymore haha
 

maniac57

Old, Fat, and still faster than you
Oct 8, 2011
4,484
22
0
memphis Tn
Can you dent the backside of the muffler to allow it to turn a bit more when the holes are drilled out? Looks like the easiest fix to me...
Much cheaper than wide cranks and easier than bending yours...
By the way, Nice build! I totally know that feeling when it first pulls under its own power...
It won't be your last I bet.
 

Fang

New Member
May 4, 2013
90
0
0
35
San Diego
Can you dent the backside of the muffler to allow it to turn a bit more when the holes are drilled out? Looks like the easiest fix to me...
Much cheaper than wide cranks and easier than bending yours...
By the way, Nice build! I totally know that feeling when it first pulls under its own power...
It won't be your last I bet.
I actually took your advice and bent the muffler in a bit, it started cracking and choking every time so I bent the baffles inside and cut the small tube, bada bing bada boom it fired right up and had great low end torque!
but alas my need for speed has taken a turn for the worst and forced me into buying the 212cc predator engine, the 66cc now gathers dust in my shed :[