Finally broke down and bought a SkyHawk from gasbike

GoldenMotor.com

Desert Rat

New Member
Jul 30, 2012
565
9
0
Apache Junctoin Az
UPDATE

OK this is where I am now.
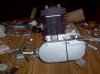
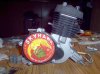
I have removed the jug and cap filed casting marks and burrs where ever I found them.
Painted and baked both with black High temp paint.
when done checked bore for roundness with micrometers and telescoping gauges. within .0005 of an inch round. thumbs up!
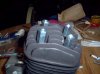
The base
at first was very hard to turn crank holding conrod, filled case with engine degreaser.
over twenty minutes crank became easier and easier to turn, emptied and blew out crank case.
then filled crank with a mixture 1/3 2 stroke oil, 1/3 30 weight 4 stroke oil, 1/3 marvel mystery oil.
let sit, periodically turning crank, emptied crank case now I barley have to touch con rod and crank turns freely Thumbs up!

Next put an indicator on crank surface, within .001 of an inch round Thumbs up!

My guy must have been having a really good day:)

Side note; when I emptied crank case of degreaser very little schmutz came out.

the only thing wrong I have found is that I have to take the clutch arm
off the splined post and turn it, they had it set to far outward
BOO HOO LOL

Tonight I lightly mill the head and jug flat and put it all back together

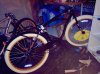
It's a Bi** haveting to wait until the 3rd to get my bike put I wouldn't have done the other
things if I'd had it now, to impatient!

and if you can think of anything I missed let me know, just keep in mind I'm keeping it stock for now!

Ride safe
 
Last edited:

Desert Rat

New Member
Jul 30, 2012
565
9
0
Apache Junctoin Az
Next to Final Update

Milled the heads and man were they flat to begin with
Took a sharpy colored the ring on head and complete
flat surface on jug took a mirror used 500 grit wet dry
completely wet spent 20 seconds going over both
could still see black in valleys of machine marks
but surface free of color and flat. thumbs up

now for upgraded bolts, taking pics posting said
pics then closing this thread and will start a new build
thread next month.
Ron R
 

Desert Rat

New Member
Jul 30, 2012
565
9
0
Apache Junctoin Az
Final Update
Doesn't she look pretty, and I went with coupling nuts again
it occurred to me that I could screw screws in the top half
connecting it to a steady rest of some sort to tie the motor down solidly top and bottom!

and of course the bike I am mounting it to
 

Attachments

truckd

Well-Known Member
Oct 19, 2010
2,837
134
63
palmdale calif
Nice looking Engine, Sorry! haven't been following this thread to closely but have you done any mods or just a general inspection and clean up of ports and lapping also looks like two head gaskets ??

What kind of paint did you use ? color looks like flat black on cylinder and head
it will look good in that Nel Lusso.
 

Desert Rat

New Member
Jul 30, 2012
565
9
0
Apache Junctoin Az
Nice looking Engine, Sorry! haven't been following this thread to closely but have you done any mods or just a general inspection and clean up of ports and lapping also looks like two head gaskets ??

What kind of paint did you use ? color looks like flat black on cylinder and head
it will look good in that Nel Lusso.
No mods just getting rid of casting burrs and marks, the paint was standard
high temp paint with baking to cure, and only 1 gasket apparently they've
upgraded the head bolts and gasket at factory now.
 

truckd

Well-Known Member
Oct 19, 2010
2,837
134
63
palmdale calif
Again it certainly looks nice!

In your opinion how were the Mechanics of the engine, tight ,loose ,quality of bearings exc. exc. exc.
Just curious, that head gasket looks thick
 
Last edited:

Desert Rat

New Member
Jul 30, 2012
565
9
0
Apache Junctoin Az
Again it certainly looks nice!

In your opinion how were the Mechanics of the engine, tight ,loose ,quality of bearings exc. exc. exc.
Just curious, that head gasket looks thick
Thanks
all I can say before getting it running is that it really looks like they stepped up
their game in quality. I'm impressed already and if the balance on the crank
is good I'll be real happy.
 

KCvale

Well-Known Member
Feb 28, 2010
3,966
57
48
Phoenix,AZ
I went with coupling nuts again
it occurred to me that I could screw screws in the top half
connecting it to a steady rest of some sort to tie the motor down solidly top and bottom!
Looks great Rat but you really don't need a top mount though I suppose it would act like a heat sink so long as that mount didn't cause your head bolts to get loose, maybe well enough to make you run a bit hotter plug to prevent fouling.
Here in the desert summer that might be pretty neat if you didn't burn your leg on it.

I have this new Diamondback Outlook in the production stall and was just mounting the engine so I thought I'd snap a couple of pics of mounting.

First off throw the cast mounts that come on the engine in the trash and use the nice steel ones in the kit, and then make sure you get the back of the engine at a direct 90 to the seat post.


Regular washer, lock washer, and nylon locking nut with a drop of blue LokTight.

Then find a muffle clamp the exact size of your front tube, 1.5" (44mm) for this D-back.


Any motor mount plate will work but I like the SBP parts Z mount, you can orient it any of 4 ways and cupped in above the mount holes so it rests right above the water bottle nub worked perfect on this bike.


The SBP HD allen bolts with washer, lock washer and a drop of blue lokight on them and just a washer with drop of blue on the muffler clamps and you have a bulletproof mount because the bottom line is if you can hold your engine head with one hand and your top bar with the other and push/pull it as hard as you can it moves at all it ain't right.

I'd bet I could whack this thing with a sledge hammer and the engine cast would break before those mount got loose, just the way I like it ;-}

I'll look for your finished build pics and so far so good Rat.
 

Desert Rat

New Member
Jul 30, 2012
565
9
0
Apache Junctoin Az
When I said a top mount I was considering a v welded from tubing connecting
to top of bolts to help reduce vibration from the top side,
maybe it's over kill maybe not? saw it here in a post.
and I'm fabing my own mounts that will allow me to mount motor just a little off center for chain clearence for 2 3/8 tires


Looks great Rat but you really don't need a top mount though I suppose it would act like a heat sink so long as that mount didn't cause your head bolts to get loose, maybe well enough to make you run a bit hotter plug to prevent fouling.
Here in the desert summer that might be pretty neat if you didn't burn your leg on it.

I have this new Diamondback Outlook in the production stall and was just mounting the engine so I thought I'd snap a couple of pics of mounting.

First off throw the cast mounts that come on the engine in the trash and use the nice steel ones in the kit, and then make sure you get the back of the engine at a direct 90 to the seat post.


Regular washer, lock washer, and nylon locking nut with a drop of blue LokTight.

Then find a muffle clamp the exact size of your front tube, 1.5" (44mm) for this D-back.


Any motor mount plate will work but I like the SBP parts Z mount, you can orient it any of 4 ways and cupped in above the mount holes so it rests right above the water bottle nub worked perfect on this bike.


The SBP HD allen bolts with washer, lock washer and a drop of blue lokight on them and just a washer with drop of blue on the muffler clamps and you have a bulletproof mount because the bottom line is if you can hold your engine head with one hand and your top bar with the other and push/pull it as hard as you can it moves at all it ain't right.

I'd bet I could whack this thing with a sledge hammer and the engine cast would break before those mount got loose, just the way I like it ;-}

I'll look for your finished build pics and so far so good Rat.
 
Last edited: