

"kindalikeawhizzer"
- Thread starter silverbear
- Start date

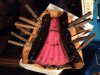
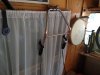
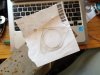
I have a few pictures for show and tell. The seat got some attention. Choosing where to cut the leather from a hide takes some study. All hides have variations in thickness and some were skinned poorly so there are nicks making thin spots or bullet holes, scars and of course you don't want to waste leather as it is expensive. I picked a section large enough and which was consistently thick. It should wear well and is buttery soft to the touch. Nice. Better to cut too big than too small, as leather stretches just so much, some not at all.
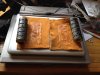
I would have preferred to do this cover differently, but I no longer have a good leather stitching sewing machine. My old Husqvarna Viking 621 died of old age a year ago. With this seat I would have taken the old cover apart at the seams, traced out each piece and stitched the new cover to match the old one. With no sewing machine I cut it in one piece.
No stitching at all with this cover as it is being held to the seat with just contact cement. I applied a thin layer of cement to the suede side of the leather for the center section and the same area on the seat, let it set up for ten minutes or so to get tacky and then pressed the two surfaces together. Following that I started at each end, again applying a thin coat of cement to the back side of the leather and to the seat, let it get tacky and press together. Then I used clothes pins to hold the leather to the seat. Let it dry some for a half hour or so and then moved on to the sides. Don't try to do it all at once. This way you can do some pulling to stretch the hide over the seat and get it pretty tight.
(cont.)
SB
Attachments
-
 227.9 KB Views: 114
 -
 206.1 KB Views: 102
 -
 217.1 KB Views: 113
 -
 191.6 KB Views: 142
 -
 185.2 KB Views: 102
Last edited:
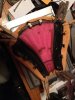
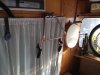
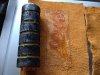
With the sides glued down I went back to the corners and finished up. Then put the seat back together and it is done. Looks pretty good, I think. The color is taking some getting used to since I usually use black elk. Foam hand grips are on order and will get hand stitched covers from the same hide so the seat and grips will match. Not always, but I usually give the grips fringe, and probably will with these.
(cont.)
SB
(cont.)
SB
Attachments
-
 192.2 KB Views: 147
 -
 158.1 KB Views: 126
 -
 144.6 KB Views: 118
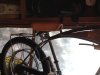
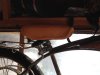
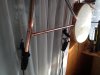
I added a cross brace to the handlebars and fitted levers, throttle and grips to see how it will look. The chrome part may get cut back a little once the bike is together, sitting on the ground with the old bear on the seat. If the bars feel too high then I'll cut the chrome sections down to bring down the height. The copper part will determine how much reach they have and again, it will be a matter of how they feel. Being an old guy I like to sit upright with some dignity, ya know.
I like the bars and I like how easy it is to make extensions if you just want to make bars longer by a hand grip or so. Add a 3/4 copper connector, a bit of 3/4" copper pipe (which will be under the grip) and there you go. The fit is snug and the copper bits can be soldered together. Copper to chrome I'll do with a little set screw. And being part raccoon I like all the shiny... chrome, brass or copper... I like it. As for two tone handlebars, they might not be for everybody, but this set suits me fine. Can't wait to see it on the bike with spiffy new elk hide grips. Since this handlebar was a scrap from the dump the only expense was the copper and I'm guessing there is maybe $8.00 invested (The half inch crossbar was a scrap from the dump.) And no shipping.
(cont.)
SB
Attachments
-
 154.5 KB Views: 134
 -
 171.2 KB Views: 110
 -
 154.4 KB Views: 134
 -
 176.5 KB Views: 120
Last edited:
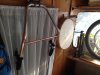
The carburetor I had given to fasteddy last summer and which he gave back for this build arrived from Canada a couple of days ago. I've been stewing over making an intake manifold and having the carb in hand makes figuring one out a little easier. Since the engine is tilted the manifold has to bring the carb back to level or parallel to the ground.
I also discovered that the throat of the carb is 1" while the Tecumseh opening is 3/4". I asked around if this would be okay and have enough assurances that I'll go ahead with using this 22mm Mikuni, by all accounts a good carburetor. I had bought it new from Sportscarpat when I thought I would be building a cyclecar.
What I came up with is a combination of one 90 degree 3/4" street elbow, one 45 degree 3/4" street elbow, a connector with a bit of straight 3/4" pipe inside it and a 1" to 3/4" reducer. It comes out level and the copper ties in with all of the other copper on the bike. Pictured is also a tracing (a rubbing actually) of the carburetor face where originally it would have bolted on to an engine. The pattern piece has been glued to a piece of flat steel and after drilling, cutting and some grinding will become the carburetor end of the manifold. The plan is to silver solder the steel to the copper reducer at the 1" end. That's the part that worries me a little. Once it is in use there's no heat involved to worry over solder melting, so I am hopeful. If it doesn't work then fasteddy or Curt or tinsmith or (heaven forbid) the old bear will weld up something from handlebar stock.
That's it. See you at the next show & tell.
SB
Attachments
-
 161.3 KB Views: 107
 -
 159.9 KB Views: 122
 -
 149.4 KB Views: 145
 -
 148.8 KB Views: 108
Last edited:
The seat turned out really nicely Silverbear. As you say the colour is different to traditionalist eyes, though I for one at least think it looks good. It reminds me of the near new English 'Middlemore' mattress saddle I purchased a while ago for my old heavyweight Phillips bicycle as it's a very similar colour.
A Kiwi would only understand the humor attached to riding a bike fitted with a 'Middlemore' saddle as Middlemore is also the name of a specialist orthopedic hospital here in New Zealand")
Those handlebars look good modified with poor man's gold, - you have a real talent for working with copper SB.
That copper intake manifold may need a support brace towards the carburettor end of things to prevent it cracking through work hardening due to vibration. I hope the copper intake does work out for you though as copper always looks good.
A Kiwi would only understand the humor attached to riding a bike fitted with a 'Middlemore' saddle as Middlemore is also the name of a specialist orthopedic hospital here in New Zealand
Those handlebars look good modified with poor man's gold, - you have a real talent for working with copper SB.
That copper intake manifold may need a support brace towards the carburettor end of things to prevent it cracking through work hardening due to vibration. I hope the copper intake does work out for you though as copper always looks good.
Thanks, Annie.
I hadn't thought about the work hardening of the copper. I'll try it and hope there's not much vibration, but over time even minor vibration might have a cumulative effect. It may be that I can give support from the air cleaner end of the carburetor. Shortening the manifold might help, too. A couple of those fittings could be cut or ground shorter. I'll think on it.
Do you see the difference in diameter between the carburetor throat (1") and the engine intake (3/4") being an issue? I don't want to engage in wishful thinking and don't understand enough about carburetors to know. Will this likely work?
As always, thanks for your kind words and considered opinion.
SB
Last edited:
I think it will be fine using that carburettor Silverbear. If you were hunting for every last bit of horsepower you could do the port matching thing and grind out the intake port to seamlessly match the intake manifold, only I don't think it's really necessary.
Thanks!I think it will be fine using that carburettor Silverbear. If you were hunting for every last bit of horsepower you could do the port matching thing and grind out the intake port to seamlessly match the intake manifold, only I don't think it's really necessary.
SB
Thanks for your input, Ray. Are you thinking a smaller jet is likely needed?You've got a lot done SB. Carb should be fine, may have to play with the main jet.
Ray
SB
Carb's made it. Good. I was beginning to wonder if they were tied up somewhere.
The handle bars are looking great.
Steve.
The handle bars are looking great.
Steve.
Oh, good. I'm glad you like the handlebars.Carb's made it. Good. I was beginning to wonder if they were tied up somewhere.
The handle bars are looking great.
Steve.
SB
I guess how it runs determines what size jet, eh? What is likely in it right now? Any idea?They come bigger than needed usually, I'm thinking like #85 on up.
Ray
SB
Nice work, Silverbear.
Being a know-nothing where carbs and leather work is concerned, I have no considered comments to make there.
But we're watching with interest.
Being a know-nothing where carbs and leather work is concerned, I have no considered comments to make there.
But we're watching with interest.
Bluegoat,
Thanks for your interest. I don't know much about carburetors and intake manifolds either, but I'm learning a little.
SB
Thanks for your interest. I don't know much about carburetors and intake manifolds either, but I'm learning a little.
SB
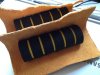
Two things for show & tell. First is the making of handlebar grips and after that some progress on the intake manifold.
Making foam grips covered in leather. The hands I'm typing with are original equipment which have been in use for seventy years. They have scars and don't work as well as they once did, but are still hands that work and make and also sometimes hurt. I find that one of the activities most painful is riding my motorbikes. Vibration through the handlebars is one of the things which led me away from China girl engines to the smoother running four strokes and well made vintage two stroke engines. I used to get back from a ride and feel my hands tingling. No thanks. Working the throttle and pressure against the grips is also tiring, so anything I can do to help these tired old hands feel better is a good thing. Some of my friends with arthritis or carpel tunnel syndrome really have a hard time with riding.
One answer for me is foam grips. The first time I tried a set I could feel the difference so now that's all I use. I like to cover them with leather for even more comfort and to make them look good, too.
I'd like to share how I make mine and encourage you to give foam grips a try whether you cover them in leather or not. I'm no expert at anything, but this is how I make mine.
Usually I use black elk hide, but this time I'm choosing elk hide tanned in a gold color to match a the seat I recently covered.You can use whatever leather you like so long as it is flexible enough to work with. Leather from an old jacket or leather bag is fine. I used to do a lot of traditional leather work when I worked with children in Indian Education, helping them with traditional crafts. Elk hide was a good leather for making medicine bags, moccasins, mukluks and such as it is both supple and wears well. It is what I'm used to for light leather work. Harness and other "pony ware" requires much heavier leather and different approaches to working with it.
The grips were purchased on ebay for a couple bucks from Hong Kong. They're ugly but work just fine. I made a little paper pattern piece of a size to cover a foam grip, roughly traced it out and cut a pair. A little too big is better than a little too small. You can trim it down more later. Then I apply some contact cement to the suede side of the leather in just the middle part and also to about half the circumference of each grip. Let it set up a few minutes to get tacky and then press leather and grip together. Now it won't slip around on you and you can still stretch it some if needed while stitching them up. By the way, this works nicely on custom knife handles. I liked for mine to have carved wooden handles to fit my hand and then covered the wood with leather stitched as I'll show you. With handle and sheath in the same leather they looked great. I made a lot of knives that way. Anyway, foam grip or hunting knife, the procedure is the same...
(cont.)
SB
Attachments
-
 222.9 KB Views: 119
 -
 286.3 KB Views: 98
 -
 189.8 KB Views: 87
 -
 236.2 KB Views: 122
 -
 192.4 KB Views: 84