

Check with refrigeration people and see were they get there torches from. They have to use silver solder on refrigerators. Just a thought..CurtI was looking at jeweler's torches and some of those are very expensive. Last year I had what was called a "pencil torch" head from Bernzomatic using regular propane tanks and it was pretty good at controlling the flame. Looked just like a regular torch head but was supposed to produce a more controlled pencil flame. It came through the truck fire looking OK, but no longer works. I understand you can use Mapp gas with a regular Bernzomatic sold for propane torches, which I bought one of thinking it would help when I'm trying to go for high heat to bend something. As you say, use what you've got. I have a couple regular old torch heads for general shop use. Good enough for now.
Did you clamp the sections of tank together and then kind of tack it with solder points or just start soldering in a continual bead, removing clamps as you go? I saw in a thread awhile back where someone riveted a tank together and then followed with soldering it up. That would work, but I think yours has a cleaner look. As for my soldering skills... some of those tanks look less than good under the spiffy leather. Soldering a curved surface is kind of tricky. Thanks to your copper tank I stopped wishing I knew how to weld. Copper is good enough and fine for me. Thanks, Bud.
SB
Firebird, Silverbear's Worksman Cruiser
- Thread starter silverbear
- Start date

The origional Raleigh had 27" wheels,the fork I put on is off a older 26" bike it looks just like your Worksman fork. So now that makes the rear brakes to high with the 26" wheel in. And now the bike has a forward rake. ( down hill slant )I could just lower the brake bracket but I have to cut the frame anyway to clear the rear belt drive pully. Right now I am working on a turn table that I can clamp wheels to and turn them to get and cut them in alinment. Also need this to cut the rear pully and fasten it to the 26" rim.....Curt I will dig out and get some pictures later.Curtis,
I hope someone more knowledgeable will step in here and give answers better than mine. What size wheels did the Shaw have? Any idea? What will fit in the frame and front fork you have. I tend to think wider is better, but what do I know? I like balloon tires, the way the look and ride. I'm about 200 pounds.
I'm not sure I understand about the brake calipers, but I'm guessing you need ones with a longer reach, like from a BMX bike. If you email me a photo of your bike I can post it here for you. Sounds like a cool project.
SB
Last edited:
Curt,
That sounds like quite a project you have going.
Good tip on the refrigeration guys. I did get a new and better quality pencil torch from the internet that came yesterday. I see that it actually comes from Harbor Freight. So far I like this a lot for doing small work. We'll see how it works after hours of use. I came with extra tips and a soldering tip, I assume for doing wiring and that sort of thing. I just use the flame and it seems to have pretty fine control. Only tried it for a few minutes, but initially it gets a thumbs up. About fifteen dollars with shipping from Ebay, probably less if you have a Harbor Freight near you. I don't.
SB
Here is a thought. Cut the bar out that goes from the frok to the pedels. and replace it with a pasthrough that should give you more room. Or I have seen some excersize pedel machines that have deep drop V shape that everyone is after. conduit benders work good on that lighter tube. you can get one at a home center. just bend a little at a time and keep the tube stright wile doing.Silverbear, I've been following you and several others on their builds. It is a great help. I have a Worksman frame and thinking about getting started on it. I would like to modify the frame with a drop-loop so I can get an EZM system in it, but I'm having trouble finding someone with a tubing bender. I have a prototype bent up with conduit, but we don't have a bender where I work to do it right. I may stick with the frame and go 2-stroke again similar to the Pirate bike. Keep at it, maybe we can get together in Thurmont when you are down this way again. Dan
Wonderful. I hope it last for you. I have had a small Smith body mans torch for years. and it does all right down to fine soldering. Sure glad I bought some of that stuff when I was makeing money? SB if you find any sowing machine motors in the dump. Save some they must be the ones that unbolt and are a seperate motor. I need one with the speed contral for my turn table. And they are supose to make good generators if you spin them. I haven't tried one yet be fun to try...CurtCurt,
That sounds like quite a project you have going.
Good tip on the refrigeration guys. I did get a new and better quality pencil torch from the internet that came yesterday. I see that it actually comes from Harbor Freight. So far I like this a lot for doing small work. We'll see how it works after hours of use. I came with extra tips and a soldering tip, I assume for doing wiring and that sort of thing. I just use the flame and it seems to have pretty fine control. Only tried it for a few minutes, but initially it gets a thumbs up. About fifteen dollars with shipping from Ebay, probably less if you have a Harbor Freight near you. I don't.
SB
i'm almost embarrassed to show people my tank building "method."
i start out all professional with posterboard to mock up a full size tank, but then...
i just trace out the pieces, cut them out with regular cheap tinsnips, clean up the edges, and then do this bizarre, "house of cards" balancing act, holding pieces down with bricks, tapping them together with a hammer, prying them in different directions with a butter knife...
i just solder a few inches at a time, then re-adjust for the next few inches, until somehow, magically, it resembles a gas tank when i'm done.
i was thinking of making a video, just to show how simple it is, and that it can be done with no professional tools of any kind (everything but the copper sheet is available at ace hardware,) but i don't want to give away all my secrets, and i don't want 20 people telling me "you're doing it wrong..."")
i start out all professional with posterboard to mock up a full size tank, but then...
i just trace out the pieces, cut them out with regular cheap tinsnips, clean up the edges, and then do this bizarre, "house of cards" balancing act, holding pieces down with bricks, tapping them together with a hammer, prying them in different directions with a butter knife...
i just solder a few inches at a time, then re-adjust for the next few inches, until somehow, magically, it resembles a gas tank when i'm done.
i was thinking of making a video, just to show how simple it is, and that it can be done with no professional tools of any kind (everything but the copper sheet is available at ace hardware,) but i don't want to give away all my secrets, and i don't want 20 people telling me "you're doing it wrong..."
Curtis,
I will indeed be on the lookout for sewing machine motors and I know the kind you mean.
Bairdco,
Someone might question your methodology, but the results speaks for itself. Your tanks are awesome and that's a fact.
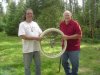
Fasteddy arrived last evening from Vancouver on his way to Prince Edward Island via the states and it has been great fun talking about bikes and sidecars and life in general. We went for a boat tour of Eaglesnest Lake today followed by a swim and shave in the lake at the dock. He brought me a great used Worksman front wheel with a drum brake and I got the new Electra tire mounted on it to see how it looks... nice, I think.
SB
I will indeed be on the lookout for sewing machine motors and I know the kind you mean.
Bairdco,
Someone might question your methodology, but the results speaks for itself. Your tanks are awesome and that's a fact.
Fasteddy arrived last evening from Vancouver on his way to Prince Edward Island via the states and it has been great fun talking about bikes and sidecars and life in general. We went for a boat tour of Eaglesnest Lake today followed by a swim and shave in the lake at the dock. He brought me a great used Worksman front wheel with a drum brake and I got the new Electra tire mounted on it to see how it looks... nice, I think.
SB
Attachments
-
 265.1 KB Views: 177
silverbear no problem was hoping someone would get some ideas or inspiration from the pics.They really make me wish i had a worksman frame. I love those sexy little tanks on the shaw bikes and the ones sportscarpat builds. Looks as if your always making progress on your build Ilove it especially the heat o meter gauge thats awesome!!!! Maybe the sun shining on the aluminum sidecar will make it work l.o.l I agree i love those rear drop stands on bikes.Have you or anyone on here ridden a MB with a suicide clutch? [belt tensioner] was wondering how that worked out.Saw a 40s model western flyer at a flea market for sale vgc springer front end frame was different then ones ive seen before.had the two smaller bars at the top an one larger one below that the rack was made to look like it connected to the smaller bars on the frame they want 250 for it dont kno wat its worth but its out of my price range he he would love to have it will try to get a pic of it.
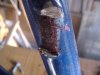
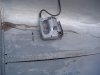
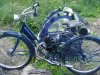
The chain guard mounts have been cut off with a hacksaw and then were ground down with a grinding bit chucked in a 3/8" drill. Takes awhile to grind things down smooth, but after these photos were taken the deed is done/. I did not remove a rearmost chain guard mount which does not interfere with motor mounting thinking there might be a chain guard from something else mounted later on if there's room. If not then I'll cut that one off too. Next is to mock up the motor placement to be sure there is room and then repaint the frame. Getting closer...
SB
SB
Attachments
-
 229.4 KB Views: 131
 -
 208.7 KB Views: 125
 -
 190.1 KB Views: 134
SIDECAR PROJECT
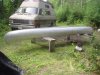
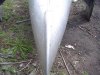
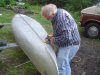
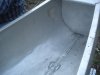
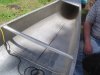
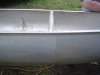
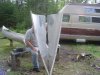
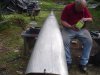
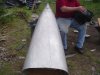
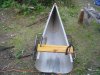
Since Fasteddy of sidecar fame is visiting from Vancouver on his way to Prince Edward Island on the east coast, I'm taking advantage of his expertise in figuring out how to convert a section of aluminum canoe into a sidecar body... my crazy idea and not his, but he's willing to help me with making it work. First we decided how long to make it and it will be a about six inches shorter than the Worksman which will be just about six feet long with the fenders in place. The sidecar will be just shy of that at around 5 and a half feet from bow to stern. The cutoff point is just behind the front seat where there is a supporting rib deal at the floor. I wanted to draw in what will now be the stern of the cut off canoe so that it is less wide. At the cutoff point it measures 30" wide gunnel to gunnel (I'm not spelling that right ,but you know what I mean.) That is too wide. Fasteddy's sidecar is 24" wide and he now wishes he had made it 20" wide, so that is what we will shoot for with the canoe. A normal chair seat is 18" wide, so this is a bit more than that. You can see in the third photo a black line nest to the floor rib running sid to side... that is the cutoff point just behind the front seat and in from of the floor rib and the thwart running from side to side above.
But first things first...
(cont.)
Attachments
-
 263.3 KB Views: 90
 -
 248.8 KB Views: 87
 -
 263.5 KB Views: 89
 -
 273.7 KB Views: 83
 -
 237.9 KB Views: 84
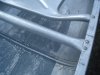
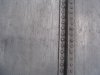
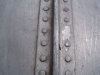
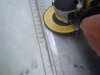
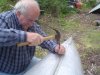
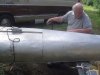
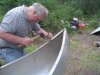
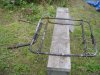
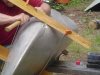
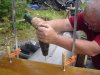
Steve's plan was to remove the rivets along the bottom of the canoe by grinding down the rivets flush to the keel piece and then driving the rivets through in order to free up each side panel which could then be cut down so that at the stern it would measure 20" in beam from the original 30". First I tried using a grinding bit in the drill. Slow going, so we turned to a 4 1/2" angle grinder which is the right tool for this job and much faster.
Fasteddy (Steve) ground a section down and then punched the rivet through with hammer and a nail set (couldn't find my metal punch). We place a round of firewood underneath to keep the keel piece from flexing too much. Those rivets don't want to come out and were designed to be water tight. Tight they are, but grind down enough and whack it with the punch and hammer and it will go.
(cont)
Attachments
-
 226.9 KB Views: 80
 -
 244 KB Views: 105
 -
 246.9 KB Views: 91
 -
 251.6 KB Views: 109
 -
 196.2 KB Views: 87
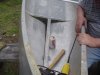
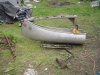
One by one Steve punched rivets through while I worked on the bike part of the project, grinding down the chain guard mounts for the Worksman. He punched rivets out from the bow piece to the point where the beam measured 20" and stopped. At that point he used a hacksaw to carefully cut through the keel piece from side to side at the bow and at the 20" mark. That piece is now removed. From the 20" point back to the spot where the new stern will be cut Steve will use a jigsaw with a metal cutting blade to cut along each wide of the keel. Once that is cut the sidecar will be cut loose from the rest of the canoe. But that will be tomorrow and we will go from there. The loose plan, subject to change as we go along, is to remove the seat which will not be used, to overlap the two side pieces of aluminum to get the shape we want and then rivet the two sections together. At least we think that is what we're going to do. By the time we're done we'll either know how to do it or how not to, but I think we're on the right track. The stern piece will be cut from 1/2" or 3/4" plywood depending on what I have already. The side pieces will get screwed into the edges of the plywood and then a section of aluminum from the mid section will be cut out to cover the plywood from the outside. While I work on the bike tomorrow as Steve works on the sidecar, I'll be thinking about what I have that I can use to make a little windscreen and how to fashion a seat, how to mount that "Indian" speedometer, how to mount a bow and stern light. By end of the day tomorrow we should see substantial progress and it is exciting. Steve is staying in his camper rig shown in the background of some of the pictures, right next to the sidecar. Moosh will awaken him when I let her out of my trailer in the morning to let him know my coffee is making and his tea water is hot.... and that it is time to start playing with our projects after some bacon and eggs. The Lone Ranger and Tonto are having fun. More pictures tomorrow when the canoe should look more like a sidecar and we can start thinking about the framework to go under it.
SB
SB
Attachments
-
 221.3 KB Views: 81
 -
 237.1 KB Views: 96
 -
 227.5 KB Views: 100
 -
 225.3 KB Views: 87
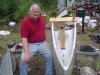
NEW HEAD BADGE
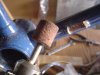
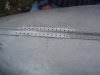
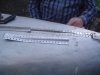
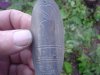
Today I removed the Worksman head badge which I really do not like... for one it is glued on to the frame. For a company that makes such great frames and fantastic wheels which say QUALITY in capital letters to have a badge wihch says www. on it and then is glued to the frame is cheezy. I pried it off, cleaned up the glue and then placed JeezusJonz Indian replica badge in it's place... oh yes.
The badge comes flat and to get get the right curve i first placed it on the head tube and pushed. This gave some curve, but not enough, so placing it on the cross bar and forming it against that made the curve just right for the head tube. Can't get over how good that looks. Now I need to drill holes for tiny screws to hold it in place one the bike has been repainted. Much improved...
SB
Attachments
-
 221.7 KB Views: 99
 -
 220 KB Views: 128
 -
 211.2 KB Views: 115
 -
 178.5 KB Views: 93
 -
 218.2 KB Views: 120
SIDECAR PROGRESS
Steve got a lot done on the sidecar today while I did some engine fitting, removed the head badge and did some work on the bike shop. I also acted as gopher for Steve and took some photos as he worked. He picked up from where we left off yesterday by cutting along each side of the keel plate using a jigsaw with a metal cutting blade. He also removed the cover for the flotation chamber at the bow and pulled out the Styrofoam inside. He removed the bow "deck" piece and punched out the rivets which held it in place, wanting the canoe to be able to flex once we pull it in at the stern. Steve cut from gunnel to gunnel (side to side) with the little saw.
(cont.)
Attachments
-
 241.4 KB Views: 89
 -
 244.9 KB Views: 77
 -
 235.3 KB Views: 86
 -
 244.6 KB Views: 92
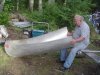
Following the floor support rib running side to side behind the front seat (since removed) and in front of the thwart (don't need to remove), Steve cut along side it all the way up to the gunnel on each side using the little jig saw. The thicker gunnel itself was cut with a hacksaw on each side and now the sidecar section was free from the rest of the canoe. You can see where the keel has been removed from the point where the beam was 20" (side to side measurement) back to the new stern end. We tried overlapping the side pieces to draw the wider part of the canoe in to 20" and were relieved to find there is very little pinching at the bow end where the sides were not cut. So, it is going to work. I had envisioned using the original little bow "deck" and Steve, the retired furniture maker and antiques restorer saw a mahogany plywood deck stretching back a bit more with mahogany also facing the stern piece. I will defer to his judgment on this since if there is anyone who can carry this off it is Steve. If I want a more bare bones look on the second sidecar, then I can do that one in just aluminum, but I have no doubt this little sidecar is going to look better than I had imagined it might. Tomorrow we'll draw the sides in and perhaps get the stern plywood in place, rivet the two overlapping sides together and should have a much better picture of what this is going to look like. So far there is ten dollars invested in this sidecar (20 dollars for the canoe divided in half) I'm thinking about investing in a couple of Indian motorcycle decals for the sides of the bow which would have originally gone on each side of a motorcycle's gas tank. Not sure, though as I don't want to overdo it. While I like the old Indian motorcycles I am also interested in all things Indian as you may imagine... so there's that. I'm trying to envision the little dashboard for the "Indian" speedometer and how to make the seat... upholster it in elk hide or Naugahyde? Leather is less practical, but so much nicer. We found a couple of aluminum curved channels which came out of my brother's old Airstream travel trailer and are thinking we can use that for the framework at the bottom of the little windscreen. I'm thinking I may paint letters in the same Indian logo script on the stern where people name their boats and yachts and such... either Anishanaabii (Ojibwa for Indian or "original people" or maybe Aaniimoosh for my little Moosh the wonder dog who will be the main passenger of this little sidecar. Steve thinks he can pound out some of the dents to make it better and clean up the aluminum some, but of course there are lots of scratches and dings making it look pretty old.
Long day.
SB
Long day.
SB
Attachments
-
 242.6 KB Views: 78
 -
 222.1 KB Views: 82
 -
 264.1 KB Views: 92
 -
 237.1 KB Views: 98
SIDECAR UPDATE
We made some great progress today on the sidecar. Some of you may recall a first sidecar attempt of mine this past spring when I converted a kiddie trailer I had found at the dump last summer into a sidecar. When I first saw the trailer looking pretty much new, but minus wheels I saw a sidecar. It was constructed differently from the one I had for Moosh and came originally with 20" wheels. I fumbled my way through that sidecar "build" if you want to call it that and liked the results... lightweight and within budget. I never got a chance to use it since I was waiting for automatic clutch parts and then it was time to come home... packed it up along with the bikes and then the truck burned.
So, I still had the frame with some plastic and oily soot all over it and figured I could use it again with a little different mounting setup for this canoe sidecar. One thing I like about it is that the frame is pretty strong, the attachment arm (which has been reversed) attaches to the rear axle easily taking care of half the attachment to the bike and the way the wheel is mounted I could move the axle mounts forward and back allowing some adjustment for where to place the wheel and also allowing for different wheel sizes... 20, 24 or even 26 inch. Since I may end up using a 26" wheel with a built in electric pancake motor this frame gives me a lot of flexibility. Also it is already there saving much time and some money. It was free in the first place and the investment remains the same, much in keeping with ten dollars worth of canoe/sidecar body. So I spent a couple of hours cleaning it up with a wire wheel attachment on the electric drill. Dirty work requiring a swim with a bar of soap at end of day.
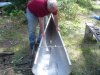
While I cleaned up the salvaged frame Steve got back to work on the sidecar with occasional help from me. First we put a rope with a loop in it around the body. I forced it together so that the stern was 20" from side to side and Steve cinched it down. Then we placed a board with two C clamps to hold it at that width and also to assure that the gunnels were even and level.
(cont.)
We made some great progress today on the sidecar. Some of you may recall a first sidecar attempt of mine this past spring when I converted a kiddie trailer I had found at the dump last summer into a sidecar. When I first saw the trailer looking pretty much new, but minus wheels I saw a sidecar. It was constructed differently from the one I had for Moosh and came originally with 20" wheels. I fumbled my way through that sidecar "build" if you want to call it that and liked the results... lightweight and within budget. I never got a chance to use it since I was waiting for automatic clutch parts and then it was time to come home... packed it up along with the bikes and then the truck burned.
So, I still had the frame with some plastic and oily soot all over it and figured I could use it again with a little different mounting setup for this canoe sidecar. One thing I like about it is that the frame is pretty strong, the attachment arm (which has been reversed) attaches to the rear axle easily taking care of half the attachment to the bike and the way the wheel is mounted I could move the axle mounts forward and back allowing some adjustment for where to place the wheel and also allowing for different wheel sizes... 20, 24 or even 26 inch. Since I may end up using a 26" wheel with a built in electric pancake motor this frame gives me a lot of flexibility. Also it is already there saving much time and some money. It was free in the first place and the investment remains the same, much in keeping with ten dollars worth of canoe/sidecar body. So I spent a couple of hours cleaning it up with a wire wheel attachment on the electric drill. Dirty work requiring a swim with a bar of soap at end of day.
While I cleaned up the salvaged frame Steve got back to work on the sidecar with occasional help from me. First we put a rope with a loop in it around the body. I forced it together so that the stern was 20" from side to side and Steve cinched it down. Then we placed a board with two C clamps to hold it at that width and also to assure that the gunnels were even and level.
(cont.)
Attachments
-
 297.1 KB Views: 146
 -
 282.7 KB Views: 136
 -
 265.5 KB Views: 92
 -
 263.6 KB Views: 97
 -
 244.3 KB Views: 119
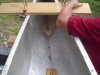
I should have pointed out that we clamped the overlapping sides at the stern end which I believe is shown in the last photo of the previous post. Now we used two long furniture clamps with a board above and another under the canoe at the bow end. This was again to keep things level and also to draw up the overlapping sides at the bow end where it wanted to bind up. Also in the earlier photos you will see where Steve "relieved" the bind by cutting a V into it there on each side. Anyway, now we started drilling and after three or four holes followed up with pop rivets. Then move the clamping boards down a few inches and drill another set of holes, pop rivet and proceed to the stern. It was starting to look like the sidecar I had imagined when I first got this notion in my head that a canoe could be made into a sidecar body. It took putting two heads together in collaboration to figure out how to do that. Steve put his knowledge of furniture making to good purpose in this project. Without his ideas I'd still be scratching my head and staring at it.
(cont)
(cont)
Attachments
-
 256.9 KB Views: 88
 -
 253 KB Views: 82
 -
 252.1 KB Views: 77
 -
 255.1 KB Views: 79
The sidecar now had some rigidity and was taking a more final shape. We followed up with drilling along the other side half of the overlapping sides, more widely spaced since it was mostly to tack things down and tidy up. We laid it out on the frame and figure it is going to work fine. Next in line later today after I go back to bed when this post is done... get up again in a couple of hours to make coffee for me and tea for Steve along with a breakfast of fresh walleye from my brother, bacon and eggs and toast. Ummm. Life in the forest is good! Then comes a new day of work. I'll finish up the frame cleaning and give it coats of primer and then black paint as the day progresses and each coat dries. Steve will focus on cutting a piece of scrap 3/4" plywood for the stern piece, screwing the aluminum sidecar body to it... then trimming off whatever excess is sticking out beyond the stern piece. Then we'll go back to the cut up canoe to remove a section of aluminum and gunnel to cover the plywood from the back and to make a matching stern cap to bolt to the ends of the gunnels. This will lock it all up both structurally and visually. We have scrapped the idea of any wooden decking and will instead use the original little bow 'deck' which we removed before so that the sides of the canoe could be drawn together. Now that the canoe section is smaller the deck piece looks bigger and better. So we will do a little cutting, put it in place again, drill new holes and pop rivet it into place. The edges will stick out over the edges of the canoe so we will have scribed it and cut off the excess before the final pop riveting. We'll make the seat frame so that it goes right up against the stern and later on I will upholster it in panels of elk hide. Treated with snow seal it should repel water and stay supple. So, black frame and black upholstery will tie it in visually with the black engine, seat, harness leather tank and lights on the Worksman... should look sweet. I guess eventually I will need to order another cream colored Electra tire or it will look a little odd mismatched. I will make a fender for the sidecar wheel using a balloon tire fender with canoe aluminum pop riveted to the inside edge of the fender to keep little fingers or a doggy snoot out of the spokes. Paint the fender black to match the black fenders on the Worksman... and then about all that is left is to mount the "Indian" speedometer under the deck in a little aluminum dashboard. Some gray indoor outdoor carpet for the floor I have leftover in the bike shop and finally a NOS water decal for the stern from a 1948 Indian Scout motorcycle... just black script saying "Indian". No big Indian in war bonnet at the bow... keep it simple and kind of understated. Don't know yet about a bow and stern light and may just have a "flag" at the stern made from an old section of fishing rod with some raven feathers tied to it at the top. All this is subject to change at any time, but I think this is it. That dog is going to look real sharp sitting there in her canoe... have to finish up the new black harness leather collar I made for her with turquoise stones and silver dollar "name tag". Goggles and a leather helmet for me and a pair of cool doggles for her... unhuh... yeah... we cool... eat your heart out Harley boys!
SB
SB
Attachments
-
 240.8 KB Views: 66
 -
 254.3 KB Views: 68
 -
 288.1 KB Views: 70
 -
 271.8 KB Views: 82
"doggles?" did you make that up?
looks really cool so far, sb. plus, i dig the whole theme. sounds like you guys are out there living on the land, yet at the same time, constructing some infernal machine...
looks really cool so far, sb. plus, i dig the whole theme. sounds like you guys are out there living on the land, yet at the same time, constructing some infernal machine...