Vintage looking board track racer project

GoldenMotor.com

davidberg

New Member
Dec 22, 2012
34
0
0
Hungary
Hi!

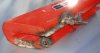
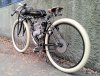
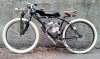
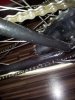
This is a project I started about half a year ago. I've been so long fascinated about board track racers and early motorcycles and started to look around to have one. Then I realized the prices and the conditions of these bikes (not to mention shipping prices: I live in Hungary therefore not so many Indians or Harleys running around...), and decided to build one.
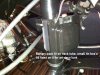
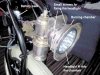
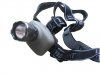
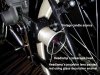
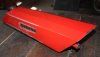
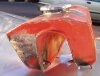
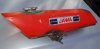
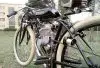
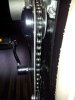
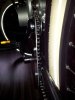
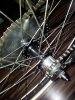
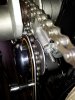
She's basically a beach cruiser frame (heavily modified, first of all I had to learn how to weld) with a Chinagirl engine, a modified moped gas tank and many small parts just to look antique (eg. a carbide lamp retrofitted to LED front lights) and so on. It took me 5 months to complete, comments about it would be more than welcome!

Regards,
David
 

Attachments

Russell

Well-Known Member
Apr 19, 2009
1,276
155
63
MA
Great looking build!
The chain routing looks interesting. Please post more details.
 

davidberg

New Member
Dec 22, 2012
34
0
0
Hungary
Thank you for your kind words!

So, get down to details:

About the front forks:
I had two options for the front forks: springer or leafspring (like on the Indian Scout). The springer forks you can get here in Europe at the shops are made in China and frankly, there's much room for improvement of quality... thin tubes, rude (if not dangereous) welded joints and so on... After a couple of rides in the streets of Budapest without front suspension proved that the Fat Frank tyres makes it a smooth ride so it doesn't really matter whether I do have shock-absorbers or not so I decided to go for the looks.
I got a chinese springer fork and connected the main tubes flipped inside out to the springer mechanism. It looked so bold I decided to leave it as is (you can see the brake pins on the flipped forks). In the future I think I'll make a leafspring fork out of scratch, but now it's adequate for street use (even the Indian 1908 Twin Racer didn't have front suspension either :)

The chain mechanism is made out of necessity. To begin with, I had a big and fat Shimano coaster rear brake came with the bike. Soon I realized the rear sprocket won't fit on it, so I bought a sprocket made for a disc brake hub. I removed the cassette from the hub, converted it to single speed with washers and fit the sprocket to the disc brake console. Because this hub is way more wider than the original coaster hub, I had to expand the rear forks. You can see on the attached photo the sprocket is so close to the rear forks that speaking about chain clearance would more than ridicoulus... It now works without the stock chain tensioner, so to manage the chain route, I decided to make the clearance on the front. There are two motorcycle handlebar raisers fixed on the seat tube below the motor mount, each one have a Shimano bearing derailleur roller with handmade washers for guiding the chain I made using two sets. It runs quietly and smooth with a nice cover plate to look vintage! And yes, I use a bicycle bell cap as a screw cap!

From the start I wanted to make it street legal, that's why I have front and rear lights - the front one is an old Cicca carbide lamp from 1922 housing a 18 power LED reflector, and for the rear one I used a trekking head lamp slipped inside a vintage candle sconce and replaced the white led with a red one.
 

Attachments

chainmaker

Well-Known Member
Jan 19, 2010
2,634
69
48
Ma USA
Really nice looking bike. If you flip the seat innerds you should be able to get that seat a couple inches lower.
 

Russell

Well-Known Member
Apr 19, 2009
1,276
155
63
MA
Thanks for the drive details. Are the pinstripes and lettering custom decals or hand painted?

What are the laws over there regarding motorized bicycles?
 

davidberg

New Member
Dec 22, 2012
34
0
0
Hungary
Thanks for the drive details. Are the pinstripes and lettering custom decals or hand painted?

What are the laws over there regarding motorized bicycles?
Since I don't have that manual skills to paint them without blurry, shaky lines ;) they are decals made from MacTac special calendered vinyl films that guaranteed to last 5 years without fading and color loss. It's a special film engineered to car marking (since my gas tank's paint is a glossy car polish made by a car body shop).

The laws in Hungary states that if you ride a vehicle which is either human or engine powered and if your displacement doesn't exceed 50ccm (or your output power doesn't exceed 350W) it is considered you are riding a moped, thus the followings must be present on your ride:
  • white front and red rear lights
  • orange prism (2 in both sides)
  • bell or horn
  • must wear a helmet
  • outside city area must wear a high visibility coat
  • have to have an insurance (costs about $45 for a year)

Note that it doesn't require a license plate, and your "documents" will be your invoice for the engine (a proof that it's yours, not stolen). Here in Hungary 50ccm mopeds are relatively common (mostly brand new scooters as well as old 50ccm motorbikes from the seventies and eighties made by Jawa, Simson and so on). While electric bikes and scooters tends to be fashionable among rural senior people they falls to the same category as mopeds. Only restriction for motored vehicles: you are not allowed to drive a quad in public roads...
 

Ludwig II

Well-Known Member
Jul 17, 2012
5,071
783
113
UK
We have 2 levels of moped in Britain. The "normal" type is 50cc, 28 mph (?kph). Lights, horn, licence, insurance and proper brakes and rated tyres. The other is 1kw, 16mph/25kph. Lights, horn, good quality and condition tyres, but bicycle brakes ok. This is basically a slot in the laws for a power assisted bicycle, which is what I will be building.

Not forgetting compulsory helmets, but no requirement yet for radioactive glowing clothes.
 

truckd

Well-Known Member
Oct 19, 2010
2,837
134
63
palmdale calif
Can you give us all more information and or details of how you converted the carbide to L.E.D. ?
 
Last edited:

jimmymc2286

New Member
Nov 26, 2012
124
0
0
Indiana
I bought an old bike lamp for my vintage build. I would be very interested in how you converted yous to LED also. If you havve pictures and details please post them for us.
 

silverbear

The Boy Who Never Grew Up
Jul 9, 2009
8,325
670
113
northeastern Minnesota
I can see that your bike is a labor of love. A lot of sitting and staring went into that build as the results show that. It is different and thus has an authentic look to it. Very pleasing to look at. The gas tank is a real plus. What is it from? And welcome to the forum!
SB
 

Indianfan

New Member
May 31, 2012
20
0
0
Hungary
Szia!

Örülök, hogy más is épít ilyen motor(kerékpárt) Magyarországon. Már azt hittem egyedül vagyok. Jelenleg egy Indian klónon dolgozom, csak a váz nem akar összejönni. Gondolom nem kell ecsetelni az itteni vállalkozók hozzáállását.... Ha gondolod keress meg, Pest mellett lakom.

I got excited and sent this message to Davidberg. Here is the translation:

I am happy that someone else is building such motor(bikes) in Hungary.
I thought I am alone. Right now I am working on an Indian clone, I am just struggling with the frame. You know the tradesmen's attitude... If you feel like, drop me a line, I live just outside Pest.


Wish everyone Merry Christmas and a Happy New Year!

Indianfan
 
Last edited:

davidberg

New Member
Dec 22, 2012
34
0
0
Hungary
Thank you guys for the kind words, yes it was a process of constant thinking, tinkering and trial and error with numerous materials and methods of applying them... a

long lasting loving process...

So, the LED lights (see attached photos):

FRONT LIGHT:

1. Got an 1922 Cicca bicycle carbide lamp from a flea market in surprisingly good condition with all the details intact.

2. Disassembled the whole lamp to pieces and submerged them in a solution of 1/2 water and 1/2 ammonia for 2 hours, dried and rubbed every part with alcohol-free glass cleaner 'till shiny.

3. Now the hard part: spent 1 week looking for an appropriate LED light. After checking numerous online shops without luck, went to the local China Mart, especially to a shop that sells household appliances from obscure sources (I mean don't try to buy a toaster there -- they sell stuff made for chinese inland market, therefore the quality is awful... :D) Found a shop has tremendous amount of flashlights, and -- with a measure tape -- checked every item that might fit into the carabide lamp's head (I was more than suspicious for the shop owner now :)

4. Luckily found a head lamp that slips comfortably into the lamp's head - bought 3 of them for $6 (business of the century :DD, the shop owner thought that I'd might be an official from the Consumer Protection Authority Board, their worst nightmare...)

5. Took the glass out from the lamp head, and separated the LED lamp's reflector from the battery pack. Disassembled the reflector (consists of: plastic bowl, plexiglass, chromed plastic LED holder, wires) and glued the reflector's back bowl into the lamp's burner chamber with silicone based adhesive you normally use in sealing bathroom fittings. I used this kind of glue because it can be removed from metal surfaces without traces -- this is important if you'd like to convert the carbide lamp back to original condition. Note that this glue doesn't hold the lamp - it is just for securing it in place and to fill out empty space inside the lamp's burner chamber!

6. Rewired the LED light (still in parts!), closed the carbide lamp head rim and carefully screwed the LED lamps' LED holder and end rim on the LED reflector. Finally secured the reflector inside the lamp's burner chamber with small instrument screws through the carbide lamp's went holes.

7. Attached the separated battery pack to the bike's neck tube and fixed the newly installed wires in it.


REAR LIGHT:

1. Got a power LED telescopic headlamp from the China Mart described earlier, took it apart.

2. Replaced the 5W white LED with a Cree 5W red power led bought from a microelectronic shop.

3. Bought an antique nickel plated candle sconce from a flea market, cut out the bottom plate of the sconce to make a cone shape, painted the inner surface to glossy black.

4. Fixed the preparated cone on the headlamp's telescopic tube with Loctite SuperGel (high-performance power adhesive, water and heatproof).

5. Drilled 2 small holes on the side of the batter pack for mounting screws, painted the whole battery pack to glossy red. Applied small scrathes in the paint for vintage look :)

6. Attached to the bike's factory dynamo post with small screws and spacers.
 

Attachments

davidberg

New Member
Dec 22, 2012
34
0
0
Hungary
The gas tank is a real plus. What is it from?
SB
The gas tank originally was a part of a small 50ccm moped made in the Checz Republic in the eighties. It's called Babetta and you can read more about it here: en.wikipedia.org/wiki/Babetta

Originally the gas tank was built in 45 degrees, thus the petcock was at the bottom plate and the gas cap was at the front plate. As you can see at the photos I brazed them for horizontal use. It has fitting snugs below the tank by factory so I used them to rig onto the lower bars of the frame. The tank is sealed inside and painted using glossy car polish made by a car body shop. It has the original Czech "Jikow" petcock, and -- because the horizontal position -- has a flow-through connection at the bottom. It can hold approx. 1.3 gallon fuel.

I used this tank because it resembles to original board track racers' tanks, I haven't got the courage yet to build one from scratch...
 

Attachments

davidberg

New Member
Dec 22, 2012
34
0
0
Hungary
Szia!

Right now I am working on an Indian clone, I am just struggling with the frame. You know the tradesmen's attitude...
Hi!

If you're working on an Indian Clone, it is advised to get a donor frame, it depends on what kind of Indian do you want to clone:

- If you're into the 1908 Twin Racer, get a diamond MTB frame, that needs only a little stretching (optional).
- From 1910 Indian started to use the drop-loop frame, for that the best you can get is a Worksman frame. You'll need to cut it apart and make the loop for yourself (or get somebody who can bend bike pipes and know how to weld).
- If your opt is the latter Indian Scout or Chief, a single bike frame won't be enough. Try to find an used bobber bike you can modify to look like an Indian.


Tips & Tricks:

- For an Indian (apart from the Single Racer) you might make an engine look like a V-twin. Problem is there's no real 50ccm v-twins around, next you can get is a Lifan 250ccm but it's not easy to get. Best result is to get an 50ccm Chinagirl AND a same one in non-working condition. If you take the cylinder and the cylinder head out from the dead one, put a spark plug and a plug wire on it, and fix it beside the cylinder of the working engine 30 degrees, it will look as a V-twin. In this case you have to lengthen the carburetor's pipe through the non-working cylinder's exhaust port to the carburetor's intake manifold. Then get a moderate sized car clutch assy, cut out a rectangular shape from it and slip the modified engine into it. At the end it will look like a serious, beefy V-Twin that ruled the board track way back then:) ...ok, without the sound. And yes, it means extra weight to the bike.

- If you spray the empty engine block with thin oil film, flame it and let it burn for 1-2 minutes and extinguish, your engine will look like a barn find (BE EXTREMELY CAREFUL!!).

- You can use brass plumbing fittings as a gas tank cap, many of them look sooo vintage.

- Simplest way to make a laid-back seatpost is to take an MTB handlebar stem, cut the handlebar hole, and slide into the seat tube.
 

silverbear

The Boy Who Never Grew Up
Jul 9, 2009
8,325
670
113
northeastern Minnesota
David,
The lamp turned out well and I like that you can return it to being what it once was. But what really rings my bells is how you looked at that old moped tank, gave it a good long stare and saw in your mind's eye what it could be by making some changes. This should give other builders some ideas since lots of mopeds from the seventies and eighties had similar tanks. I had one from a Tomas that I tossed when I cannibalized the moped for other parts. I lacked creative vision, but you didn't. Well done, sir!
SB
 

silverbear

The Boy Who Never Grew Up
Jul 9, 2009
8,325
670
113
northeastern Minnesota
Indianfan,
Welcome to the forum. You guys have to promise to use English. For a minute there I thought somebody put something in my coffee... couldn't unscramble the letters! Ha! Cool that there are two members in Hungary. But now you have thousands of brothers in the wind through this forum. We are the richer for you guys being here. Welcome, indeed.
SB
 

davidberg

New Member
Dec 22, 2012
34
0
0
Hungary
David,
The lamp turned out well and I like that you can return it to being what it once was. But what really rings my bells is how you looked at that old moped tank, gave it a good long stare and saw in your mind's eye what it could be by making some changes. This should give other builders some ideas since lots of mopeds from the seventies and eighties had similar tanks. I had one from a Tomas that I tossed when I cannibalized the moped for other parts. I lacked creative vision, but you didn't. Well done, sir!
SB
Thanks, to tell the truth, when I purchased the frame, in my head it completely looked like the same as now... Cream tires, engine, gas tank, handlebars, lights, etc. Just like you see a photo in a magazine. All I had to do is find the parts that corresponds to the image in my head... I work as web designer so visuall creativity is a must for me everyday...