WMD's Onex 29er build

GoldenMotor.com
Jun 2, 2014
19
0
0
Springfield, IL
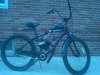
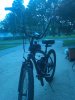
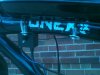
I bought this a couple years ago with the intent of motorizing it, now I’m finally getting around to it.
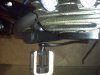
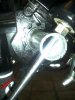
Calling it the BBB, (big black beauty!) This will be my 3rd build, and a premium one at that. I can’t believe I spent so much on parts. I’ve probably got a couple more trips to the hardware store as well. The motor I got from an ebay seller “bicycle_motor_works”, advertised as the “2014, much faster” model. We shall see about that.
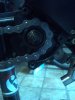
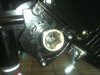
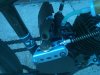
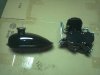
I can say one thing though, the finish/paint on this is the best I’ve seen. It came with a black muffler too, welded, no pesky screws that fall out.

dance1
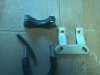
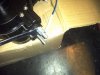
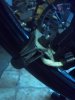
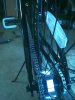
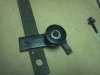
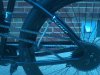
Now lets mock it up and see how everything fits!
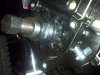
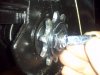
 

Attachments

Jun 2, 2014
19
0
0
Springfield, IL
Got this heavy duty front mount ($15, supposed to be specifically for the Onex 29er) and a few other parts from ebay seller “sunmotorparts”.
When removing the studs for the front mount, thread your nuts down close to the base of the stud, lessens the chance of breaking them if they're in there good, no problems here.
Now some will say ditch the rubber, but this is an aluminum frame so I don’t want a pinch point that may start a crack, and it may dampen some (probably not much) vibration. BTW, that’s 5/16” fuel line and some small vacuum line that I cut a slit in for the clamp part of the U-bolt. The rear is a solid, perfect fit, no rubber there.
 

Attachments

Jun 2, 2014
19
0
0
Springfield, IL
The good news, the muffler clears! (barely), I have good chain alignment, Manic Mechanic sprocket adaptors are awesome! This is my first time using one. I've read elsewhere that you torque them to 25 ft lbs. Someone correct me if I'm wrong. Also keep in mind the allen bolts are SAE, not metric.

The bad news. The drive spocket cover/clutch arm housing had a screw butched in there bad, I ended up stripping the head and had to drill it out. Should have used the hand impact driver first. Found some socket head screws that will look real nice, just need to find the 6x50mm one for the top right (the longer one that holds the chain guard).

Other bad news, Drive sprocket is binding, chain is riding up on it and then not letting go, gonna have to remove it and grind on it for a better fit.
More on that next time.
 

Attachments

Master-shake

New Member
Feb 24, 2013
315
0
0
texas
What are you gonna do about the front brakes?

I'm currently on the rebuild of one of my bikes like that. We should chat about these bikes. Do you have any other 29ers motorized? I notice in heavy winds I can only go about 24mph on my onex. Its top speed is 34 with no wind on a flat road. I need more power it think cause a gust of wind makes me lose a lot of speed rather quickly and surely that can't be safe if a car is behind me.
 
Jun 2, 2014
19
0
0
Springfield, IL
Master Shake! Awesome, Meatwad and Fryloc with ya? Love that!
I got a brake set off Amazon: Tektro - C326 Caliper Brake Pair, They're big enough to clear the fender and go around the tires. Problem is the rear center bolt is too short, seller is working on sending me a longer bolt.
This is my 3rd build and 1st 29er. I have no idea how fast it will go, that's a 40 tooth MM sprocket, which should be faster than the stock 44, but I'm not sure how the 29 inch tires affect the top speed. If it goes at least 30 I'll be happy.
 

Master-shake

New Member
Feb 24, 2013
315
0
0
texas
The tires affect everything. Have you thought about the tires? The ones that come stock for those bikes are pretty bad. I went with some schwalbe big apple tires. Having better tires actually improved my top speed by about 5 mph. The ride is also a bit less scary.
 
Jun 2, 2014
19
0
0
Springfield, IL
I probably will get new tires, but for now I need to get the thing up and running first.
Latest progress....Binding sprocket solved. Find a 19mm socket with thin enough walls to get over that big nut without tearing up the inner threads on the drive gear (ur gonna need those threads for the puller)
Some kits come with a double ended spark plug tool, (pictured) but that's pretty flimsy so I'm not sure how it'd work, share your success stories! Now there's various ways to hold the sprocket while you're torquing at that nut, you'll find the solutions listed elsewhere on the forum, my solution... Air impact driver! Came off in about 2 seconds with it set on it's lowest setting, put back on on setting 2 of 4.
Not sure what the pictured dremel bit is called (came with a kit I bought 15 years ago) It's green and is made of some sort of stone-like material. I wore it down to a nub with one trip around the sprocket, grinding the paint off but not doing much else for the chain fitting correctly. Then it was time to get a little more aggressive....can you say "Bench Grinder"?!
Oh yeah! A half second touch to each tooth and a little buzz to the shoulders and BINGO! Chain runs smoothly.
Remember to remove the clutch pin (pic of my lily white hand holding it), and there's a little ball behind that, BEFORE you put the puller on! I forgot this and it went flying across the garage after the gear came off.
Next topic, my version of the spring loaded chain tensioner!
dance1
 

Attachments

Jun 2, 2014
19
0
0
Springfield, IL
Ahhhh, the freaking chain tensioner! After having lots of trouble with stock tensioners I went for a spring design. Finding the proper spring is a challenge though. I took a fishing scale with me (the zebco fisherman's "de-liar") to the hardware store and figured 5lbs of force to move the spring should be enough, nope! When installed on the bike that spring didn't move with any less than 10lbs. So I went with a smaller spring. Then the whole thing fell apart on the maiden voyage! Should have got that locknut for the pivot arm. So, at least the Onex has almost square chainstays, so it's holding the stock tensioner just fine, lesson learned!
 

Attachments

Jun 2, 2014
19
0
0
Springfield, IL
Progress! Tank mount studs, way too short. I used m5 coupling nuts and m5x10mm screws. Good luck finding the coupling nuts, most hardware stores only go down to m6, found these at Menard's @ 79c apiece. Same for the CDI box, bolts too short, just ziptied it on there for now. Saw others mount the CDI to the seatpost, I may do that as I'm gonna run a key switch behind the seatpost anyway.
So she's together and runs, I did the clutch mod, got some apehangers. Still need to to the aforementioned key switch and solder and shrink wrap the wiring, do some more painting, loose the white chain and pedals, hmmmm, what else? Oh yeah, I got a "screw your engine kit" from "bikebobber", very nice kit, in black of course! Almost there! More to come.
 

Attachments

Speedfreak241

New Member
Jun 22, 2014
21
0
0
Florida
Looks good I was going to do an onex cruiser build but I chickened out because I didn't feel like doing a lot of work. Looks like your making good progress on this build. On the speed part with the 29" tires you should get 30 with the 40tooth sprocket. I have the 44 on my huffy millenial and I'm on my first tank and it's going 23.