American Deluxe hybrid trike

GoldenMotor.com

silverbear

The Boy Who Never Grew Up
Jul 9, 2009
8,325
670
113
northeastern Minnesota
For some time now I've been thinking about building a gas/electric tricycle from stuff I have left over from other projects and donors. I doubt that I'll actively be building on it much for another year or so, but now is the time to start putting things together into a mockup at least so that I have a better idea of where I'm going, how to get there and what ways I can make rather than buy what I want/need.

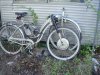
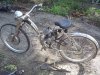
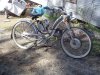
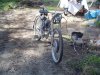
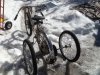
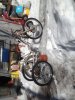
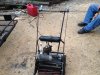
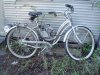
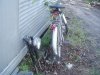
Pictured below is one of the first bikes I put together. I was more crippled then from a disease I have called GBS or Guillane Barre Syndrome, which has symptoms like polio. A girl's bike frame was easier for me to climb aboard so I picked one that appealed to me, a 1963 Schwinn American Deluxe, made in Chicago. I rode this bike a lot until it started running rough (I think probably a cylinder head gasket needs replacing) around the same time I was moving into 4 strokes. The bike got stored away and has been neglected since.

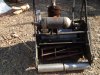
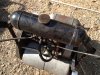
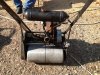
I had cool 1942 Schwinn 'The World' girl's bike I intended to use for a trike project, but then gave it away to my good friend Fasteddy for his trike project. I'll use this bike instead. The engine is the bigger China girl, 80cc or whatever you want to call it. I put a pull start on it and it served me well, started easily and had nice power.

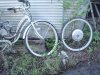
Pictured below is the 63 American. Also pictured is a
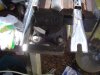
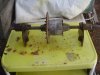
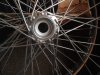
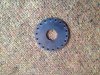
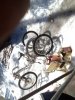
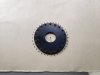
Golden Motor 36 volt front wheel pancake, one of the earliest ones they sold. I actually had it mounted on this bike at one time with three lead acid batteries on the rear rack. I liked aspects of it, but it did not feel safe with too much weight too high up and inadequate braking for all of the accumulated weight of bike plus rider. I did like riding along with the gas motor and kicking in the electric on steep hills or shutting down the gas motor, and going under electric power more quietly. The gas/electric combination was nice. The weight was a deal breaker. I removed the pancake motor and it has been sitting since.

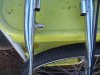
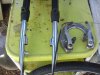
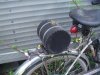
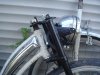
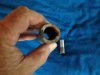
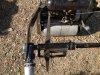
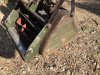
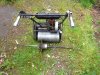
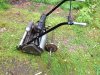
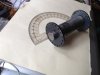
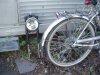
In the past couple of years I have become enamored of suspension forks. The ride is so much better that I'll never go back to a rigid fork. Following the lead of msrfan and his use of moped forks for his briggs builds, I have done the same and grab one whenever I can for possible future use or to give someone. The one pictured is a German made Sachs Hercules which was intended for a light motorcycle/moped application. I figured it would give me a nice ride, in effect stretch the front wheel forward several inches and give the bike a nice look. I also made a honker of a headlight for it from a Harbor Freight dune buggy light, much modified. The basic light costs about $12.00 and is well made with good chrome... a real bargain. The 12V halogen bulb got removed and I used a cluster of led lights from another good deal at Harbor Freight, a 4.5 volt flashlight that puts out a lot of light. I removed the post mount, drilled two mounting holes so it could fit between the fork ears and have a nice headlight for less than $20.00. If anyone is interested in some how to pictures on the conversion, let me know and I'll post them.

So that's the basic stuff. Now to see if the intended parts will go together...
(cont.)
SB
 

Attachments

  • Like
Reactions: Tom from Rubicon

silverbear

The Boy Who Never Grew Up
Jul 9, 2009
8,325
670
113
northeastern Minnesota
Photo #1 shows the forks with a protrusion on the fork to the left in the picture which is a stop for the original drum brake hub. It sticks out enough that it rubs against the pancake motor, so it needs to be cut shorter with a cut off wheel.

Photo #2 shows the forks next to a salvaged front V brake set up. Since the electric wheel has no brake I need to come up with one... so I am trying to figure how to adapt this V brake or another one similar so that I have a good rim brake. It is about the only option. Don't know yet how I will mount it, but I will.

Photo #3 shows the fork with the stop cut down.

Photo #4 shows an axle from a riding lawn mower which Curtis Fox sent me. The sprocket is attached to a differential and I'm told by Curt and Fasteddy that it can be made into a trike axle. I'll take their word for it and explore this further down the line. If I can avoid buying a trike conversion kit I will. There is no budget for such a purchase.

Last photo shows the intended gas tank which I made from a coffee can with hand stitched harness leather. Not sure how it will mount yet and probably won't until the rear axle assembly is done. There will be some kind of pickup truck type of box with stowage for the three lead acid batteries down low and a spot for the motor controller. The gas tank should hold a goodly amount. If I have a rear rack it won't be that one.

So let's mount the fork...
(cont.)
SB
 

Attachments

silverbear

The Boy Who Never Grew Up
Jul 9, 2009
8,325
670
113
northeastern Minnesota
Oops... that fork isn't going to work. Look how much too long it is for the head tube. Maybe it could be shimmed with a bunch of washers, but that's no good. Back to the drawing board. Darn. I liked that fork.

However, as luck would have it a friend recently gave me four rusty Amerchi Harley Davidson light motorcycles from the 1970's in varying states of not all there. Two of the same type I gave to my son, a Sprint is looking for a home and may have found it... and the fourth I was already dismantling to use the drum brake hubs on another bike. I removed the fork and it fits just right. Awesome! I temporarily mounted the honker headlight and electric front wheel... and... it is going to work. Looks pretty good, too. You can see how it adds some reach to the front of the bike which in turn makes the seat seem even more jammed up tight. So the seat will get a lay back post later on after I have it on three wheels and have a better idea of how I want it to lay back.

The seat, by the way, is from an I don't know what. Maybe a 50's Monarch. Not sure. I had a bunch of vintage seats that I took apart, fixed what needed fixing, cleaned them up, gave them new closed cell foam and upholstered them in black elk hide. I used one, gave a few away and this is the last one and the least cool, but will be fine for this trike which is not trying to look like anything in particular and is a hodge podge of this'n'that. I also removed the rear rack and may mount a different heavy duty Schwinn model made into a jump seat or just a place to mount the gas tank.

So that's where we are and now I have a better idea of what the core parts will be. I'll check in now and then to report progress or ask questions. Please feel free to advise, critique or whatever. I have learned so much from you good people and there is still a lot to learn. Many thanks...
SB
 

Attachments

Last edited:

silverbear

The Boy Who Never Grew Up
Jul 9, 2009
8,325
670
113
northeastern Minnesota
I have a couple of questions regarding wheels. I see on manufactured three wheelers that they come with wheels a size smaller in the back than up front. What's the reason for that? Does it make it more stable?

I'd rather have heavy duty spokes on the rear wheels than what I see on sets being sold on ebay. I'd as soon build my own wheels and give them 11 gauge spokes since this trike is not going to be light and is to be motored at greater speeds than a pedal trike. Assuming I use 24" wheels in back (front is 26") can I get hollow core bearing sets to work in a standard 24" rim? Or do you have to buy a commercial set of trike wheels?
Thanks.
SB
 

fasteddy

Well-Known Member
Feb 13, 2009
7,446
4,888
113
British Columbia Canada
Silverbear,
I have tubing left over from the tricar front ends and I bought a bunch of bearings when I bought a set to rebuild the trike rear end that I bought. You know how that is. When your paying for one set why not order 3 sets just in case.
Here is the just in case moment.

It's nothing to cut the tubing to length and push the bearing into the ends and then bend the supports for the two halves of the axle housing with the conduit hickey. I can weld tabs on where they welded them on the one I have so you can mount the rear end to the bike.

The bearings are for a 5/8 axle and I'm pretty sure that Worksman Cycles has 5/8" hubs and wheels. The problem is that many if not all the new trike hubs are 15mm which is slightly bigger than 5/8".
I don't know what Husky has but they are worth a try.

We can make them any with up to 36" which is the longest axle I can get with a key way cut in it the full length.
Don't know if you will need to cut the axle in the center and drive each wheel separately or if you can find free wheels to allow you to use the solid axle.
If you do that one wheel will tend to skip when your turning so you may have to split the drives up.

Steve.
 

fasteddy

Well-Known Member
Feb 13, 2009
7,446
4,888
113
British Columbia Canada
Silverbear,
To address the rear end that you have now. I would take the rear wheel off the bike and block it up so the top tube is level. Then put the rear end in place behind the bike and where it looks like it should go.
Measure from the ground up to the center of the axle and see what fits best a 24" or a 26" wheel.

With this rear end you can lock both wheels on the axle which is 3/4" if I remember correctly. Were the wheels bolted on through the axle or held on with a key and a nut on the end of the axle? You may have to add a piece on the axle with a length of keyed shaft so you can add the wheels. I have lots of heavy walled 1" tubing with a 3/4" inside diameter that would slid over the ends of the axle and the extension and could be bolted down through the tubing to hold everything in place.

If you are going to build a stake body or a box style body on it, square tubing is best for building the frame. I have something that I took off the web and stored and I'll try and find it. They used a rear end like the one you have.

Any bearings and related parts can be purchased from Northern Tool.

Steve.
 

silverbear

The Boy Who Never Grew Up
Jul 9, 2009
8,325
670
113
northeastern Minnesota
My friend, once again you help to make my pipe dreams into something manageable. You may have noticed that I'm not all that mechanically inclined, much as I love this stuff.

So what is the purpose of the rear axle I have? I'm assuming that the differential (that is what it is, right?) can be moved so that the sprocket is in line with engine sprocket. Does it transfer power to the whole axle, thus both wheels or does it somehow shift the driven wheel from one to the other depending on right turn, left turn, straight ahead? My question reveals my lack of understanding, so treat me as the eager 12 year old I am under this old guy disguise. In other words, keep it simple and assume I know nothing which is close to the truth. So what's the deal with the freewheel hubs?

The one part I do understand from what you've said is that this is doable and as far as the axle and framework to mount it to the American is not going to cost a fortune. The fortune is in the wheels. Can I build my own or do I need to order from Worksman or Husky? That would be the simplest, to just order them. The hard part is paying the bill.

So it doesn't really matter if the rear wheels are the same size as the front? Couldn't I get an idea of how it would sit by putting a 24" wheel on the back and skip all that blocking and measuring? I have a skinny one from an old English 3 speed... should be good enough to determine how it sits, right? Not that there is a great hurry in deciding on wheel size, but if I knew I needed 24" and ran across a used set of Worksman on ebay ... Always good to have a plan before you get there so you can take a few shortcuts along the way.

Thanks, Steve. Now I've got more to think about.
SB
 

fasteddy

Well-Known Member
Feb 13, 2009
7,446
4,888
113
British Columbia Canada
Silverbear,
if you were to look up pipe dreamer I'd be looking back at you with a cheesy smile.

The axle you have applies the Ackerman steering principle to the rear end. Inside wheel in a turn moves less than the outside wheel when making the turn so the inside wheel binds up if there is a straight axle and doesn't if there is a differential which allows them to turn at different rates.

I don't have the photo of the trike rear end any more by the look of it but I'll dig through everything I printed out later on today and see if I have it. It was the frame and rear end of a Pryor moped trike, He used the same kind of differential on them.

The differential can be moved to line up to the chains and a second sprocket can be added on the other side of the differential using the same bolts

You could skip the blocking and checking but then you may be doing the S***, S*** Dance around your new driveway while waving a lot of expensive parts over your head that don't fit because you didn't check everything out first. I will be more than happy to instruct you on the proper foot work for the dance part since I am considered somewhat of an expert.
I'd block it up and see just how it looks to be certain. The axle will be just under the frame and part of it. You may need 20" wheels which is why I said to make sure of the height first. Put the axle even with the chain stay and see where that leaves you for wheel height. We can fudge it a little.

Check with the steel sales place in Duluth as to the price of 1-1/4" square steel tubing. It will take a couple of lengths at least to do it. Other than a pair of outer bearings for the axle from Northern Tools that should be it for the frame and axle mounts.

A lot easier than a tricar for sure.

Steve.
 

silverbear

The Boy Who Never Grew Up
Jul 9, 2009
8,325
670
113
northeastern Minnesota
It has been awhile since posting on this thread, but the project is still alive and well, living in Minnesota. No photos today since I'm typing on the chromebook and don't have access to me pictures.

Progress over the winter is in having located a set of 24" 'worksmen front wheels to use for my rear trike wheels. Nice and heavy duty. I also purchased a set of Cyclops 2.4" wide tires which look great and should give a cushy ride. Up front is the same tire in 26"

Curtis Fox sent me several salvaged rear differential type axles from old riding mowers. I dismantled two of them in order to mix and match axle parts to get one with the maximum width which comes to 35" axle end to axle end. That should give a pretty good footprint for a more stable ride. Along with the suspension front fork from a light duty Harley motorcycle it will give about as good a ride as I can get from a motored bicycle weight trike. That's the intention anyway. I do not want to tip over ever.

Mounting the Worksman wheels to the differential axle is something I've pondered and asked others for advice. I purchased a set of wheel flanges from Atomic Zombie before they stopped selling parts. These disks are meant to weld directly to the axle and are pre drilled for 36 holes so they can be laced to the rims of your choice. That was my solution to the problem and it would work fine for me as it has for many others at Atomic Zombie.

Then my friend Curtis suggested that I use the cores from the wheels the original riding mower my differential came from. I like this solution better than welding discs to the axle since going this route would allow me to remove the wheels. So now the plan is to leave the Worksman wheels intact (they have no axles right now).... weld the mower cores to steel discs made to fit the Worksman axle opening and weld those to the worksman wheels. The cores are keyed as is the differental axle shaft. At each end of the axle there is a C clip to lock the wheels in place. The wheels will mount and come off just as they did when they were little mower wheels, but now the wheels are 24" Worksman. Elegant, methinks. Photos as we go later on will make this more clear.

The other big deal going is the acquisition of a late forties to early fifties Atco rotary mower which comes with the much loved by me Villiars Midget, a 98cc cast iron two stroke putt putt motor. It has a foot start similar to the old Maytag engines and is set up with a dog clutch. Forum member Robin of British Columbia ran across it in his landscaping business, recalled that Fasteddy and I had sung praises about the engine and also some lamenting at how hard they are to find. Steve (fasteddy) had given me one to use on a 1934 Elgin build (still not quite done) and it's foot start assembly (too wide to use on a bicycle build) got passed along to Intrepid Wheel Woman down in New Zealand for her cyclecar project using the same engine. Recycling at it's best...

So, Robin sent me a PM wondering if I'd be interested in this old mower which was in running condition. I was. Arrangements were made for Robin to pick up the mower from the owner and hold it until such time that fasteddy (Steve, who also lives in B.C.) could pick it up. Then he would bring it along when coming to Motor Bicycle Summer Camp For Boys Who Never Grew Up here at my place in northeastern Minnesota. Camp opening is running late this year, but as I type Steve has picked up the motor from Robin, money has passed from one pocket to another, and the mower is now somewhere in Montana or maybe North Dakota attached to the back of Steve's camper. Steve called yesterday with a trip progress report (at that time in Idaho) and figures he'll pull in here tomorrow some time. Since he is running on Indian time I figure he'll get here when he gets here. The Wonder Dog is watching the driveway, knowing he is loaded up with dog cookies.

Steve says he started up the mower while visiting Robin and says that it fired right up and ran smoothly as if it were made this year. The plan is to utilize much of the mower frame work into the back of the trike, welding as we go. We'll use the dog clutch to engage the engine and of course the foot start will remain in place. Not sure how we'll drive the rear axle, but it will probably involve a jackshaft in order to transfer power and align with the differential. There may be two jackshafts depending on how things line up with the pedal chain. Curt also sent me some salvaged pillow block bearings so I'm sure Steve and I can figure something out. I also ordered a pair of disc brakes for the rear axle. Still figuring out what to do for the front wheel brake. Probably a mickey moused V brake.

While the main focus at summer camp will be finishing up the mechanical aspects of the Hiawatha tri-car the secondary goal will be to do the American Deluxe bike to trike conversion utilizing the differential axle and Atco mower assembly. All of the welding and running gear. Paint and such can be next winter.

This will not be a fast trike. I don't want it to be as I have no death wish. I'll be 70 next birthday so The Great Nevermind is coming up soon enough as it is. Yes, I will wear me helmet. Yes, I will wear a smile. Aaniimoosh The Wonder Dog will have a trailer of her own. Yes, she will be required to wear her doggles. This is going to be a great trike. Woohoo!

Summer camp is almost here... oh boy!
SB
 
Last edited:

BarelyAWake

New Member
Jul 21, 2009
7,194
21
0
Maine
That Villiars Midget will make an outstanding centerpiece in what will doubtlessly be a fitting tribute to an era gone forever, I've seen your vintage builds, I eagerly await pictures of the progress on another beautiful bike ...erm trike :D

(hide yer copper & brass scrap folks, don't say I didn't warn ya) :p
 

silverbear

The Boy Who Never Grew Up
Jul 9, 2009
8,325
670
113
northeastern Minnesota
Here are some photos showing some stuff. Pretty self explanatory.

Keyed shafts are the cores from the riding mower wheels which will become part of the Worksman rear wheels. The shafts will slide onto the differential axle, held in place by the key and at the axle ends with a C clip.

Three donor differential axles from old riding mowers, diameter is 3/4". A new axle of the same type 38" long and 1" in diameter is available from Northern Tool for around a hundred bucks. Differential is made by Peerless, if I remember right. Diagrams are available on the web.

The disc with holes drilled along the edge are from Atomic Zombie. With these the idea is to weld the discs directly to an axle so that they can be laced into a rim for very stout wheels. I didn't go this route since I want the wheels to be removable and have the cores from the original riding mower wheels. These discs are no longer available for purchase, but there is an excellent tutorial on the Atomic Zombie site for making your own.

A few pictures show the axle more or less in place on the bike to give an idea of what it will look like with three wheels. The Harley fork extends the front wheel a bit and when we make up the rear end assembly we'll stretch the wheelbase out that way, too. Should make the ride a bit more roomy and stable. A strong frame and stout wheels make for a good foundation. Initially this trike will utilize lead acid batteries which are heavy by themselves. Add to it the weight from the Atco mower assembly, differential axle and trained circus bear for steering and it will be a heavy weight ride, so it needs a good foundation.

Fasteddy should be pulling in sometime today. Can't wait to play with that Atco mower. I'll take some pictures.
SB
 

Attachments

Last edited:

silverbear

The Boy Who Never Grew Up
Jul 9, 2009
8,325
670
113
northeastern Minnesota
Fasteddy pulled in a couple of days ago with the Atco mower on the back of his camper as pictured below. Once off the rack and on the ground with the grass catcher removed it was a little easier to see what was what. Only a 22" cut, but what a little cutie. The big roller you see in back powers the mower along in place of wheels and it does a remarkably smooth cut, much favored back when for golf course greens. It has enough torque that even when at an idle and with the cutters and roller engaged it putt putts along spitting out grass ahead of itself. The muffler is right there at the motor and is pretty quiet. Gas tank is very cool and I intend to use it with the trike. The lever attaching to the dog clutch is super simple and works well. I'll use that, too. Foot start is a breeze. The carb could use a cleaning, I imagine, but choke works well and so does the throttle.

What's not to like about this little motor? I mixed up some gas with the oil recommended by my vintage motor guy in southern Minnesota. It is Areoshell in 30 weight mixed at 16 to 1 ratio... 8 oz. oil to the U.S. gallon of gas. The oil had to be purchased from an aircraft supply place online. I'm told this is what you should use on vintage 2 stroke motors. ideally anyway, and is what they used to use in racing outboard motors. I also use it for my Sachs engine made in 1934. Good stuff.
(cont.)
 

Attachments

Last edited:

silverbear

The Boy Who Never Grew Up
Jul 9, 2009
8,325
670
113
northeastern Minnesota
First photo shows the side which has power transfer from the engine to the cutters up front and the roller in back. This is all hidden by the cover so I don't know if sprockets and chains are employed or just what. Last two photos show the differential axle behind the mower. The sprocket on the left side of the differential will be powered by whatever is now powering the roller in back and will probably require a jackshaft to align things. On the right side of the differential another sprocket will be bolted on which will connect to the pedal chain, probably requiring another jackshaft.
SB
 

Attachments

silverbear

The Boy Who Never Grew Up
Jul 9, 2009
8,325
670
113
northeastern Minnesota
Some thoughts regarding this build, particularly the use of an old riding mower differential axle...

I've been contemplating this build for a long time, following along whenever anyone put together a motorized trike. I've studied every kit version I could find and tried to familiarize myself with the difference between a solid axle and a differential axle. Everything I have seen in conversion kits is using a solid axle, usually driving a single wheel. A differential axle drives both rear wheels while allowing for different rates of spin while making turns... otherwise the wheels would bind up during turns if both wheels were driven and there was no differential. So as I understand it the differential allows for the different rate of spin while turning. Turn right and the right wheel travels less distance than the outer (left) wheel. Turn left and the opposite is the case.

For a pedal only trike I would guess that driving just one wheel would be okay, but I would think that the inherent limitations of that setup would magnify with either gas or electric power to a single rear wheel likely to be traveling at greater speed than a pedal trike. Also, the kits I have seen utilize a 5/8" axle and the means of attaching the driven wheel to the axle strike me as minimal and most suitable to pedal power.

That's why I've been interested in something more substantial in an axle which would be motor driven. I've also noted that in the kits the wheels are generally pretty narrow with light spokes. Having experienced spoke failure in a motorbike with a sidecar due to the lateral pressure on the spokes while making turns, I wanted wheels and spokes to be heavy duty enough to not worry about the wheels or spokes not holding up.

The other consideration for me is cost. There is an expression "you get what you pay for" suggesting that if you pay more money you get more quality. For those of us who recycle old frames and parts, who fabricate to make our builds our own... we know that "you get what you pay for" is often not the case. Besides, I just don't have the money to go the "sign a check" route to a class build. I have to focus on putting my limited funds into what I cannot find, what I cannot make or adapt and all the while trying to keep quality as a guiding principle.

That is why I'm so enthused about utilizing an old riding mower differential and making up my own wheels to go with it. My axle will be 3/4" in diameter and longer than kit axles. And it will have the differential so that there is two wheel rear drive without binding in turns. And if you also salvage the rear mower wheels you have the key to making your your own heavy duty bike wheels. If you can score the riding mower parts for free or next to nothing you are off to a terrific start and in the end will have something better than what you can buy in any kit. Better quality at less expense is something I like!

That's the part of this build I'm most excited about and most want to document with how to photos and commentary. I'm convinced it is the way to go for a serious motored trike. I think one reason we don't see a lot of trike builds on the forum is that they tend to be expensive and often have less than stellar results due to the limitations of available kits. This route of mine won't be for everyone wanting to do a motored trike, but it may be of help to others on a budget who want quality and like to fabricate.

So, as cool and interesting as the old Villiars engine and Atco mower parts might be and perhaps the additional allure of an electric front wheel... what I hope will get most of your attention is the axle and wheels part of this build. It might be just the thing for your someday trike project.

Fasteddy has arrived for this session of Motor Bicycle Summer Camp (for boys who never grew up) and while our primary focus is on finishing up the Hiawatha tri-car, as soon as it is together we'll shift our attention to the hybrid delta trike of this thread. We hope to have the running gear together with the axle and wheels in place and the Villiars engine and attendant Atco mower parts (frame, dog clutch and foot start) also mounted and functional by the time Steve heads back to Vancouver in early September.

I have learned so many things here on the forum through the years. My hope is to give back a bit in sharing this build. I'd like to think that sometime in the future some guy or gal is going to read through the thread and realize that he or she can save some money and make a great trike using an old riding mower axle and wheel parts. Giving back is a good thing, I think. I'm no expert at anything... not a mechanic or machinist or engineer, etc. But I can share my experience in this adventure and maybe it will be of benefit to someone. I hope so. Pictures will be coming and details of the wheel conversion may be of interest.
SB
 
Last edited:

silverbear

The Boy Who Never Grew Up
Jul 9, 2009
8,325
670
113
northeastern Minnesota
This post is about making the pattern for the hub flanges and transferring that pattern to the metal they will be cut from. I made a mistake along the way which is for me at least part of the creative process. When you screw up go back and make it right and then move on. See if you can catch where I messed up. I'll clue you in at the end of the post.

In reading through and studying the tutorial on Atomic Zombie I saw where the author created the pattern with photoshop. Huh, what's that? I discovered it is a program I don't have, tried to download and found that my operating system or browser or something is too old to download it. So, what to do? What would someone have done before Photoshop was around? How about a protractor and compass? I dug around and found mine.

I used part of a manila folder for the pattern and made a circle the same diameter as the spoke holes on my Worksman wheels, then added a second circle a 1/4" or so outside of that to approximate the total hub diameter on the worksman wheel. What really matters is the center being true and the circle of spokes, not the total diameter of the hub.

I figured that I have 36 spokes per wheel and a circle has 360 degrees, so that would be a space of 10 degrees between each spoke. I used to a ruler to make lines radiating out at 10 degree intervals all around my circle and then used the compass point to poke through them.

Next up I set the pattern on my piece of metal and weighted down the center with a wheel core which left an opening at the center. I sprayed it with a can of red paint and the resulting dots tell me where to use a hammer and punch to dink the metal for later drilled holes. Worked Great!

Except for one thing. Something didn't look right. It seemed like the holes were awfully close together and then it dawned on me that each side of the hub gets 18 spokes, not 36! Duh...

I was about to make a new pattern and realized that all I needed to do was punch every other hole.
So that was my mistake. Did you catch it? Now that the paint has dried I can punch the dots and later on will drill out the holes with the drill press.
SB
 

Attachments

Last edited:

silverbear

The Boy Who Never Grew Up
Jul 9, 2009
8,325
670
113
northeastern Minnesota
Forgot to comment on the hub flange pictured which I purchased from Atomic Zombie while they were still selling parts. I have a pair sitting on a a section of 3/4" rod inside one of the riding mower wheel cores. So you have an idea of what a hub will look like. I couldn't use these perfectly cut flanges because the diameter was smaller than that of my spoke holes on the Worksman hub. I would have had to purchase a new set of spokes and I'm too cheap for that.
SB