

Welcome to the forum. Bummer on the sprocket needing a reverse install. Even though Chain tensioners are not needed or wanted they sometimes help the chain clear the frame... ya never hear that one. You should have luck with reversing the sprocket though...Like Chaz said The gremlin shake out is always present and takes time and is a learning process that never ends really but once done you will have smooth miles. Its a hobby for us that do enjoy always tinkering and improving. I've been going with my chains so they don't need a tensioners and then I add the one that screws to the engine case its self and has a skate board wheels as it quiets the whole works down and takes up even the slightest slack that is always present and sometimes changes as the wheel revolves slightly. Also prevents having a too tight pedal chain for absolute perfect tension and trouble free safe miles. Might be worth the 40 bucks they cost.
1st Time Build- Trials and Tribulations...
- Thread starter JankeyKevin
- Start date

how cool Kev! Now I'll have to build mine so we can ride. Not sure of electric vs gas .... but gas is faster! ")
Todd
Todd
Chaz, thank you for the kind words, I do appreciate them. Yes, the springer I ordered does have the disc brake bosses. I'm still debating whether I want to go for the lighter aluminium disc ready wheel? Can you convert non-disc wheels to disc? I guess, I need to research that. Hmmm?
Zip Tie, I also appreciate the guidance. Of course, I did buy one of those chain tensioners with the skate board wheel (since I buy some of everything!) lol. I still have a little room for slack in my drop outs. If I can't get the tension needed with the drop outs, I will definitely add it. It seems to be, hands down, the best tensioner on the market. Chaz mentioned that the chain will continue stretching so I may be forced to install it.
Detroit Brother: I can't wait to go for a scoot! Just let me know when you are ready!
So to answer my own question, I did start researching front braking options. Obviously, the cheapest and easiest is to run rim brakes. I could keep my chrome rim, installed and riding in 20 min. The biggest negative is severely decreased stopping power in wet conditions (not that I should be MBing in the rain but you never know when you may get caught).
I could buy and install a drum brake ($70-$100 hub only). Those seem to be mostly sold as hubs (the ones already laced run over $300!) However, it would fit my retro vibe nicely. I would still have to have the wheel laced to my chrome rim. Kinda expensive but very cool. I have no idea about stopping power?
The other option would be buying a disc ready wheel or disc ready hub and have it laced to my chrome rim. The complete wheels come brushed aluminium so I could take the time to polish it to a high lustre but would never match chrome. The disc ready hub comes painted black so I would, then, have to strip to match my bike's vibe.
I guess, I'll sleep on it as the springer fork hasn't arrived yet. I think, I am kinda leaning towards the drum though. Kinda pricey but I guess you can't cheap out on safety....
Insights anyone?
http://www.custommotoredbicycles.com/disc_brakes_rotors_26_inch_wheels_conversion_brackets
About half way down there's a disc brake hub adapter that I run on my bike and I have a Springer fork. Then all you need is the disc which you can get anywhere.
About half way down there's a disc brake hub adapter that I run on my bike and I have a Springer fork. Then all you need is the disc which you can get anywhere.
Motakitty, thanks SO much! This is the perfect solution and exactly what I was looking for! As soon as I get another paycheck under my belt, I will be ordering....
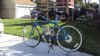
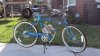
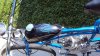
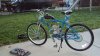
Since my last update, I have kept UPS pretty busy! I got the kickstand, bike lock, chrome seat post, rear tail light and mirror. I also received the springer fork but not the disk ready wheel or chrome steerer nut & bearing covers. Maybe, this week. I'm excited for my headlight to arrive! That may be another week or two.
The mirror isn't so great. There is no real way to tighten it in position and with the vibration of Michigan roads, keeps moving around. I may have to fabricate something more robust.
I also flipped the sprocket and added the skate wheel tensioner. The bonus of originally buying the hub clamping sprocket adapter came in-handy as I didn't have to unclamp from the hub which made the flip relatively easy. I did purchase two shorter M6 bolts as the ones from the kit hit the tightening mechanism on the hose clamp.
Lastly, I had the tank striped. Ok, not really, lol. Its a decal but I still think it looks cool. The color shade is off a bit but I'm good with it. I may actually have it striped at some point....
My buddy checked my speedometer (came with the kit) against an app he has. The speedometer is off by 4mph (when it says 10mph, actually 6mph)! It is like it was not designed for 26" wheel bikes (the MOST common size). I know, I could get a digital one but it wouldn't go with the theme of this build. So I found out, I am really topping out at a mind numbing 25mph! Oh well, still fun!
Here are some photos of my latest additions....
Attachments
-
 871.4 KB Views: 253
 -
 908.7 KB Views: 242
 -
 936.9 KB Views: 273
Last edited:
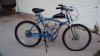
Well, its been a month since my last post and I have been busy! I swapped on kevlar front & rear casings, springer front suspension, dual pull brake, front disc brake & a better headlight. It is, finally, meeting my vision for this ride.
The only thing is I couldn't seem to get the mechanical speedo to work with the disc wheel. It just wouldn't fit right. Perhaps somebody knows the secret? I ended up persuading my fork arms out to get the wheel to fit but the speedo mechanism kept binding up. Oh well, I just guesstimate my mileage. Does anyone know of a modern electronic speedometer which looks vintage?
The only thing is I couldn't seem to get the mechanical speedo to work with the disc wheel. It just wouldn't fit right. Perhaps somebody knows the secret? I ended up persuading my fork arms out to get the wheel to fit but the speedo mechanism kept binding up. Oh well, I just guesstimate my mileage. Does anyone know of a modern electronic speedometer which looks vintage?
Attachments
-
 971.6 KB Views: 234
 -
 890.2 KB Views: 224
I've installed many mechanical speedos and they all took putzing with to get working, but once working they all perform well. Here are mu tips.
1 oil the cable and the lower housing with 3 in one light oil. This is critical!!
2 play with the bend of the L bracket, the angle it goes into the spokes is critical
3 test it before installing it so you get the needle moving and note the direction of spin when working.
4 make sure the cable ends are seated properly on the speedo and the lower housing. If the needle is not moving, it is the likely cause
5 install the housing on the opposite side of the disc side, or if sitting on the bike, the right side.
6 the use I'd large flat washers may be used as shims for the lower housing.
7 the face plate removes easy with the 2 small top screws FYI
There is a analog looking digital speedo but its like 400.00 plus as I remember.
Your bike is looks amazing, good luck.
Thank you Zip Tie, I do appreciate the compliment. I will try the analog speeedo install, again, with your guidance. I think, I understand 1-5 but #6 is where I got stuck: "6 the use I'd large flat washers may be used as shims for the lower housing."
What the specific problem was things were super tight and the wheel was binding. As mentioned, I spread the fork enough to get the wheel to fit and the speedo lower housing to go on. I recognized #5 and installed opposite the disc. I also "thought" I had oriented the L bracket properly. If you would restate #6, I would appreciate. I think, this is where I ran into my issue. Thanks again.
What the specific problem was things were super tight and the wheel was binding. As mentioned, I spread the fork enough to get the wheel to fit and the speedo lower housing to go on. I recognized #5 and installed opposite the disc. I also "thought" I had oriented the L bracket properly. If you would restate #6, I would appreciate. I think, this is where I ran into my issue. Thanks again.
Sorry, I've been out of town last week and missed the question on the washer shims.
The large washer can o two things for the lower housing on these speedos,
A keeps it from binding from slight bending of the sometimes all plastic lower housing when when wheel nuts are torqued down tight. ( some lower housings have a brass insert stiffener installed in the housing cup, some are all plastic and when it gets tightened it binds)
B it adds a bit of spaces o the crank arm isn't too close and then binds the turning mechanism. Basically one wants to make sure everything is relaxed after tightening down the front wheel nuts..
Hope this helps you and anyone installing these cool but slightly fussy speedos. Installed and oiled right they will last a lot of miles.
Last edited:
Well, its been a SUPER long time since I made an update to this thread. That doesn't mean I haven't been busy with the bike. Since last time, I installed a lay-back seat post, replacement springer seat, throttle, and a whole lot of dialing in. I also got the speedo back on (the mph is off though- is there a gear ratio fix for that?)
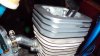
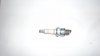
My new question is I got this new speed head and put it on. Then I had a heck of a time getting the thing to start. I tried all my starting tricks and finally pulled the spark plug. I have been running the standard NGK BP6HS as recommended on this site. The problem is this new head must be decked lower than factory and the piston shoved the gap closed on the electrode. My question is: is there a good shorty plug you guys recommend or is there another solution you suggest (like extra washers on the plug to decrease the depth)?
I did get the bike to fire using NGK BMR6A from the local parts supply. It is a lawn & garden plug but don't know if this is the best choice for our 2-strokes?
Thanks.
Attachments
-
 78.2 KB Views: 207
 -
 66.5 KB Views: 215
 -
 19.1 KB Views: 196