Honda GXH50 & Honda Elite CH80 carb mod

GoldenMotor.com

hondabicycle

New Member
Aug 14, 2011
63
0
0
Greeley, CO
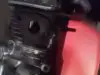
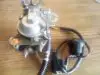
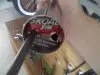
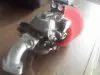
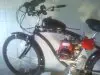
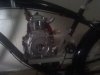
This is what I'm shooting for. My Honda Elite CH80 carb is on the way used from ebay $71.
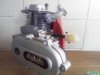
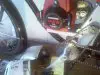
I want to place it on my Honda GXH50 and am looking for options as it's going to be a tight fit.

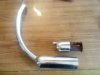
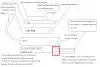
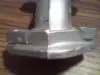
Here’s what I have so far as intake adapters are concerned. I'm also looking for other ideas concerning other adapters.
https://www.cantonracingproducts.com...&category=7780

The guys at sudco.com gave me this link and I'll share it. Really nice stuff here.
http://www.sudco.com/CatalogJPG/130.jpg

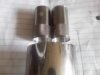
Here's some brass that might work I'll have to check the web site for dimensions but I'll store the info here to keep it togethor.
http://www.rianvalve.com/products/Z41F-16T-Brass-Flanged-Ball-Valve-713960.html

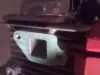
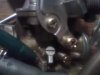
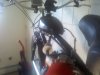
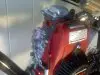
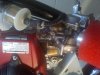
Here's the CH80 actual intake parts that I might be able to cut and piece on.

http://cgi.ebay.com/ebaymotors/Hond...44?pt=Other_Vehicle_Parts&hash=item2566063808

http://cgi.ebay.com/ebaymotors/HOND...rcycles_Parts_Accessories&hash=item588ffafaba


The carb actually looks like it will fit rite on but I'll find out for sure in a few days.

I can help on fine-tuning a carb also. This is textbook Honda 101.
It’s recommended to be done on a warm engine. So you'll need to find a spot to were it will start and run the engine for about 5 minutes. I also recommend using the 1/8 turn at a time method.
To obtain optimal performance on a carb after it has been cleaned.
1) Have the idle screw set a reasonable position maybe 2 turns out from zero.
2) Turn the mixture screw all the way in.
3) make 1/4 or even 1/8 turns out and try to start the motor doing so till the motor starts. Write down this position on paper.
4) Continue 1/4 turns or 1/8 turns out till the motor wont start. Write this position on the paper.
5) The position between 3 and four is exactly were you want to be.
6) Adjust the idle accordingly.

Here's some exhaust reasoning that will also apply.
A smaller outlet opening end increases backpressure. This effectively decreases the powerband to create more low-end torque. It also decreases exhaust tone and enriches carburetion.

A larger exhaust outlet end decreases back pressure. This widens the powerband at the top end. It also increases exhaust tone and leans out carburetion.


Thanks Guys and Gals
.wee..duh.
 
Last edited:

andrewflores17

New Member
Jul 12, 2010
479
2
0
colorado springs, CO
thats a good idea let us know how it goes

with toyotas you can take V6 componets and bolt them on the 4 cyl for a little extra boost on certain things brakes afm etc

never woulda thought about useing the same principle on a bike
 

hondabicycle

New Member
Aug 14, 2011
63
0
0
Greeley, CO
I deleted the last post I had here to keep the thread easy to get to the point.
Anyway I removed the Carb and attached a picture. There’s a plastic governor you can see in the picture as the governor is round and the port is square so it can be ported a little also.
I have another guy checking his inventory for the specs on the manifold so it l
I took the restrictor off and attached a photo. Some options there I thought it was epoxied on but it came off. Probley better off with a custom spacer anyway.
Another thing it wont hurt to port the square port to a round port because I can alway go back to the restrictor plate if needed plobley wont need it but it wont hurt like I said.
Then just get a round mount on there and away the horses go.

.flg.

Bye the way andrewflores17 I run a stage 3 please don't try to stage me!

I've added another picture with the Honda CH80 carburetor with the starting thermal enrichment valve removed and a penny put in its place. I'm just going to silicone over the penny. It was my wife's idea.
To get the ch80 carburetor able to perform on the GX50, what is needed is to remove the starting enrichment thermal valve and seal off the internal vacuum chamber. If this is not done the choke will remain on and you would need a 12V battery to allow the choke to turn off.
The reasoning behind this is the GX50 motor needs less gas to start then an 80cc motor. So the starting enrichment thermal valve is not needed. Killing two birds with one stone.
There are also a lot of features on this carburetor like the limiter cap allows high altitude adjustment, air mixture screw (after 1985) that’s factory set to 1 ½ turns out.
The throttle assembly adjustment screw conducts the idle adjustment.
So now I’m just waiting on parts.
One bad ting about it is I’m going to have to buy a Honda Elite ch80 throttle assembly as the cable for the carburetor wont interchange with the basic motored bicycle stuff.
On the other side I'm going to have trouble free throttle for a long time.
 

Attachments

Last edited:

hondabicycle

New Member
Aug 14, 2011
63
0
0
Greeley, CO
The other day when I testing my bike out I noticed an RPM flex.
I was going to take apart the exhaust anyway to make it a fiberglass packed tunable exhaust. I was actually going to create a prototype for these little engines but its much cheaper to use whats already out there.
I stumbled on a flaw in the exhaust as I took it apart. Take a look at the picture attached and notice the round seal protruding the farthest to the right of the small piece cut away.
That piece is acting like a seal but it’s an internal leak creating the RPM problem.
I’m waiting on parts so I can rebuild the exhaust.
So Stay Tuned
laff

I'm getting real excited about the exhaust so I thought I put it out here.
The end result after the internal and actually the exhaust is complete I plan to have three pieces of small fuel line sticking out the back of the pipe. Two pieces are going to be able to close with brass fitting. This gives the option of running one, two or three pipes allowing the tuning for low, mid range and top tuning.
The rest of the design is almost complete down to a new idea of a red bull can if it fits. If not I'll find something that does and use O-Rings seals.
For me I'm only going to have 2 fuel lines for pipes sticking out to keep the exhaust staging correct. It is possible to have 3. So I'll see what I can do to draw this stuff out.
I'm giving the credit to some members of my family.

"Referring to the exhaust design picture"
Its important to create a seal in the front of the red bull can as best as you can with o-ring’s or some JB weld previously dried. As long as its close it will be ok because the rear section of the can is sealed tight.
I added a picture to make the seals simple as Im just going to use the top of a skaol can then JBweld it to reinforce and seal.
Another good idea would be to reinforce the outside of the red bull can with thin wire mesh then JB weld it section at a time.
When rapping the packing around the pipe there's a special tape the pro's use that would burn away later. It kind of needs the tape to insure you get enough of the packing in there. Wheter it burns away or not might not be an issue as long as the holes in the pipe are about 2 inches behind the seal.
The rest is up to your imagination.
I aint in a hurry so it might be while anyway.

The last thing I was worried about was the limiter cap on the airscrew that limits airscrew adjustment and makes you buy new parts every time you overhaul the carb.
So anyway I attached a picture to show were I’m going to machine off the blocker on the carb giving no more limits to what I’m doing.
So anyway I have a green pen pointing to the part I’m cutting off.
The only reason I was worried about it is because the difference in the combustion chamber size might need a new adjustment.
 

Attachments

Last edited:

hondabicycle

New Member
Aug 14, 2011
63
0
0
Greeley, CO
Here's a picture of part of the intake. Im going to have to take a dremal to it. I need to upgrade my rotary tool to a dremel. I was using a harbor freight $10 package.
I should be able to finish by next month. Cash is tight now days.
The intake in the picture is going to be to big.
I was looking for an intake with 18mm intake hole and finally found one.
Its going to need a little dremel work but it will be fine for cutting in half and using a hose to connect the two pieces.
http://www.motorparts4less.com/products.php?id=38
 
Last edited:

hondabicycle

New Member
Aug 14, 2011
63
0
0
Greeley, CO
I'm buttoning it up and a couple cut and snips more. About a week away from test time.
The 18mm manifolds will fit almost perfectly if machined right. There's one to the carb (pictured) and one to the motor (pictured). The one to the motor when perfectly centered to the port on the motor needs just a hair on all four sides of the motor need porting. About 1/2MM on all four sides.
After seeing it going together so smooth I feel good about it. Might mount the carb tomorrow. Then just a few things here and there.
 

Attachments

Last edited:

Barnfresh

Member
Sep 5, 2011
205
10
18
Nor-Cal
It would be nice to be able to compare the top speed before and after your CV carb mod. So what kinda of top speed are you getting with your stock setup?
 

hondabicycle

New Member
Aug 14, 2011
63
0
0
Greeley, CO
I rode it for about three hours total and can only estimate what the speed was. It was close to 50mph. I did'nt use a speedometer.
I was not happy with the setup before as I disconnected the governor and had a poor setup concerning the throttle.
Another problem I was having was with a steady throttle hand the RPM's would flex. So I never took it to top speed and disassembled the exhaust pipe I purchased and found an internal leak in the setup I got from bicycle-engines. I figured this was the RPM problem that could have caused serious engine damage if I continued.
You can estimate a setup like this at 50mph with little engine stress meaning a low rpm.
I'm hopping to go 73mph with the new setup.
I also done some gear work on the stock 4 stroke shift kit from SBP. I now am running a 36 tooth chain-ring were was a 48 tooth. (This would be the gear thats next to the bicycle chain ring) Then on the right side of the four stroke shift kit I had a 9 tooth and now have an 11 tooth. This is some serious change to the gearing. I hope with the new power increase it will power through with the high torque exhaust I made.
To better discribe the exhaust problem were there was supposed to be a seal there was just a metal ring which only partially sealed the attempted to send the exhaust flow through a baffle. So the exhaust flow was out of control causing the flex in the rpm.
 
Last edited:

Erich_870

New Member
Dec 4, 2009
78
0
0
Alaska
I rode it for about three hours total and can only estimate what the speed was. It was close to 50mph. I did'nt use a speedometer...
You can estimate a setup like this at 50mph with little engine stress meaning a low rpm.

I'm hopping to go 73mph with the new setup...
"Extraordinary claims require extraordinary evidence". You're going to need to run with a GPS before you claim 50mph. You were probably going fast, but guessing you were doing 50 without proof gives you no validity.

Erich
 

hondabicycle

New Member
Aug 14, 2011
63
0
0
Greeley, CO
I mounted my carb today. I also received my new phone that has a camcorder.
I'll be rapping up the mod sooner than I thought. Maybe a week only left.
I'd post a picture but I'm switching phones.
I do also have a gps with MPH on it.
I tried to upload a video but I still need my micro sd card.
I have all the mounts for the gps and phone so I'll have some cool video soon.
My new phone dont even work yet.
But I do have a picture of my gps
 

Attachments

Last edited:

Barnfresh

Member
Sep 5, 2011
205
10
18
Nor-Cal
Wow 50mph with a stocker,you must know a lot about tuning. I'm just thinking that 73mph is such an odd number why don't you just shoot for 75?
 

hondabicycle

New Member
Aug 14, 2011
63
0
0
Greeley, CO
I had my first minibike when I was 4 believe it or not.
Almost killed myself then they sold it on me. I started an alluminum polishing buisness at 8 and bought my own bike since then.
Its just a number I'm shooting for.
 

MotoMagz

Well-Known Member
Aug 2, 2010
1,817
1,154
113
Michigan
I had the same set up you have now minus the carb you have.Modified airfilter and exhaust tried every differen sprocket combination SBP has and changed my gearbox output sprocket.My top speed was 41mph clocked by a portable police radar.Was really probly going about 38mph.Good luck with the new carb set up.Not bashing you but I just don't see 50mph coming out of this set up...but I would like to!!!!!
 

hondabicycle

New Member
Aug 14, 2011
63
0
0
Greeley, CO
New Test Results

This morning I fired up the One Arm Bandit. RPM didnt run away like others figured.
Has a new raw power tune. Ready for the ride soon. I ordered velcro for my electronics double safety and it will arrive from china by the 28th.
So no video on the speed run until then.
I will provide video of it tuned and at idle speed only until the velcro shows up.
This is an excellent mod. I would say best I seen so far.
 
"Still faster then any easy bike ever made!!!"

Are you saying that your bike is faster than any easy bike [EZ Motorbike] ever made?

If so, then please show proof that your bike can exceed the 50.2 MPH we acheived on the Dyno and Roller Road tests. We did a few test with alcohol, and several with Nitros, and did exceed 10,000 RPMs, but didn't find enough extra power to pull taller ratios to exceed the earlier records. The most power we extracted was 2.85 HP, just not enough to do much above 50 MPH.

We used a high lift camshaft [base circle reduced], Whizzer 18 MM carburetor, Q-Matic drive [12 X 1], and a tuned exhaust to reach those speeds. Best we ever managed on street test were 48 MPH with a 165 pound rider on LEVEL ground, and checked with a police radar unit. At 12 X 1 we managed 50.27 MPH @ 7800 RPMs [on the DYNO]. When we changed the ratios to 11.55 X 1, it still managed to hit the same 50.2 MPH [on the DYNO] but the motor wouldn't exceed 7500 RPMs due to more load. The last test were at 10 X 1 and the top speed was only 50.2 MPH but the RPMs were only 6500 [on the DYNO].

Here are the problems we faced when trying to improve the power of the HS or Honda motors..........Installing a larger carburetor didn't help the power any, just gave us a carburetor with a custom made adjustable main jet for better top end tuning. The valves couldn't be enlarged due to space in the head. The exhaust made the biggest difference in power. The camshaft moved the power curve higher, but removed a lot of low end torque in the process. Although the modifications did increase the top end RPMs by about 500, it became dangerous as these motors don't survive long periods of time over 10,000 RPMs.

I am willing to bet you can't even get close to 73 MPH, unless you drop it off a cliff and measure the speed prior to it hitting bottom.

Consider these facts..........In order to reach 73 MPH @ redline [7800] you would need to shift to 8.2 X 1 and have enough torque to pull the weight. At 8.2 X 1 the motor doesn't have enough torque or HP to reach redline due to load.

Keep us posted on your record speeds.

Have fun,
 

hondabicycle

New Member
Aug 14, 2011
63
0
0
Greeley, CO
I was doing 65mph in 4 gear I had 3 gears to go. I heard some noise from the exhaust and it blew out my exhaust mod. It got really squelly when I was going that fast.
Heres a video below and this is how it sounds with the exhaust blown out.


676A0204 - YouTube

Heres a picture of the blown out exhaust.
I got no reason to lie and I will have video of a speed run in a few weeks.

I was also doing 28mph in first gear. It needed a little peddle to start but when it got past that it was really fast. I hardly had the need to get out of first gear.

After doing those speeds I'm tearing it down and making adjustments accordingly.
 

Attachments

Last edited: