

Mt, I'm hoping to spray 'contact cement to glue an ole nagahide cover. Not having done 'seat covering' before, I'm not sure my first try will pass QC
choppin n weld'n another 'junk yard' frame
- Thread starter scratchbuilder
- Start date

I generally cover with leather, doesn't cost a ton if you shop blemished hides. I always buy glove thickness, its very pliable. Don't know if vinyl comes in various thickness, I would think so. May make the difference between an easy job and a cuss fest if you use thinner material I you can find it.
how did u weld a 1 1/8 head tube to the old frame? looks like you just chopped the old head tube in half and fit the new one on top of it, matching the concaves. then welding up the seam? how is this working for you. I want to do the same on my bike just want to see how u did it.
Hey Moto, that's what I did. Another guy here did it, so I went for it. It takes a spare piece of pipe to hammer in place to get the fit right. The cut was more like 2/3. Like leaving a1/2" on each side of the top tube. Of course mount your forks and line it up..it will be very close. Depending on how straight your cuts are down the head tube. The good frames are 1"...the good forks are 1 1/8"..for me. I used 1 1/2" pipe,and headset fits tight.
Last edited:
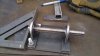
JS idea, weld plate to front side of seat tube. Weld bearing hangers to 1" plate. Drill holes to mount my 'pillow blocks'. Makes it adjustable. Plus its puts the Js behind seat tube, instead of the whole thing behind stube.
Attachments
-
 1.1 MB Views: 272
Last edited:
Well, cut the Js holder plate toooo short. On the right I can't get a weld in w/0 interfering with the bearing holder. On the left, not enough room for sprocket adj. So back to KH metals for another piece. But its going to work.
Attachments
-
 316.5 KB Views: 296
 -
 331.9 KB Views: 298
Last edited:
Nice fab work Scratch even if short.
Here a trick I have used on many builds. Use split lock rings. This was on my 125cc 4spd Lifan build. They are very strong. The engine and the jackshaft were mounted using them(engine weighted 60+lbs!). Allows adjustment of the jackshaft. I have never had any movement of a JS using them. They must be sized correctly though. I welded one half of the ring to the frame on the engine since it needed no further adjustment. The engine could be removed quickly with just 4 bolts.
http://motorbicycling.com/attachment.php?attachmentid=48631&d=1338666789
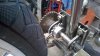
I like that. I'm not sure this is the way I should do this. One of the changes I have to make is moving the bearing holder to the inside edge of the channel. Being in the middle, as you can see interferes with the sprocket. I went to sleep thinking how can I improve this. If this is a go I'm gonna have to gusset the left side also and grind out the middle of the channels so that they rest on each end and not lay flat on the plate. Del Rio's Js is having slight movement and getting cockeyed partly because its a flat plate on flat plate( I should just weld it) together with being on the mm plate,so torque and vibs I'm thinking cause movement even though its sinched down with 4 bolts. What's the story on the lifan build?? Got another pic of js?
Last edited:
I was trying to see how adjustment is attained. The way both my engine mounting plate and my bearing hangers on my bike are adjustable is to slot non-movable metal plate or bracket. What keeps bolts from slipping is by using external star tooth washers between any place you have two surfaces bolted.
Enough surface at the head of a bolt can be enlarged to use with the external star tooth washer and the non-movable metal surface by using fender washer in between.
I've actually used multiple size flat washers when I did not find a fender washer with inner and outer dimensions I needed. The flat washers and the external star tooth washers eventually deform and need to be replaced. This maintenance was after like 2 to 4 years I found. Probably if taken apart and reassembled more often then replacement time would be shortened too, I'm thinking.
Not all the washers in the photo below are there as I was just testing fit, but you can see where a small amount of the external teeth of a external start tooth washer is peeking out not sandwiched between both washer and bracket. It would be best if the teeth all were sandwiched, but as I found it does not matter, as long as a large amount of the teeth are is what I found.
http://motorbicycling.com/attachment.php?attachmentid=84667&d=1484636158
I was curious if the bearing hangers inside diameter have the bearing fit snug. I had ones that are stamp cut holes that the shear left very uneven hole. Loose fit was not really a problem till I had left a bearing too long before replacing and there was both creeping of the bearing in the hanger and the shaft in the inner bearing cutting a groove in the shaft. I shimmed the bearing holder with copper foil and will also check for creeping and just plain replace bearings more often, its cheaper to deal with.
Last edited:
The adjustment is done by the plate having holes one drill bit bigger. I only need level adjustment, not chain. My bearings have lost there snugness, but no play. They are from AGK. I will do the star washer on del rio's Js. I got my carb, so tomorrow I'll see if swappin cranks is a ok.
Last edited:
OK got it about the levelness adjustment. Belts are way more forgiving that chains in that regard. I did notice that I had to grind away some of the weld I made on a plate that it was not completely flat. I did not crack the engine when bolting down, but I noticed something strange. Why the heck was the chain becoming tightened more just because I torqued the engine mount bolts. The engine bottom was teetering on the un-level bump of the engine platform. I used a straight edge of a t-square after grinding the imperfection away and it was gone.
Do you have any pictures of the surfaces of the jackshaft?
I was wondering if the engines run before and after swapping fine, what the condition of the surfaces could be and still run well.
I have some with scratches and was wondering to what extent it could impact running well.
Do you have any pictures of the surfaces of the jackshaft?
I was wondering if the engines run before and after swapping fine, what the condition of the surfaces could be and still run well.
I have some with scratches and was wondering to what extent it could impact running well.
Last edited:
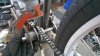
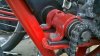
Here's pics of Js..red is del Rio, the one that had slight movement after some riding. Re'did it with 3/8 spacers for adj. had 1/8. once again its nice. The 3hp 5/8 crank swapped is good. Fired up and runs good. I'm going to see if welding a 1/4x2" piece length wise under my mm plate to help with low rpm vibs. By the time I'm done adding metal I'm gonna have a 100# bike....hope not
Attachments
-
 292.9 KB Views: 259
 -
 286 KB Views: 246
Last edited:
I mistakenly said jack shaft, meant picture of how smooth the used "crankshaft" looked that you had already said you swapped one engine to another. This I think so to have a longer crankshaft to attach clutch.Here's pics of Js..red is del Rio, the one that had slight movement after some riding. Re'did it with 3/8 spacers for adj. had 1/8. once again its nice. The 3hp 5/8 crank swapped is good. Fired up and runs good. I'm going to see if welding a 1/4x2" piece length wise under my mm plate to help with low rpm vibs. By the time I'm done adding metal I'm gonna have a 100# bike....hope not
Hey that's great the cranks swapped works in the other Briggs engine.
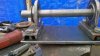
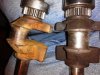
Found this at the O'rileys, Green Thread Lock. It can be removed, but only just a few minutes and I needed to unscrew the set screw on a gear with key way and it was a B#%^. But it did not ruin the threads.
The spit collars I use on the shafts, I have never had loosen and don't need the stuff, but the key way set screws, have had some gone missing. Glad they are under covers and they could be dangerous. But no more of that now.
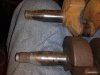
Pic of the two used jack shaft and the newly discovered thread lock that is less than Blue or Red and comes apart with less hassle. It says 1500 pounds hold and if you heat for short while to 500 F it can become liquid again I never tried that, but was almost certain I stripped threads and was so amazed it did not happen! I don't know if after drying for a few days or more will it be needing heat to remove the set crews using the stuff. Time will tell.
Attachments
-
 271.4 KB Views: 266
 -
 386.7 KB Views: 253
 -
 474.8 KB Views: 241
 -
 328.8 KB Views: 271
Last edited:
Wow, I don't know if that's too ruff or not if you could polish em up without loosing 1000ths... I met a guy who sold me 5 briggseys...5$ ea. One is the 3.5 I swapped cranks on. None had carbs...but I put pz's on mine anywho. Thinkin about the low rpm vibs..maybe swap isn't good. Reading about crank balancing here I learned the piston is involved in the weight..the 3.5 piston is bigger the the 3...ummm.. It does smooth out entering midrange rpm.. Ah what the heck I've never experienced blowing up an engine..ill be sure to run a scatter shield...lol
Last edited:
OK, I have the serial numbers on the two Briggs engines. One does not say 3hp on any part I can see, too rusted a recoil cover. The Mod Ser online I think remember saying 3hp. The newer 9XXXX what ever Mod Ser Briggs engine has a more clean paint and says 3.5hp.
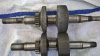
In any case you see the bore and piston diameters being different?
I will be making sure to look and take out the calipers when I have the heads off these engines. In the meantime will look to see what can be found at the Briggs Website or other online places like Smokstack.com
I suspect you didn't get a photo of the crankshaft you swapped, but seems like you feel the photos of the scratches on the cranks I showed seemed more than what you recall of what your going to see run in a different engine?
All I did was take a wire brush, but no 1200 grit paper. Maybe a little sanding with that ultra fine grit?
I hear if no high spots, the scratches only hold oil and as long as I guess that ratio of surface area not scratched to scratched is high, maybe OK?
To sand enough to remove scratches may very well remove more than 1000th and so if I use sanding to limit it like you said.
Last edited:
That's my thought too, smooth the journal..more oil on surface....yeah I'm going eyeball the 3.5 crank, see if I can notice a difference. Heck I got a nice side job goin..maybe look for a 4hp edger!!And I'll be Sure to check shaft length!! Cali has the 4hp limit..might as well max out legally
I am somewhat still thinking how I could adapt the crankshaft that have the longer shaft for putting a clutch on, but still retain using the recoil cover. Using that cup and rope start I know how to do, but so much already is attached to the fan shroud for the throttle, plus the airflow you really ought to keep the shroud as is. I know I've seen so many not doing this, and it works with out it, but also the kind of trail riding, I need to keep as much moving parts away from doing me harm.
https://www.facebook.com/Graphic.world.co/videos/vb.260547404011897/1386319034768056/?type=2&theater
If you can view it, what do you think?
https://www.facebook.com/Graphic.world.co/videos/vb.260547404011897/1386319034768056/?type=2&theater
If you can view it, what do you think?
I don't know about the head air bag...id prolly land on a sharp thing. Besides its kool..strapin on your helmet to go ridin. Nostalgia
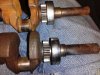
Why yes..there is aaaaaa difference. Gee can ya guess which one is da 3.5??lol
Attachments
-
 410 KB Views: 231
Last edited:
One side of the counter weights is wider as that is easily seen.
Of my extra crankshafts, the pics of the two I have show them being the same as far as the counter weights go. Probably will fit in the 3.5 Briggs and then have a longer 3/4 crankshaft for clutch.
The cup rope starter and a matching flywheel cowl, as opposed to the recoil has me concerned though.
I would guess my two crankshafts are also like the heavier crankshaft you have with the short shaft, except the ones I have, have the longer crankshaft.
I don't know if you have exhausted a search for parts, but I may just decide to swap em for something or sell them. You do see they are not nearly as in good condition from pictures we shared. The scratches I mean.
The two crankshafts I have do show different stamped numbers on them, but look similar. Only one thing I did just notice, the more scratched rusty one may have the shaft end for the cups rope starter threads shorter, either for a reason in manufacture, or some one cut it off. As far as I can tell it probably could be used the way it is if the scratches don't matter too much. Maybe you know, what is that little nub after the threads with a dimple in the end of the shaft needed for? Something to do with maybe using a flywheel puller is all I guess.
Last edited: