

From what I have seen on my two reeded motors, a KTM50 clone, and a Stage 2 Cag pocket bike engine, they use boost ports because with the reeds it works for increasing the intake opening duration, which will work out with the harmonic pulses from an expansion chamber to stuff more air in the engine so you can jet richer and still make it go POW! and therefore make more HPees. This is a science requiring a lot of knowledge and data, either that or having a lot of trial and error experience with what will work and what won't though, if you put reeds on a stock piston-ported engine without boost porting its just an intake restriction which will limit your peak power, you gotta utilize the increased duration of the intake cycle afforded by the reeds.
Building a Ht Motorized Bicycle or Three.
- Thread starter Theon
- Start date

Cheers 16v,
I was gathering that boost ports are the way to get the most out of this, But without some good lead I'm not sure that I know enough to pull it off, still this is why I plan to get two barrels, I've ordered only one so far as I like to know what quality I will be receiving before I buy the second. Top end wasn't my goal with this motor, but still could be fun.
And Intrepid I am following your builds/posts religiously.
Yes 4 strokes are an easy to understand motor compared to a 2 stroke, and my knowledge has along way to go, however I have always had a bent to the more mystical science's. And love the thought of getting 4 or 5 ponies out of something so cheap, small and light.
This one doesn't have to be 'fast', But I'm planning something a little more radical down the line, with a little more experience under my belt.
This bike is wearing 'Knobbies' and will be my 'Dirt Bike'. So 65 Kph tops will probably do, as long as it can 'climb' as well, without shift kit.
OK back to my Soft tail.
And the first motor I built in this thread, with the old RSE crank, I pulled it down again, and decided to use the 5pc crank in my Soft tails cases, They're Identical cases, except for a pulse tube which I don't need on the Softtail, and it was such a smooth motor that I wanted it in this bike. It's likely to be stupid fast with the shift kit, and I have all the bits to put it together and sick of it all laying around on the bench.
So that's my project this arvo.
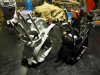
I've got both bottom ends together.
The black cases received a pulse tube barb from a pocket bike carb overflow, and were given a test fit to the bike. I've solved my photo issues (dodgy SD card) and so have some pics.


The black cases received a pulse tube barb from a pocket bike carb overflow, and were given a test fit to the bike. I've solved my photo issues (dodgy SD card) and so have some pics.
Attachments
-
 99.8 KB Views: 155
 -
 82.6 KB Views: 129
 -
 123.7 KB Views: 143
 -
 91.8 KB Views: 117
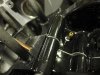
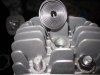
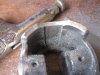
Getting TDC.
Then with my trusty engine stand, $2 protractor, 1mm solder, old verniers and a .7mm base gasket.
I roughly torque the head down without head gasket and do a squish test to find TDC.
And get a squish (without head gasket of .2mm) a little tight, but good.


Then with my trusty engine stand, $2 protractor, 1mm solder, old verniers and a .7mm base gasket.
I roughly torque the head down without head gasket and do a squish test to find TDC.
And get a squish (without head gasket of .2mm) a little tight, but good.
Attachments
-
 85 KB Views: 125
 -
 107.6 KB Views: 122
 -
 98 KB Views: 122
 -
 85.6 KB Views: 115
Last edited:
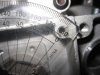
Port Timing.
This barrel has ramped transfers, and I get a Transfer opening time of 116, which is a little early for a standard flat roof transfer port, but good for this style of barrel.
I've taken a little out of the roof of the exhaust, and it opens at 106.
With a new unmodified piston I get inlet closing at 55, so I will be taking a little of the piston skirt to bring it to 60.
Not after a race motor here, so keeping my port timing conservative.
And other than the piston skirt mod I'm happy with all of this and feeling this motor should be back in the bike today.
Last edited:
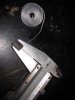
Inlet Timing.
Dropping my piston to 60 deg I scribe a line on the piston where it meets the inlet port floor, and after removing the piston and barrel from the motor I measure that I need 2.5mm from the piston skirt to correct my inlet port timing. This I will do with a Dremel, but can be done with a 1/2 round file. The previous piston that I ran with this crank was lightned considerably, as well as having a little more inlet duration getting me 9500 RPM, But that's not what I'm wanting from this motor, and I will give the skirt a bit of a chamfer and that's about it.
Dropping my piston to 60 deg I scribe a line on the piston where it meets the inlet port floor, and after removing the piston and barrel from the motor I measure that I need 2.5mm from the piston skirt to correct my inlet port timing. This I will do with a Dremel, but can be done with a 1/2 round file. The previous piston that I ran with this crank was lightned considerably, as well as having a little more inlet duration getting me 9500 RPM, But that's not what I'm wanting from this motor, and I will give the skirt a bit of a chamfer and that's about it.
Last edited:
The Seals.
When I build one of these motors I leave the seals until I have the bottom end together, reason being, I like to be sure the crank is spinning freely before I install the seals as they will drag and you can't tell if the crank is free. I then use a slightly oversive socket (21mm) to push the seals in as you do not want the seals to go in to far as they will then be rubbing on the bearing. I forgot to mention also to remove the sharp edge from the step in the crank, for this I use a needle file. if you have not split the cases and therefore have not removed that sharp edge and are just replacing seals, wrap a little electrical tape around the crank step to prevent damaging the seals. Oil or grease the shaft and seal and make sure it is square, they rarely come squarely installed from China and this should be checked on all new motors.
When I build one of these motors I leave the seals until I have the bottom end together, reason being, I like to be sure the crank is spinning freely before I install the seals as they will drag and you can't tell if the crank is free. I then use a slightly oversive socket (21mm) to push the seals in as you do not want the seals to go in to far as they will then be rubbing on the bearing. I forgot to mention also to remove the sharp edge from the step in the crank, for this I use a needle file. if you have not split the cases and therefore have not removed that sharp edge and are just replacing seals, wrap a little electrical tape around the crank step to prevent damaging the seals. Oil or grease the shaft and seal and make sure it is square, they rarely come squarely installed from China and this should be checked on all new motors.
Last edited:
Key's.
It's important to get the keys to fit snug, otherwise they are likely to damage your seals.
If the key is a little lose, I give the underside (curved edge) a tap with the hammer to widen it a little. I also find a lot of the keys have been given a bit of a rough time and often give them a light file to take away sharp edges.
There are two sized keys, but I have spares as I have found there is a multitude of discrepancies in key sizes and I want them to fit perfectly. I have also found the Mag rotor key is always narrow, however the other three could be either narrow or wide? So when swapping clutches, sprockets or drive gear you have to get the one that matches.
On this motor I found the crank to have a wide slot for the drive gear, and the drive gear to have a narrow slot, and although the tapper should hold the gear, I filed a wide key to suit.
Last edited:
The Clutch Shaft.
I have left the clutch bearings out of the cases until now, as the clutch shaft can make it difficult separating the cases while you are test fitting the crank and adjusting crank shims ect.
Using a 25mm (1") socket I first install the clutch side bearing. Being a cheap skate I reuse the original new bearings for the clutch if I find them to be in good order, but use new Japanese bearings for the Mains.
The clutch bearings are spinning a lot slower, are not under as much shock load and can be replaced without splitting the cases.
On every motor I have the clutch flywheel runs wobbly from new. But I find with a little test fitting and file of the shaft, I can get it to run a lot closer to true. Another reason to install clutch bearings after the bottom end is complete.
I also test fit keys and make sure the main clutch spring is adjusted correctly so that it will not push the clutch side bearing out of its seating position when the clutch is engaged.
When happy I grease the clutch mech and install the sprocket side bearing and sprocket.
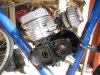
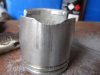
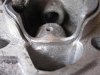
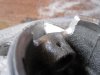
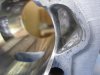
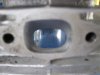
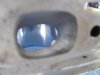
The Piston,
As mentioned earlier, I wish to notch the inlet skirt to correct my inlet timing to 60 deg,
While at it I chamfer and radius everything to reduce drag and improve flow.
I gently clamp the piston into the barrel at it's lowest travel point both to hold the piston while I work and to give an idea of how I want the flow improved into the transfers.
This barrel has already been modified to suit the more radical piston I was running, but will do for now on this motor.
I notice a little scruffing on the piston skirt from the inlet port and realize it needs a little more chamfering.
Attachments
-
 62.1 KB Views: 109
 -
 106.3 KB Views: 116
 -
 84.4 KB Views: 113
 -
 83.8 KB Views: 110
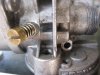
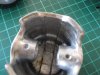
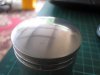
Polish.
Once I'm happy with my piston mods,
I bring everything to a mirror finish.
This helps keep the piston cleaner, cooler, and stronger.


Once I'm happy with my piston mods,
I bring everything to a mirror finish.
This helps keep the piston cleaner, cooler, and stronger.
Attachments
-
 72.5 KB Views: 115
 -
 53 KB Views: 107
Does cutting the skirt for transfer flow help much? Seems to me the transfers are the single weakest link in the ht's and I like what you are doing. Should help reduce vibration too.
While I'm on Polish,
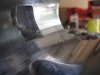
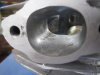
The Barrel.
This barrel was gifted to me for 'product testing/advertising' on an OZ forum.
I will say that I had a falling out with the 'Boss'.
However if you do don't mind his 'Humor'.
Dino at 'Screaming Roo' in Perth. Is probably one of your better OZ suppliers of Quality parts and motors.
I however have a much better relationship with Tony at 'Rock Solid Engineering"!
Right here in Tropical Far North Queensland!
Tony however did not have a '40mm inlet stud' barrel to sell me, neither did 'SR' have one listed and as such I have ordered one from Ebay from a 'bargin' supplier.
I won't mention there name until I receive there barrel.
But at $35 Delivered I will buy a few more depending on my perception/inspection.
So,
for now, to get a motor up and going as soon as possible, I will use this one, It was likely a 'seconds' as it has a minor casting imperfection, hence it was gifted, and I am grateful, as it was by far the best Barrel I've had to work with, so thank you again Dino (he is a generous man!, we just clashed a little and he has put a lot of time and money into creating a 'better motor').
Back to the barrel.(and the Keg!)
It was 'Thrashed'.
It was my 'test engine'. And this old RSE crank is from a long time ago! And Tony said the same! I've had three different barrel/piston combos on it so far, and this will be it's probably sixth 'rebuild/rework', from at least its 3rd Owner!, and I could see this motor had been 'Worked On', As it was not as Tony would have left it!
However, it has 'Out Preformed' any of my other cranks!, and is still 'Tight'.
Back to the Barrel!
It was 'Thrashed'!
You know how you look after things so much better when you've had to 'part with the cash!'...
I already knew what this motor would do, I tested a few different carbs on the new set up, with and with out air filter, at 9500 RPM and holding over 75Kph in tropical FNQ summer heat and humidity, with no more of a 'run in', than than back and down the road for a 'retorque'.
It's got a couple of 'scores' ,but otherwise is 'nicely worn in?'.
I've been giving it a little more 'finishing off' and is 'just about ready' after a little work 'Repolishing'.
And thank you Maniac, I've been trying to put aside the time and 'mood' to put this together for weeks!.

And this is what I've tried to do, Drelmeling out every bit of off excess aluminium I could get at, and this was aimed towards the idea of reed valves 'at some stage', It all depends on what this new barrel turns out like.
As to who gets this one.


Attachments
-
 72.9 KB Views: 112
 -
 61.2 KB Views: 118
 -
 57.8 KB Views: 115
 -
 43.3 KB Views: 108
 -
 37.5 KB Views: 131
Then Wash!
Degreaser, fuel, what ever, degreaser better though.
Then in the kitchen sink, get it clean first!
Hot soapy water, fresh running hot water, in the oven for crank and cases, then blow dry, use a little nylon brush, get it clean. Everything!
Degreaser, fuel, what ever, degreaser better though.
Then in the kitchen sink, get it clean first!
Hot soapy water, fresh running hot water, in the oven for crank and cases, then blow dry, use a little nylon brush, get it clean. Everything!
Gentlemen/Ladies,
Assemble your engines!
I find,
Check Ring Gap!,
To install rings on piston, gently!
Install piston to barrel, with finger nails.
Arrow pointing to the Exhaust Port (Most of the time), check that the piston ring gaps are to the inlet.
Leave room for fitting wrist pin, and install one clip.
I forgot to mention about making sure your head studs are seated properly, I use a little blue Loctite. And straight( perpendicular really), so that the barrel slides on without dropping metal filings in to your new spotlessly clean motor.
Fit your 15mm Wrist Pin Bearing.
After cleaning and soaking in oil.
Make sure Crank Rod is clean also.
And test fit oiled pin.
Also test fit oiled pin to piston.
Put some oil in the Bore.
Install Base gasket.
Slide on and fit pin followed by clip.
Head Gasket.
Next the Head.
The Head,
My Opinion.
You should have bought a motor with a straight fire head!
For those that didn't they cost like $15, throw away your angle fire heads, but not until you check/rectify your squish! You'll probably want to rectify the 38mm stroke port timing while your there, and grind the bejesus out of all the ports, to get it to go any where near a 40 mm stoke standard motor. So then you will spend $65 Plus on a good crank, $35 to $60 on a better barrel, as well as the $15 for the head, then you need ...
My father told me as well as my collage teachers, that for an 'older style motor in good tune, you wanted between 8 and 9.5 to 1 compression ratio on the **** fuel these days,
If you have some good leaded fuel take it to 10.5.
The Straight fire head, with a 40mm stroke crank in the right barrel, with your squish set will give this with a bit of a shave. and give you a far better running motor.
Or just buy one!
A really useful tutorial Theon. I can't say I'm quite ready to get my Dremel out just yet, but at least now I do feel that I know more about tuning a China Girl.