New Build, relatively new to the Forum...a few questions (Pic heavy)

GoldenMotor.com

2door

Moderator
Staff member
Sep 15, 2008
16,302
175
63
Littleton, Colorado
Brass,
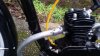
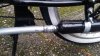
Your tensioer bracket is the absolute best way to go if you have to use a tensioner. Bridging the seat and chain stay is the safest way to mount a tensioner.
If you do some research here, using the search feature and typing in 'chain tensioner' you'll see lots of discussion on the pros and cons of that infamouse piece of hardware.

It isn't always necessary and there are ways of running without it.

As far as the secondary clutch spring, there are two schools of thought on it. Some will say it keeps pressure off of the clutch components thereby decreasing component wear. Then there are those of us who say it serves no purpose and with proper cable adjustment it is unneeded.
There is a thread with some discussion on the small clutch spring. I'll find it and post it here for you to read and make your own decision on whether to use it or not.

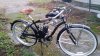
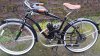
Yourt bike is looking good. Thanks for the updates.

Tom

EDIT: Here's that link > http://motorbicycling.com/showthread.php?t=59876
 
Last edited:

Brassneck

New Member
Oct 30, 2015
72
0
0
Seattle, WA
Today the weather was finally dry (cold, but not raining like it has been the last few days)...so I thought..."let's see if things fires up?"!

I got the carb set up (stock set up...clip in the middle slot), sealed it on the intake (teflon fuel resistant tape as a precaution for air leaks I had read about) and got all the fuel lines connected.

I put in a little oil before tightening down the spark plug (Tested for spark...all good there). and got my gas mixed up with some 2-stroke oil at 16:1 ratio...I was going to go with 20:1, but I don't think it would hurt to just start there. I poured in about 1/4 Gal. in the tank and checked for leaks at the tank/petcock/fuel lines. I didn't see any signs of concern, so out to the driveway I went.

Choke on, clutch pulled, and I started pedaling... released the clutch...chug-chug-chug...then sputter sputter sputter. So it took a few tries but it finally came to life!!! Woohoo!!!! And then it died. Ha ha...

So I noticed that it would die as soon as I let off the gas and realized I hadn't taken the choke off. So I tried it again...and it started up (smoke everywhere...reminds me of my old RD from back in the day...unmistakable two-stroke smell). I putted up and down the street (cheesy grin the whole time) to get a feel for how it sounded/ran...but still would cut out without throttle... So I adjusted the idle screw a few turns out...and back at it again. This time it started up right away, and idles without giving it gas...nice!

Two issues that I found and I think I addressed, but would love some feedback:
1)It would bog down really easily...too rich? or is that normal for this little engine? If I feather it... and keep up speed it seems to do alright...but that seems tedious and feels "wrong" to me.
- So I raised the clip on the needle to the highest slot. But I also then needed to tightened up the idle screw a bit. So NOW it seems to run better--doesn't bog down as much...but it's not GREAT. I'm guessing the 16:1 may be a factor? I didn't get to test it much before it got too dark...so tomorrow I'll play around some more, but if anyone's got any thoughts. (I'm pretty much at sea level...if that's important to anyone).

2) It feels like the clutch is slipping a little...not enough to not start the bike, but even with some pedaling, it doesn't seem to pull right away... I'm use to a motorcycle clutch, and I imagine some slipping is going to happen...but what's too much? I'd like to not burn out the clutch pads too soon.
-So I spent some time tightening the clutch and it also doesn't slip as much but am worried it's too tight? What's the best setting? With the clutch pulled in, I have the cover plate pushed it and the cover screw (thingy) tightened as far as it will go...then backed out about 1/4 of a turn (with the nearest set-screw mark).

Final take-aways...I live on a little hill (not huge, maybe 2-3% incline) and it seems to pull me up it ok, but not at record speeds of course. I took it out around the block a few times... trying to get a feel for the throttle...it's got a pretty short pull...not use to that. I have been trying to avoid WOT, but it seems like it needs it to get going...? Top speed is 22mph (downhill), trying to vary the speed as much as I can. I rode it for about 20-25min...and let it cool off before I took it out once more for about 10 min. But I ran out of daylight for more.

I probably need to do some more tuning and reading on here for best practices. Any how, I'm excited... hoping to get to ride tomorrow (weather permitting).

Here's a vid of the bike running:
https://www.youtube.com/watch?v=AOdyvQkbBdc&feature=youtu.be
 

bailsafe

New Member
Oct 23, 2015
71
0
0
Slippery Rock, PA, USA
Your gas-to-oil ratio is probably too rich. I got my bike running for a few weeks on 18:1 but 32:1 is a huge improvement, and I only have 20 miles on my engine. You should see your throttle response improve after that (at least, I certainly did).
 

Brassneck

New Member
Oct 30, 2015
72
0
0
Seattle, WA
Your gas-to-oil ratio is probably too rich. I got my bike running for a few weeks on 18:1 but 32:1 is a huge improvement, and I only have 20 miles on my engine. You should see your throttle response improve after that (at least, I certainly did).
Good to know, thanks...I'll burn through this gallon and move to a higher ratio I think.
 

2door

Moderator
Staff member
Sep 15, 2008
16,302
175
63
Littleton, Colorado
Brass,
Start here for proper clutch adjustment. http://motorbicycling.com/showthread.php?t=22726 It might be that your cable is too tight. Follow the instructions for the right way to adjust the flower nut.

Most of us agree that 16:1 is too much oil. I know the kit instructions say to mix it that way but many of us disagree. Don't go any higher than 24:1, and 32:1 is even better.

Don't expect the engine to give you top performance until it has a couple of hundred miles on it. Run through several tanks of fuel before worrying about how it runs.

Don't be afraid to run it hard a little. WOT for short durations is safe and there are many of us that do not follow break-in procedures too closely and run our engines like we plan to ride the bike. Don't baby it. That will just promote plug fouling, especially with a high content oil mix.

The needle 'C' clip should be in the second notch from the top. That's a good starting place for a new engine. You'll probably find it will work in that position well after break-in.

Now would be a good time to 'check' the torque on those cyclinder head fasteners. They will probably take a little tightening but don't exceed 140 inch pounds. Use a torque wrench! Also check everything else for tightness on the bike. Wheels, steering, brakes, anything with threads should be checked after a couple of initial rides.

Good luck and keep us posted.

Tom
 

Brassneck

New Member
Oct 30, 2015
72
0
0
Seattle, WA
A quick update:

Did a quick look at every bolt, especially the fairings...so far so good.

Noticed the chain slacking a little...not sure if the tensioner is slipping or if the chain is stretching...either way, I adjusted and tightened it down.

I also adjusted the clutch a bit more...feels good now (Or else I'm getting more use to it).

Checked the head bolts..still holding torque.

I did have to adjust my brakes a bit, so now my stopping is much better. The pads are practically riding the rims, but I'd rather have good brakes than worry about the wear on the pads at this time. Disk brakes are probably a better choice, but that's not going to happen on this bike.

Been riding around the neighborhood for as long as I can stand the chill. Super fun, though and EVERYONE I pass gives me a nod...that's pretty cool. I even pulled up next to a police car... he gave me the thumbs up. Ha ha. (I have no idea if it's even legal to ride this thing around here-- I did read something about it needing to be registered or something or other, but I'll just keep to myself until I learn otherwise).

As to issues...I've left the needle clip at the top notch since my last adjustment and that seems to be ok...although it seems to want to 4 stroke in the mid-range... gotta read up on that, but again, maybe it's from the rich oil mix and/or break in period?

Thoughts?
 

Brassneck

New Member
Oct 30, 2015
72
0
0
Seattle, WA
Been playing with the bike for a few days now...starts up great, idles great...but tuning it is still on the list as it's not perfect.

After about 40 miles on the bike, I wanted to check the spark plug. As I suspected, it's is oily/black. I know the mixture is heavy but also likely rich. Before I messed with the carb any more I wanted to play with a few things to see if/what will impact a leaner condition--Specifically with regard to exhaust and air intake.

With regard to air intake, I've run the bike without the stock filter to see how it breathed and it seemed to be a little better in terms of smoother idle and overall running. So I think the breathing of the carb could be better than the stock filter...Not sure on what works best (More reading to do), but I see them advertised all over...so there seems to be some options there.

Anyone have a recommendation for a better air filter to fit the NT stock carb?

As to exhaust, I am guessing this has the most impact for leaning out the bike. With the 16:1 ratio, it's pretty much dripping oil from the exhaust cap...so I took it off to clean...and for kicks ran it with the cap off... WAY louder! But also very very peppy! Lots of torque and ZERO 4 stroking! I'm sure this would impact top end speed, but I liked the power. :)

I think 2 strokes need back pressure, but how much? I think the baffles in there provided enough without the cap and still allow the motor to breath better (my only other 2 stroke was back in college and I didn't know anything about it other than mixing fuel/oil and riding it like an crazed idiot...so I never really played with tuning on one until now). I'd be happy to run it without the cap, but the noise level isn't really appropriate for anyone...so I recapped it and it fell back into it's mild sound and loss of torque , it's not ideal, but I'mm still breaking in the engine...so nothing is of HUGE importance right now. However, I want to figure out a way to open up the exhaust and minimize the sound down the road.

I've read up on a few ideas to drill out the baffles, but for some reason, all the posts on this are a few years older at least and I don't see anyone with the same type of exhaust (internals) as mine. When I unscrew the cap, all that comes out is the little exhaust pipe that's attached to the cap. Everything else (baffles, etc) are welded (I think) inside.

Is there a picture or two of the modern style exhaust internals anywhere?

Some ideas I had:
1) I could drill a hole or two in the little pipe (The one attached to the end cap that comes out when I unscrew the cap) I believe this pipe goes up into the baffles and pulls exhaust from within the baffle chambers.

2) I could cut the little tube off just inside the end cap...so that it no longer requires the gasses to be pulled from within the baffles

3) I could drill a hole in the baffle end-cap...this is the part of the internal baffle that's closest to the ground (Away from engine)...and is visible when the cap is removed and you look down into the exhaust pipe. This cap has a tube welded to it with lots of holes. (Not sure if drilling this cap will do all that much?)

4) I could drill the inner baffle end cap (I imagine this is closest to the engine side and isn't visible without removing the entire baffle assembly.) Maybe a combo of option #2 & 3 might work?

5) I could simply add another hole in the end cap?

Anyone have experience with any or all of these? Which would be the better route to go? (The good thing is these pipes are cheap and messing one up isn't the end of the world...but I'd like to do what's been proven to work as the first steps).

Thanks for the help/advise!
 

Brassneck

New Member
Oct 30, 2015
72
0
0
Seattle, WA
Got a new seat/seat post and grips today...decided to see how they looked on (Feels good riding...which is good).

I like the idea overall...but I'm not sure it looks correct. I'm looking for a 90 degree seat post of some kind...so I can get it lower, but I don't have welding skills.

It may grow on me... especially after I fab up the gas tank that will go on this bike.

(Sorry about the blurry pic...was in a rush)
 

Attachments

Brassneck

New Member
Oct 30, 2015
72
0
0
Seattle, WA
Short update...haven't been in town for a few days... and yesterday I found the carb leaking (Must have been doing so over the last few days)...I took it apart and cleaned it up...lowered the float a bit (The float's not cracked or leaking which was my initial fear). I also jiggled the primer "button" as it seems to be hanging up a little which may have been the cause of letting fuel past the valve...so far so good once put back on. We'll see.
 

2door

Moderator
Staff member
Sep 15, 2008
16,302
175
63
Littleton, Colorado
The most common cause of a leaking carburetor is dirt in the float needle valve. We always suggest installing an in-line fuel filter and cleaning the fuel tank before installation. You'll also want to remember to shut off the fuel petcock whenever the bike is parked.

As for the seat post you might want to check our 'Swap & Shop' section. One of our members makes custom posts to your specifications.

Tom
 

Brassneck

New Member
Oct 30, 2015
72
0
0
Seattle, WA
The most common cause of a leaking carburetor is dirt in the float needle valve. We always suggest installing an in-line fuel filter and cleaning the fuel tank before installation. You'll also want to remember to shut off the fuel petcock whenever the bike is parked.

As for the seat post you might want to check our 'Swap & Shop' section. One of our members makes custom posts to your specifications.

Tom
Thanks Tom...good reminders.

Yep, in-line filter is aftermarket, I have about 20 of them laying around (for my motorcycles)...and imstalled on day one...note: I tossed the one that came with the kit..it was garbage.

Fuel tank was so dirty...glad I cleaned it prior to install...simple precaution that is a MUST DO with these kits.

I have a few manual petcocks on my other bikes...so shutting them off is standard practice for me. ;)

Thanks for the tip on the seat post...I saw those and will go that route...they look perfect. I'm going to wait on it until after I make my gas tank...later this winter.
 

KCvale

Well-Known Member
Feb 28, 2010
3,966
57
48
Phoenix,AZ

Brassneck

New Member
Oct 30, 2015
72
0
0
Seattle, WA
Are you looking to mod the frame for an in frame gas tank?
This is harder and more costly than you may suspect.
I converted a Columbia fake 'board tracker' in frame gas tank facade into a real 1.3 gallon tank and it cost me countless hours and $300.


http://motorbicycling.com//www.pinterest.com/pin/create/extension/
Hi KCVale, I saw your tank when I was doing some research...Awesome job!!! When I saw it... I was thinking...that's what I should have done. It's perfect. :)

But you're right... I don't expect it to be quick, nor relatively cheap. (None of my hobbies are cheap unfortunately). I wish I had experience working with metal as that would be great...instead I'm going to build a tank out of fiberglass/epoxy that will sit over the top bar slightly...I've got a few ideas on shape, but we'll have to see how it ultimately comes out.

I've built a few molds for my cafe bike, and am familiar with fiberglass/epoxy and fuel...so it should work OK. I'm definitely not the best at it when it comes to finish/paint, etc. However I'll be taking my time...and perhaps this time it will look decent. LOL
 

KCvale

Well-Known Member
Feb 28, 2010
3,966
57
48
Phoenix,AZ

Brassneck

New Member
Oct 30, 2015
72
0
0
Seattle, WA
Do you happen to have a link for your chain tensioner? I like that look.
Yep...I got mine on Amazon, but I don't see it listed anymore. But you can find them on ebay.

Here's one: http://www.ebay.com/itm/like/262017078567?ul_noapp=true&chn=ps&lpid=82

Note: I didn't realize there were different sizes when I ordered...I think mine is 12", but I would have gotten a 10" if I had known...as it would have fit better. That being said, I'm using the bottom portion for a custom exhaust mount location...so I suppose it all works out in the end. :)
 

Brassneck

New Member
Oct 30, 2015
72
0
0
Seattle, WA
Update on my build.

I've been playing with exhaust options, having gone from the stock, to a modified stock (essentially took the end cap off...then took an aerosol can about the same dimensions as the exhaust pipe, drilled out the bottom hole and strapped it around the exhaust (Leaving the baffles in place). This allowed a lot more air to flow, and helped the low-end torque...and only a little louder, but I don't think it looked all that great.

I was thinking I'd go with a poo poo pipe as I like the look, but decided to make my own. I read on here about using EMT tubing...which sounds pretty cool. I have a bender, so why not? So I got a cheap stock exhaust pipe off amazon and cut the pipe off about 1 1/2" from the top mount flange and same with the bottom at the exhaust itself... I got some 3/4" EMT tubing and started bending to what I thought would work...Alas, I ruined the first pipe, as my bends were too wide and fixing the initial bends ended up kinking the whole thing. (Good thing these pipes are cheap... only about $3 per 5' pipe).

The next one I did a lot more measuring and thinking through how the bends ought to be.. so that I could bend down the line as I went... which clearly is a must do...it's really hard to go back and fix them once things are twisted/turned on the pipe. LOL

So once that was done, my focus came to how to connect the pipe with the top mount flange and the exhaust pipe itself. The main issue with using EMT is that the exhaust pipe OD is just a hair smaller than the 3/4" EMT tubing. I first thought if I could grind down the exhaust OD to slide into the EMT, that would be perfect...but I think there will be structural issues with the thickness of the pipe when it's that thin...and I abandoned this idea as I started to sand... realizing how thin I'd be going.

So my temp solution is to use EMT connectors... the EMT fits snug, but as stated, the exhaust tubing is way too loose.... however there are screws to lock it in, and I've used exhaust repair wrap as a filler for the diameter difference. It's not pretty...but so far it's working. What I need to do ultimately is weld it together so that is more rigid (as it does move a little when riding) I think brazing would work...but I have to get my hands on some Oxy/Acetylene...which I don't have.

Anyways, here are some pics.

If anyone has ideas on connecting the pipes without welding that may work...let me know.

In terms of performance: Way more quiet... the exhaust is stock and baffles still in there...but I've found the pipe to be a little peppier... little to no 4 stroking. I'm happy with it...

Once I get the connectors more secure, I'll paint it black.
 

Attachments

2door

Moderator
Staff member
Sep 15, 2008
16,302
175
63
Littleton, Colorado
You're certainly on the right track. This is a little late but in case you want to try again I'll suggest you leave more pipe from the flange. Retain some of the bend that was already there and that means you don't need a complete circular bend in the EMT.

As for connecting the conduit to the exhaust pipe, here is another suggestion. I 'swedge' the EMT. It doesn't take much to get it to slide over the pipe material and all you need is about 1/2". I TIG weld this connection using stainless steel filler rod. Of course I realize everyone doesn't have access to TIG and it isn't necessary. Your idea of brazing will work, just not as pretty. There are 'swedging' tools available but I made one from a pair of battery cable terminal spreader pliers. I heat the EMT then insert the pliers and squeeze while rotating the pliers inside the EMT.

Another suggestion. EMT will buff well and give you a near chrome-like finish. I use a buffing wheel on a bench grinder and stainless buffing compound. Once buffed you can retain the shine with an occasional cleaning with any good metal polish.

Just in case you don't know this (if you do, sorry, just need to include this) But welding or brazing on EMT will expose you to potentially toxic vapors. The galvanized plating is not good stuff to breath when it is heated. Do it outdoors and with good ventilation.

Your idea to use conduit connectors might work but keep in mind that the 'stop' or that stamped ridge at the center is a weak area and prone to breaking under stress or vibration. Just be aware.

Tom