

to have it flush requires me to mount the engine really high... custom motor mounts maybe?2door look at the angle of the rear mount in relation to the seat post tube, it is no where close to being mounted flush on the tube, this will not work as we already know from our own experience.
chain tensionor mounted upside-down on seat stays instead of chain stays?
- Thread starter bfgmovies
- Start date

oh yeah i have a huge plate that i created and a much larger u-bolt on the down-tubes there, my down-tubes are enormous and even the "universal" mounting plates were too small.. maybe I should drill my frame?It looks like your rear mount is still not sitting flush with the seat post down tube, if it is not flush top and bottom your rear studs through the mount will break very quickly while running, it is very important that the rear mount sit flush and snug on the down tube.
Question: is the front down tube that runs from the fork tube down to the cranks too large for the front mounting of the engine to fit over it?
The reason I ask is that it looks as though you have a mounting plate of some type on front of engine which is not needed if the engine itself will saddle over the front tube, if it will saddle over it that will allow your engine to be lower and also would probably help to resolve the issue with the rear mount not setting flush on the seat post tube. I may be off the mark on this here but I cant see clearly enough in the pic to tell the size of that front tube and what you have on the front of your engine.
You can cut the rear mount down to move the motor farther down.
If you still need more clearance consider getting a smaller rear
sprocket that will also let you cruise at lower RPM's and more top speed.
If you still need more clearance consider getting a smaller rear
sprocket that will also let you cruise at lower RPM's and more top speed.
oh yeah i have a huge plate that i created and a much larger u-bolt on the down-tubes there, my down-tubes are enormous and even the "universal" mounting plates were too small.. maybe I should drill my frame?
BiMoPed, has some good suggestions there, smaller sprocket would lower the position of the chain, and like he said you can take the rear mount and cut maybe 1/4" of an inch off the back side which would allow the engine to sit lower as well, NOW...... if you do this mod. you must make sure that the cut is very straight and even so the mounting block will sit flush back with the engine block, if not it will stress the studs and cause them to break under load & vibrasion.
I know the frustration you are going through on this because I was there once myself with a bike that just had things against it as for as motorizing it, it too was a Schwinn and I still have it, but I stripped it down and used the front suspension and a few other things to build another bike that had a much more user friendly frame, the Schwinn Comfort Bike was causing me way to much trouble.
As far as custom mounts go....normally they are used when we have too much room and need to/or can reach out to the front down tube, but in your case you dont have enough room and that pretty much rules out a set of custom mounts because they require more room than you have to work with and would make the problem even worse, I dont fancy drilling the frame myself and really dont see that this would benefit you in any way as far as adding more room, honestly I would say your bike is probably better suited for a friction drive set up just like my Schwinn is, but I do think that if you could remove some material from the rear mounting block and also go to maybe a 36T rear sprocket you could possibly get the clearance you need and get it done that way, it's hard for myself or any of us to give absolutes for ya since we are not able to actually put our hands on the bike and give it a closer look, but with a couple of these mods. it does seem to be posible to get your motor mounted in a position that will work.
Also, if the carb. still has a clearance problem after the engine is in a workable position, you may consider using one of Jim's little Custom Billet Intakes, and a low profile breather, Pirate Cycles has them both and they are great products you can get them both for about $32-$34 shipped to your door and not only do they give you more room but your engine will run better too, they are great products.
If you need some advice on how to remove 1/4" material from the rear mount and get the cut straight just let us know and I will post some pics of what you will need to do, I dont have them but I can take a part and create some for you if need be, all you will need is to have a bench vise available, a Hacksaw, a couple small pieces of thin flat steel or alum. to use as guides and a tape measure or set of calipers, even an old wooden ruler could be use if need be.
If you have these tools available and need this how to advice just let me know and this afternoon when I have the time I will put something together for you on this that can help you cut those mounts down if you choose to go that way with it, GREAT Idea BiMoPed.........!
Attachments
-
 475.1 KB Views: 88
 -
 104.6 KB Views: 107
lol, I just noticed, yeah that's a little off flush2door look at the angle of the rear mount in relation to the seat post tube, it is no where close to being mounted flush on the tube, this will not work as we already know from our own experience.

If you decide to cut your mount, I'd first get a block of hardwood, cut a hole the same diameter in it as your seat tube, cut across the hole you cut and drill two mounting holes. This way you can cut the engine block side back of the mount and test fit without ruining the aluminum mount. You can even keep the hardwood block as your permanent mount.
Just my $.02 here but I dont think I would want a rear mounting block made from wood even if it's hard wood, it will compress in time and cause the engine to get loose and this will cause the rear studs to break if not caught in time.
But IF... someone has the tools to do all the work you described it would be fine to build a ptototype mount just to make sure it was the correct size before cutting the Alum. one, if not I would just remove about 1/8" material at a time until it set in the desired position, after all it is always easier to remove a little more material that it is to put it back, but in this case it can be shimmed on the back side if to much is removed so that would not really be a big issue here.
But IF... someone has the tools to do all the work you described it would be fine to build a ptototype mount just to make sure it was the correct size before cutting the Alum. one, if not I would just remove about 1/8" material at a time until it set in the desired position, after all it is always easier to remove a little more material that it is to put it back, but in this case it can be shimmed on the back side if to much is removed so that would not really be a big issue here.
oh man thanks for all the input! well anyway here is what I did!BiMoPed, has some good suggestions there, smaller sprocket would lower the position of the chain, and like he said you can take the rear mount and cut maybe 1/4" of an inch off the back side which would allow the engine to sit lower as well, NOW...... if you do this mod. you must make sure that the cut is very straight and even so the mounting block will sit flush back with the engine block, if not it will stress the studs and cause them to break under load & vibrasion.
I know the frustration you are going through on this because I was there once myself with a bike that just had things against it as for as motorizing it, it too was a Schwinn and I still have it, but I stripped it down and used the front suspension and a few other things to build another bike that had a much more user friendly frame, the Schwinn Comfort Bike was causing me way to much trouble.
As far as custom mounts go....normally they are used when we have too much room and need to/or can reach out to the front down tube, but in your case you dont have enough room and that pretty much rules out a set of custom mounts because they require more room than you have to work with and would make the problem even worse, I dont fancy drilling the frame myself and really dont see that this would benefit you in any way as far as adding more room, honestly I would say your bike is probably better suited for a friction drive set up just like my Schwinn is, but I do think that if you could remove some material from the rear mounting block and also go to maybe a 36T rear sprocket you could possibly get the clearance you need and get it done that way, it's hard for myself or any of us to give absolutes for ya since we are not able to actually put our hands on the bike and give it a closer look, but with a couple of these mods. it does seem to be posible to get your motor mounted in a position that will work.
Also, if the carb. still has a clearance problem after the engine is in a workable position, you may consider using one of Jim's little Custom Billet Intakes, and a low profile breather, Pirate Cycles has them both and they are great products you can get them both for about $32-$34 shipped to your door and not only do they give you more room but your engine will run better too, they are great products.
If you need some advice on how to remove 1/4" material from the rear mount and get the cut straight just let us know and I will post some pics of what you will need to do, I dont have them but I can take a part and create some for you if need be, all you will need is to have a bench vise available, a Hacksaw, a couple small pieces of thin flat steel or alum. to use as guides and a tape measure or set of calipers, even an old wooden ruler could be use if need be.
If you have these tools available and need this how to advice just let me know and this afternoon when I have the time I will put something together for you on this that can help you cut those mounts down if you choose to go that way with it, GREAT Idea BiMoPed.........!
I went to lowes today and actually got myself a freaking dremel tool, and I swear I am SO GLAD i got this thing because now I can cut through so much metal a million times faster and more acurate than using that crazy hack saw...
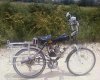
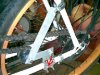
well I cut the rear mount as short as I could get it, which lowered my engine just low enough to clear the seat stay.. I'm actually going to order a 36t sprocket as well (which I intended on doing in the first place) I was also able to use the dremel to get a few more links off (before it took me like 3 hours to get a pin out, and now it only took like 10 minutes) I haven't tightened everyhting down yet (so it may look like there is slack) but that won't be there once I get it tightened down
so I'm pretty excited about this!
Attachments
-
![IMG_1282[1].JPG](/data/attachments/24/24021-bef0478d14948e560bb6c4fca41f7d59.jpg) 233 KB Views: 104
233 KB Views: 104 -
![IMG_1280[1].JPG](/data/attachments/24/24022-98ebe44dad2d4238379628e0906f8271.jpg) 300.2 KB Views: 103
300.2 KB Views: 103
Glad to see you got he engine mounted nice and flush, those Dremels are a great little tool, I use mine all the time for many things...!oh man thanks for all the input! well anyway here is what I did!
I went to lowes today and actually got myself a freaking dremel tool, and I swear I am SO GLAD i got this thing because now I can cut through so much metal a million times faster and more acurate than using that crazy hack saw...
well I cut the rear mount as short as I could get it, which lowered my engine just low enough to clear the seat stay.. I'm actually going to order a 36t sprocket as well (which I intended on doing in the first place) I was also able to use the dremel to get a few more links off (before it took me like 3 hours to get a pin out, and now it only took like 10 minutes) I haven't tightened everyhting down yet (so it may look like there is slack) but that won't be there once I get it tightened down
so I'm pretty excited about this!
Now if you dont have them already I suggest getting some 6mm Nyloc Nuts to put on behind the factory nuts on those studs, also use a dab of blue loctite on each of them, this will serve as pretty good insurance against them coming loose, also when you tighten everything down for keeps be sure NOT to over tighten the nuts just get them good and snug and then just tweak them a little this has worked great for me, never have anymore issues with lose nuts or broken rear studs after using this method.
If you plan on running your bike before you get your 36T sprocket you will need to make a simple but very important Mod. to your chain tensioner by drilling a small hole through it and into the frame tubing under it so that you can put a small sheet metal screw through the tensioner and into the frame, this will keep the tensioner from rotating inward and wrecking you and your wheel, this will need to be done only after you have it in the position that it needs to be with the roller lowered all the way down so that as the chain stretches you can raise the roller to adjust it.
I realize that I may be telling you things that you already know so just disreguard anything that you already know, I'm just sharing everything I can thank of that may help you avoid problems that I had on my first build and later resolved through help from other on this forum and trial and error on my own.
The pic below is of a tensioner I put together for one of my bikes a little ugly but plenty stout and that is the most important thing to me, you will notice that even though the pic is not real clear you can see where I drilled it and installed a small self tapping sheet metal screw to secure it to the frame.
Just hang in there and take your time. think everything through and keep asking questions.....together we'll have you up and running pretty soon looks like!
Shan

Attachments
-
 56.7 KB Views: 112
Last edited:
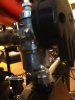
cool I went ahead and did what you said and ran it for the first time today and it was pretty epic, although for some reason my carb is leaking and I don't know were it's leaking from. I know it's not leaking from where the fuel line attaches to the carb because even with that disconnected it leaks
here is where the gas collects and drips from
here is where the gas collects and drips from
Attachments
-
 158.7 KB Views: 94
Did you try tightening that screw? That's the bowl drain and there is a gasket under the screw head. If you're certain the fuel is coming from that screw then tighten or seal it. If not, you might have a float that is too high or a little crud in the needle valve that is holding it open. If the carburetor bowl has too much fuel in it, the fuel will find a way out and will cause a flooded and over rich running condition. Check your spark plug color. Very dark indicates a rich mixture. I've found most carburetors can benefit by lowering the float level slightly. This is accomplished by bending the tangs of the float pivot, ever-so-slightly downward. Make sure you bend them both equally.
Tom
Tom
thanks man! tried that and it worked, also had to do some more modifications to my custom made offset intake manifold and everything seems to go well, however my engine doesn't idle.. like I'll brake it to a stop and then the engine just shuts off automatically, I have no idea why it would do this?Did you try tightening that screw? That's the bowl drain and there is a gasket under the screw head. If you're certain the fuel is coming from that screw then tighten or seal it. If not, you might have a float that is too high or a little crud in the needle valve that is holding it open. If the carburetor bowl has too much fuel in it, the fuel will find a way out and will cause a flooded and over rich running condition. Check your spark plug color. Very dark indicates a rich mixture. I've found most carburetors can benefit by lowering the float level slightly. This is accomplished by bending the tangs of the float pivot, ever-so-slightly downward. Make sure you bend them both equally.
Tom
Did you turn the idle screw in?thanks man! tried that and it worked, also had to do some more modifications to my custom made offset intake manifold and everything seems to go well, however my engine doesn't idle.. like I'll brake it to a stop and then the engine just shuts off automatically, I have no idea why it would do this?
I don't remember messing with it, should I turn it out?Did you turn the idle screw in?
The idle screw does just that...adjusts idle. Turn in to increase idle and out to decrease. All it is, is a stop for the piston.I don't remember messing with it, should I turn it out?
Just for sake of clarification here, and for newbies who might misunderstand, the carburetor slide, or barrel is what Al is talking about when he referred to the piston. The idle speed set screw blocks downward movement of it thereby increasing/decreasing the amount of air/fuel that can flow during idle. It works much like the one on any carburetor except that its action is internal as opposed to being attached to the outside and working on the carb linkage.The idle screw does just that...adjusts idle. Turn in to increase idle and out to decrease. All it is, is a stop for the piston.
No offense, Al. I knew what you were referring to.
Tom
No offense taken, sometimes one can explain in laymen terms better then another. What seems so simple to those that know runs others ragged.
Hey bfgmovies, just wanted to say that I'm glad to see that you have your bike running, I know you've been working like crazy on it.....!
Shan
Shan