Ok the kids went to bed early so I thought I would start a new thread reporting back to you with my progress. I have taken more away from these forums then I have given to it. So I hope this helps someone that is in a similar situation of minimum tools, time and money!
So my original question , Found here: http://motorbicycling.com/f13/exhaust-fabrication-expansion-chamber-25186.html . Basically my question was how in the world am I going to take a dirt bike expansion chamber and connect it to my exhaust port of my 49cc 2 stroke? After a number of responses I realized 3 things A:Realized that this forum consists of a lot of experienced fabbers B: I came to my senses to stop looking online for a flange and just buy a piece of steel and fab it myself.
So this is what I did.
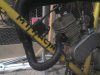
I received my expansion chamber on Saturday ,Ebay sale, from a guy in Texas and could not be anymore pumped. I call it a piece of art , a beauty ,a finely crafted sound chamber designed to harness a sound wave and its pressure<---(Definitely not a wiki definition) Here is the pipe.


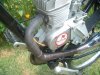
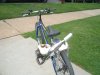
Like I said I am so pleased with it because it really fits well with my frame and pedals. The bend is pretty much perfect for the application and will require minimum fabbin to make it clear everything and has plenty clearance.
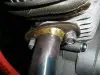
Ok so you all know what the exhaust port off of your chinese girl looks like but here is what I am working with for the inlet of the chamber.

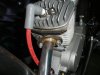
I really am open to suggestion at this point in time because I have an idea at this point and time and I hope it is the best and works. I fabricated a flange and I am pretty embarrassed guys by it aesthetics. I did all of this with only an angle grinder, a hand drill, files, sand paper and other basics. So bare with me, it sits flush on the jug and I am hopeing and praying I can get a 45 degree copper elbow welded or brazed to it. Which opens another question...do you think I will run into any problems joining these two different metals? Can I expect to have this brazed or welded?

(Continued on next post)
So my original question , Found here: http://motorbicycling.com/f13/exhaust-fabrication-expansion-chamber-25186.html . Basically my question was how in the world am I going to take a dirt bike expansion chamber and connect it to my exhaust port of my 49cc 2 stroke? After a number of responses I realized 3 things A:Realized that this forum consists of a lot of experienced fabbers B: I came to my senses to stop looking online for a flange and just buy a piece of steel and fab it myself.
So this is what I did.
I received my expansion chamber on Saturday ,Ebay sale, from a guy in Texas and could not be anymore pumped. I call it a piece of art , a beauty ,a finely crafted sound chamber designed to harness a sound wave and its pressure<---(Definitely not a wiki definition) Here is the pipe.
Like I said I am so pleased with it because it really fits well with my frame and pedals. The bend is pretty much perfect for the application and will require minimum fabbin to make it clear everything and has plenty clearance.
Ok so you all know what the exhaust port off of your chinese girl looks like but here is what I am working with for the inlet of the chamber.
I really am open to suggestion at this point in time because I have an idea at this point and time and I hope it is the best and works. I fabricated a flange and I am pretty embarrassed guys by it aesthetics. I did all of this with only an angle grinder, a hand drill, files, sand paper and other basics. So bare with me, it sits flush on the jug and I am hopeing and praying I can get a 45 degree copper elbow welded or brazed to it. Which opens another question...do you think I will run into any problems joining these two different metals? Can I expect to have this brazed or welded?
(Continued on next post)
Last edited:

")