just ordered 70cc puch hi hi head .review to come

GoldenMotor.com

rogergendron1

New Member
Sep 18, 2013
882
2
0
42
woburn ma
edit... this thread contains detailed info on the correct insallation and modifacation off the 70cc puch hi hi head.


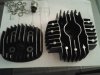
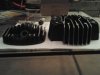
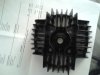
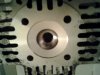
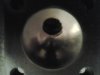
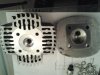
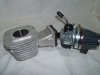
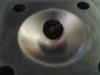
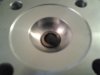
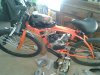
okay I just ordered the 70 CC pUch hi hi head from treatLand.
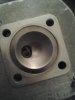
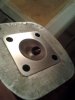
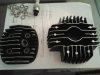
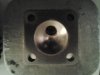
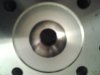
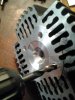
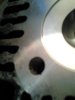
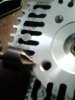
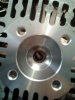
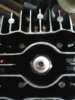
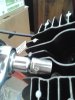
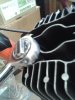
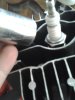
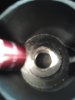
I am currently running the stock angle fire head milled down to a 6cc combustion chamber With no squish band ... it got milled off wile decking down the head and reshaping the chamber to a single hemi sphere.

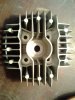
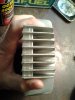
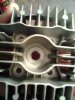
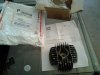
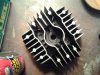
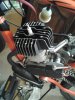
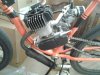
With a 6 cc head on a 66cc gt5 i was at 11:1 comp uncorrected. Roughly. The results were a dramatic Increase in power everywhere, especialy. The midrange . I liked the increase in power a lot but i know that with a head that has a proper squish band and Large cooling fins with a single dome and strait plug will be even better!!! So i gave in and ordered a puch 70 cc hi hi . I plan on doing a full review of the head vs my stock rechambered head with pictures comparisons and all. I think i will run the hi hi with a single stock head gasket and see how she goes for a day. Any way pics when it arrives in the mail and a review of price quality and instalation.

More to come.
 
Last edited:

rogergendron1

New Member
Sep 18, 2013
882
2
0
42
woburn ma
Oh the stock rechambered head was not bought. It was modified by me.
I decked it almost down to the cooling fins and reshaped the chamber to a single half sphere. Final size measured with plexyglass and water was 6cc .
 

Moto

Member
Jan 7, 2012
403
15
18
San Francisco, CA.
Just a small piece of advice for the puch head: Ive put these on lots of motors for friends and my personal bikes - they are great. However make sure you have proper clearances to keep the piston from hitting the head. I have had this problem before. It seems to happen when the motor gets hot and the piston starts to hit the head. This seems counter-intuitive as metals expand as they get hot. Just make sure you have the necessary clearances by adding some base gaskets if necessary or a thicker head gasket (even with this they are very high compression) - otherwise your piston will get beat up and trash your cylinder etc. -Ethan
 

rogergendron1

New Member
Sep 18, 2013
882
2
0
42
woburn ma
Just a small piece of advice for the puch head: Ive put these on lots of motors for friends and my personal bikes - they are great. However make sure you have proper clearances to keep the piston from hitting the head. I have had this problem before. It seems to happen when the motor gets hot and the piston starts to hit the head. This seems counter-intuitive as metals expand as they get hot. Just make sure you have the necessary clearances by adding some base gaskets if necessary or a thicker head gasket (even with this they are very high compression) - otherwise your piston will get beat up and trash your cylinder etc. -Ethan
yeh i am running a stock head milled down now .... it has a 5mm flat spot where the squish band used to be due to the amount milled off,( the chamber size shrank in diamiter and looks like it belongs on a 50cc lol) and with a stock head gasket the piston does not hit the flat spot that hangs 5+mm into the boar of the jug even on a 60 mile ride at 3/4 the whole way !
so i asume that with the same stock head gasket and a chamber size that of the boar and a squish band that angles up and not a large flat spot the piston will not hit...

look at the head i am running now ! i took so much off the outer fins started to be sanded down too lol !!! that was a mutch as i could take off without the dome of the piston hitting with the stock gasket ....

you see the giant flat where the rest of the chamber used to be ! lol there was chamber and a squish band there... not no more !! so i am guessing that the 70cc hi hi witch has a wider chamber than this head currently does will not hit the piston with a stock gasket and still give a little more comp than what i am running now .
i also bought 3 diff size gasket paper to make diff thickness head gaskets out of so i can experiment to find the thinnest one i can use to seal the head get the highest comp and still maintain a funtionable squish band.

for all its worth though this head i have now milled way down ... is giving a MASSIVE boost compared to stock !!!!

ps... the first pick shows the stock gasket on the head i milled down so you can see the jug boar size vs the head dome size, the second pic showes just how mutch i milled off and how i ground out the double chamber setup they had and made it one big 6cc dome chamber... i tell ya this was the most power i got from a modded stock part, partly because the single small dome premotes a realy fast clean burn.

i am hoping that the added cooling off the puch fins will keep my motor cool enough to cope with the secondary burn of the large squish band it has, i do however like the tiny well shaped central dome it has ! it looks like it will make a verry fast compleate burn and has an ideal shape !

cant wait for my bike mail !!!

stock head for comparison to my head, you can see my chamber is litteraly 1/2 the size lol you see where the stock squish band ends at the 45mm mark ? and the dome is 47-48mm diamiter ? my head is milled almost 2mm in beond that 45mm mark . i dont think i wil have a prob with piston hitting .to put it bluntly the stock head has a 47-48mm wide dome mine has a 43mm dome, i decked down so far i took a solid 5mm off the dome diamiter !
 

Attachments

Last edited:

rogergendron1

New Member
Sep 18, 2013
882
2
0
42
woburn ma
my piston sits a little low in the jug, it has a large deck hight. this has alowed me to run extreemly high comp with out any trouble and as an added benifit... my transfer ports open all the way up at BDC ! and the piston sits lvl with the exhaust port at BDC.. this jug and piston combo is a gem and i plan to runn it as long as i can !!!!

i actually think i can run the puch 70cc hi hi with a thinner than stock head gasket and still afford to deck the jug a little... SAFELY !

i am honestly expecting about the same comp as i have now but mabey a lil bit more, and the added benifit of a real squish that covers 30% of the chamber, and the cooling compasity i need from the extra large fins, and it looks way cooler espesialy when its going to be flat black with pumpkin orange tipped fins to mach my jug new paint !!!

yes i have a halloween orange and black bike !!! the case is now pumkin orange to match the bike and the case covers are flat black the jug is flat black with silver tipped fins soon to be orange tipped fins with a black puch head orange tipped fins
 
Last edited:

rogergendron1

New Member
Sep 18, 2013
882
2
0
42
woburn ma
ok ok yehhhhh... i just got my puch 70cc hi hi head from the mail man today !!! just now actualy!

well i have to say that the build quality on the head is pretty good, not perfect but pretty good.
the castings are verry good, only a little bit of flake left where the fill marks are other than that its verry nice.
the chamber is milled perfectly and has a smooth machine finninsh that can be brought to a polish in seconds with a dremal !
the squish band is huge as i would expect ... it looks to take up about 35% of the chamber and thats good.
the casting metal itself is aluminum and good aluminm at that ! i can tell by feel and wieght that its of a much better alloy than our cheap motors are. there are no dimples or pockets or air spot marks in the material ether like my stock head has ... its full of lil air bubles.
the packaging they sent it in was damn good to. it cam in a large padded bag, in the bag was a box with padding and in the box was the head wrapped in plastic. the head was coated in oil to prevent corrosion . verry well packaged i must say !

i wiped it down and gave it a quick coat of flat black vht engine enamal. i will give it 4-5 more coats and paint the tips of the fins orange before i install it later on tomorrow

pics coming soon of the unboxing and of the head itself in detail. i have to take them on my phone and e mail them to my self so i will get them up tonight .

also i will have pics of the 2 heads together and of the instalation if your interested .
 

rogergendron1

New Member
Sep 18, 2013
882
2
0
42
woburn ma
theese photos are of the head painted and a comparison between the stock and the puch head

as you can see the puch head is over all around 3 times larger, about 2.5 in taller if you are wondering about clearance issues.

when comparing the puch to my stock decked down head you can plainly see that the puch head has way more cooling fins and way more cooling aria, this is good for a higher comp motor.

the combustion chamber on the puch head has a squish band that takes up around 30% of the chamber and the combustion chamber itself is tall round and a little conical, i would imagine that tall narrow conical design would premote a verry fast and efficiant burn.

the stock head had a small squish band that was only 10% of the chamber at best and was greatly ineffective. the stock comp ratio was 6:1 .... low. my head has been decked down as far as mechanicaly possable to gain comp and doing so decked 5mm + right off the diamiter of the chamber, i then ground out that double chamber dome into a single dome as much as i could to premote a faster burn without loosing to much comp, the final result was a 6cc single dome. it worked amazingly well for what it was !!! i came to 11:1 uncorrected comp and i never once overheated. gained plenty of power all over mostly in the midrange.

i am expecting a bit more comp than the 11:1 i previosly had and an overall broader power band though like before centered around the midrange with a bit more top end due to the proper squish band.

pics of head top, side to side comparisons , chamber pics next post
 

Attachments

rogergendron1

New Member
Sep 18, 2013
882
2
0
42
woburn ma
here are side by side chamber comparisons...

lol you right !!!! holy material removal... it took 4 hours of sanding and test fitting with 80 grit to get the comp i wanted then finish sanding and chamber reshaping! lol the stock head was taken right down to the outer edge of the cooling fins !!! however it worked AWSOME !!! it ran at 11:1 comp and never once over heated, gave me awsome power for what it was ! dax head eat your heart out !!!!!!!!!!

pics of drilling out the stud holes and mounting procedure tommorow.....
 

Attachments

rogergendron1

New Member
Sep 18, 2013
882
2
0
42
woburn ma
i am going to run this head a little wile mabey a week or so, this way i can get a good judgement on the fuel mix and octaine ratio i need. right now i am guessing 40:1 96 octaine and that should be good.

then if i may pull it off and deck the puch head down a solid 1 mm to get more comp but only after my titainium wrist pin, high quality needle bearings, new piston, and arrow big block gt5 reed valve ported jug, reed block dellorto combo come in.


ITS MY BIRTRHDAY !!!! YAAAAY !!!! the new arrow big block jug and reed valve and dellorto carb are my gift to me from me lol !!!!
 

rogergendron1

New Member
Sep 18, 2013
882
2
0
42
woburn ma
my b day is jan 20 and i will be 32 years old... old man lol

my presant to myself is going to be one of the 2... i havent decided yet, i could go with the regular reed block jug kit with the dellorto carb or the big block machined jug kit with no carb and use my cns with a milled adapter, hmm the dellorto setup is 190$ the big block is 220$ and no carb ...

it might be worth it to just go the big block and buy a mikuni vm .... but i would be looking at 300$ where as the other kit is complete at 190$ and will run with the best of them, i have acsess to a bridgeport miller so i could just mill the intake down like the big block jug if i wanted but i think the actual big block uses different but better reed asembly i am not shure

someone fill me in
 

Attachments

rogergendron1

New Member
Sep 18, 2013
882
2
0
42
woburn ma
now back to the head...

for mounting hardware and intalation tools, i highly recomend you get the following

8. 13mm nut size 8mm stainless steel nuts

8. 8mm or 5/16 stainless steel washers

4. 8mm or 5/16 stainless steel lock washers

1. battery or power drill

1. 8mm or 21/64 or 11/32 drill bit 5/16 is close...

1. socket wrench and a 14mm and 13 mm deep dish socket

1. plug wrench... for your plug of course...lol

2. new plugs !!! you need them ! nkg b6hs or champion L86C

you need 8 washers because unless your replacing your head studs with stainless steel threaded rod (wich i highly recomend) some head studs threading come up short and you may need an extra washer on each stud to fill the thread gap

you need 13mm socket sized 8mm ss nuts because the standard 14mm socket 8mm nuts will not fit ! you will not be able to get a socket wrench in the head to torque them down you need to go a size smaller on the nut, and you need 8 of them because your going to double nut the head once you have got the right torque so it will not lossen under the extreem compression, this will save you from head gasket leaks and having to check and retorque the head over and over again !

you need 4 lock washers to help keep the nuts from coming loose and also to help mantian the torque specs, also they help take up space for those heads with short threaded studs like the grubee gt5.

you need the wrenches for assembly and dissasembly

you need the drill and the 8mm or 11/32 to drill bit to drill out the stud holes in the puch head to fit 8mm studs, if you have 6mm studs skip this step ! hint ... if all you got is a 5/16 bit from a standard home depo drill bit set then you can get away with it by drilling it out then wobbling the bit in the hole verry carfully to widen the hole till it fits !

the plugs you buoght will be needed as follows ... use one old plug to get it running and tune it in as best you can, then install one of the new plugs go for a good run and do a plug chop and see how it runs, if its way to lean or rich you put the other new plug in and run it again after tunning and or rejetting, you should be golden after 3 atempts.

pictoral and video of drilling and assembly and startup tomorrow.

i hope the puch head gives it th same or close to the same sound it has now ! lol i love the way my motor sounds !! its real loud and throughty deep growly sounding, it sounds like a deep growly beast ! the little 66cc sound much bigger than it realy is with the modded exhaust i have, even with the glasspack screwed in at night it still sounds deep and growly, just quieter lol and for some reason the idle is lumpy like a huge cam in a drag car lol seems like when you raise comp real high it has that effect on the idle... it idles just fine all day, it just lumpy like a 4 banger with an overly tall cam ...
 
Last edited:

rogergendron1

New Member
Sep 18, 2013
882
2
0
42
woburn ma
ok more on the head for those with questions about plug to piston clearance issues here are some pics

the pics are of my stock head decked way down vs the puch 70cc hi hi head with plug installed
i used a credit card as a strait edge to show relitive distance from the plug tip to the gasket surface so you can get a rough estimate on the deck hight to plug tip clearance...sorry my strait edge and vernier cliper are in NH lol

but the sstock head i was running had about 1/4 inch clearence and the puch head has almost 1/2 inch clearance from the gasket surface to tip of plug.
 

Attachments

Last edited:

rogergendron1

New Member
Sep 18, 2013
882
2
0
42
woburn ma
ok now that u have the new head and have a good guess on wether or not your piston will hit its time to drill out the head for 8mm studs... and for show i drilled it out using a 5/16 bit and a hand drill, i did this for those of you who do not have acsess to a lot of tools and bits and need to use whats available in dads tool kit just to show you it can be done!

first you want place it on a flat block of wood to drill though, start by drilling all the holes out with the 5/16 or 8mm or 11/32 if you got it, drill bit. now try and give it a test fit... wont go on huh? yup thats cause 5/16 size comon bit is a lil too small.... go back to the drill and hold the head in your hand, place the bit in the head stud hole and begin drilling wile SLIGHTLY wobbling the bit around and circles, go back and test fit... repeat as nessasary, it took me 2 tries to get the head to slide on snugly.... IT SHOULD NOT BE FORCED ON !!!!

now pull it off again and grab a 45degree chamfer bit if you have one and chamfer the gasket surface stud holes lightly. this will enshure you have no burs or hanging metal, if you do not have a chamfer bit then clean it by hand with a sharp knife.

now wash the head off and dry it out to remove all the foriegn material and metal bits...

ok we are ready to mount !
 

Attachments

rogergendron1

New Member
Sep 18, 2013
882
2
0
42
woburn ma
ok now its time to mount it up by hand no bolts with the single stock gasket, once you got it on roll the rear wheel foward to turn over the motor wile leaning your chest on the bike seat to aply wieght and holding down on the head to feel for piston crown contact with the plug or squish band... got contact ? add another gasket and check again. if you still have contact with 2 gaskets you may want a shorter plug, if its hitting the squish with 2 gaskets your jug base gasket needs to be replaced .... you can make one from 1mm or 1.5mm gasket paper, keep in mind 1.5mm gasket will raise your jug by .5mm from stock and slightly alter your port timming.(IMHO for the better). if the combo of all thease things do not solve your contact problem... well your out 40$ lol lol lol lol

now that you know you have clearence mount the head and check to see if the threads on the studs make it to the bottom of the head if they dont add the washers til the non threaded part is covered then add lock washers and your first set of 13mm socket 8mm ss nuts and hand tighten with the socket, now check agian for piston clearance by rolling the tire foward.

still have clearance ? good now tighten the nuts down snugly with the socket wrench and check agai by rolling the rear tire.

still ok ...? good now grab your torque wrench if you got one , if you dont and your a skilled mechanic who knows the feel of a wrench do it by feel and tighten up the head bolts to 120in lbs there abouts...and guess what lol roll the bike foward again and check for piston clearence lol lol we do not want to destroy our motor so we check check and check again !!!

now install your second set of nuts to lock the first in place they should be torqued down the same .


ohh and on a side note ... i am a verry firm believer in NEVER USING GASKET SEALER OF ANY TYPE ! silicone is the worst it mushes into your motor and gets eaten by the engine ! spray a gasket s0cks ! all that sh1t is, is just a band aid till you can buy a new gasket and clean up the mating suface !! never use it to asemble a motor ! let the gaskets do there job and seal the two surfaces ... if you have a leak then you have a mechanical problem that silicone or gasket spray wil not solve !!! you need to lap you surfaces together till they are perfect and then use the proper gasket for the aria your sealing ! i never use gasket sealer EVER and i NEVER have any leaks ! this is because i lap and clean all my mating sufaces and use the correct type of gasket ! all that sh1t does is make your gasket stick and tear up when you need to remove the part and now you need to do more work to clean the mating suface or you go and add more goop and the problem get worse lol !!! dont use gasket sealer ! its only a band aid there for an emergancy when you have to reuse an old worn gasket until your new one arrives !

a perfectly lapped head will seal right up to the jug with no gasket or sealer and never leak !!! i am only using the stock gasket as a 1mm spacer and plan to add or subtract from that as needed to fine tune my comp ratio, i may even mill a o ring grove in the head and run just a single o ring !
 

Attachments

Last edited:

rogergendron1

New Member
Sep 18, 2013
882
2
0
42
woburn ma
ok now that we are all mounted up remove the spark plug and rotate your rear tire til the piston is at TDC and shine a light into the plug hole to visualy inspect where the piston is in relation to the chamber, plug, and squish band....everthing look good to you ? good lol now intall the plug to the puch specified torque. i would recomend using a nkg iridium or nkg b6hs or champion L86C all good plugs, the iridium plug will offer a more effitiant and cleaner burn if it wll clear your piston, its worth the whole 9 bucks so just buy it lol

now that the plug is in and properly torqued ..... guess what we do ... lol yup roll the rear tire foward with your hand on the head and ear next to the fins listen and feel fr contact. no contact good...

now ... connect your plug wire to your plug.... WAIT WUT YOUR STILL USING THE STOCK PLUG WIRE AND CAP !!!!! get rid of that thing lol and go get a 2ft length of 8mm high preformace wire and cut it in half, now you have a good high preformace plug and wire and the other half can be used as a spare ! come on i only paid 7 bucks for a 2 ft length of msg 8mm preformace wire ! you have a pretty high comp motor now you need all the spark you can get!!!
 

Attachments

rogergendron1

New Member
Sep 18, 2013
882
2
0
42
woburn ma
ok we now have to give the bike a once over and make shure everything is tight AKA... fenders, chain guards, motor mounts, chains, wheels, and all that ...

once your done checking your bike make shure you have the proper fuel... i would recomend you run high octane for a high comp motor that will be reving high and pulling hills but thats your choise, if you hear any kind of pinging drain your gas and run high octain fuel

your oil should be able to stand up to the high comp ratio and heat and abuse, i recomend opti 2 mixed anywhere from 50:1 to 100:1 amsoil 50:1 or ipone 40:1 to 50:1 or pro mix 40:1 to 50:1 or any real good full sythetic will work fine at 40:1 to 50:1 as long as its full synthetic good quality oil.

now get pedaling and get it started then stop and let it idle, wile its idling and warming up you should be listening and feeling for any kind of problem as in detonation or pinging or clashing sounds that would indicat a problem, if you hear something deffinatly wrong shut it off and pull the head to check for damage.

if its been idling fine for about 5 min and is up to temp go give it an easy ride around a relitivly flat road and do some easy low rpm cruising to feel out the motor then come back and let it idle again always lisning for something out the ordanary.

if nothing out the ordanary is going on give it a ride around a wile and come back and shut it down. when the motor cools off do a plug read and see if you need to tune your carb, if you do tune and jet as needed and install a new plug and go for another ride and repeat till its all dialed in...

there you go !!! you new puch head on you china HT motor is running like a charm !!!

pics of bike and video of bike in action soon to come !!!
 
Last edited: