

Beginner01's first build..
- Thread starter Tony01
- Start date

Yes, for now. I will port and polish it someday... just don't have much time ATMLooking good. Are you leaving the motor stock?
")
I've been busy lately, but finally got some more done on the bike.
I'm having many issues and have solved a few of them.
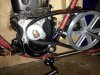
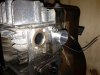
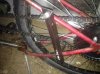
1. Front disc brake alignment. When assembled with the adapter on the fork (203mm) the adapter was rubbing on the brake. I took the adapter to work and milled .040" off the mounting tab points, and it seemed to fix the problem. Maybe the fork I have is junk, or the wheel builders messed up with the hub spacing... but the fit was nowhere near perfect as stock.
2. Clutch. Cut up a beat up old 2-3" Starret .001 micrometer to use for my clutch arm. The hole in the engine faceplate has threads, but I couldn't figure out what it was though I was thinking it was a 5/16-18. I went in there with a 5/16-18 tap anyway, and put a screw in.
I need a stronger spring. The belt will be tensioned as stock, and when I pull the clutch lever the cable will pull the arm away from the belt, releasing tension and allowing it to slip (I hope!)
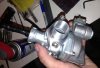
3. Intake manifold. After hours of searching and researching for a B&S intake manifold designed to fit the 45deg angled bolts, I gave up and decided to make my own. For a short time I was thinking of getting into DIY sandcasting and making a complete part, then milling out the internals. Fortunately I found a couple of scrap parts at work with a flange, 1" OD and hole through, and modified them into two halves of an intake manifold. The japanese Honda knock-off carb I have from thebay has a 1.9" bolt pattern with .854" center hole, set horizontal, and the briggs is an approx. 1.35" bolt pattern with a .812 or so hole set at a 45deg angle. Have fun finding an intake manifold to fit that.
These two intake manifold flanges will be connected by a 1" ID rubber tube hose clamped on both. And maybe glued. I wish I could weld aluminum!
I still have multiple issues to work out.. need a stronger clutch spring, figure out the clearance in the back for gear shifting, and my front disc brake. The inner piston doesn't retract all the way back in (needs cleaning/oiling) and the line needs to be shortened. I guess other issues will arise when I get through these
I'm having many issues and have solved a few of them.
1. Front disc brake alignment. When assembled with the adapter on the fork (203mm) the adapter was rubbing on the brake. I took the adapter to work and milled .040" off the mounting tab points, and it seemed to fix the problem. Maybe the fork I have is junk, or the wheel builders messed up with the hub spacing... but the fit was nowhere near perfect as stock.
2. Clutch. Cut up a beat up old 2-3" Starret .001 micrometer to use for my clutch arm. The hole in the engine faceplate has threads, but I couldn't figure out what it was though I was thinking it was a 5/16-18. I went in there with a 5/16-18 tap anyway, and put a screw in.
I need a stronger spring. The belt will be tensioned as stock, and when I pull the clutch lever the cable will pull the arm away from the belt, releasing tension and allowing it to slip (I hope!)
3. Intake manifold. After hours of searching and researching for a B&S intake manifold designed to fit the 45deg angled bolts, I gave up and decided to make my own. For a short time I was thinking of getting into DIY sandcasting and making a complete part, then milling out the internals. Fortunately I found a couple of scrap parts at work with a flange, 1" OD and hole through, and modified them into two halves of an intake manifold. The japanese Honda knock-off carb I have from thebay has a 1.9" bolt pattern with .854" center hole, set horizontal, and the briggs is an approx. 1.35" bolt pattern with a .812 or so hole set at a 45deg angle. Have fun finding an intake manifold to fit that.
These two intake manifold flanges will be connected by a 1" ID rubber tube hose clamped on both. And maybe glued. I wish I could weld aluminum!
I still have multiple issues to work out.. need a stronger clutch spring, figure out the clearance in the back for gear shifting, and my front disc brake. The inner piston doesn't retract all the way back in (needs cleaning/oiling) and the line needs to be shortened. I guess other issues will arise when I get through these
Attachments
-
 228.9 KB Views: 414
 -
 255 KB Views: 376
 -
 154.5 KB Views: 371
Last edited:
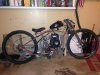
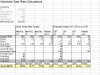
Well, I've got most of the bike built up and started doing some first runs this week. It sure is fun to ride around just pedaling it, with the super low sitting position. I'm sure I look funny riding around like that but it sure is fun!
I'm having trouble with practically everything on the bike, though. I solved the intake manifold issue - kept the flange for the carb side and needed a more solid way to mount it.. so I took the original carb, sawed it off about 1.5" from the intake flange.. then mounted it by the bore on a tapered shaft (.7495 to .751) and machined the end of it with a 1deg taper to fit the carb side flange I made last week. Then I put some red loctite and hammered the carb side flange onto the taper... and voila!! an intake manifold that fits perfect and still has the original carb angle and mounting flange, with the bottom screw farther away for easier mounting.
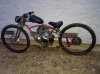
There is a problem with the belt drive. With a 33" belt, the motor will not start as there is not enough slip. A 34" belt will allow the motor to start, but when I let the clutch lever out (tension the belt) there is still too much slip. Seems I need a clutch lever with more throw and a bigger idler pulley. I'm determined to get it working as it is, but I'll do an automatic centrifugal clutch setup if I have to.
Also having some chain clearance issues. I can't use 4th, 5th, or 6th gear as the chain rubs on the inside of the chainstay. Looking for a 3-speed megarange freewheel. Do they exist?
Test running today I got a flat on the front tire... and had to walk the bike three blocks home.. man that was fun
Got some lights as well. Found a 5" 12V headlight and 2" taillight at the auto parts store for a combined $20. Seems like a good deal. Hooked up the headlight to a car battery and it is BRIGHT! Thinking of using a Tung-lin 12V bicycle generator but will have to convert it to DC if I will run an LED tail-light. Just got them today and haven't tried to mount them. More pics to come!
I'm having trouble with practically everything on the bike, though. I solved the intake manifold issue - kept the flange for the carb side and needed a more solid way to mount it.. so I took the original carb, sawed it off about 1.5" from the intake flange.. then mounted it by the bore on a tapered shaft (.7495 to .751) and machined the end of it with a 1deg taper to fit the carb side flange I made last week. Then I put some red loctite and hammered the carb side flange onto the taper... and voila!! an intake manifold that fits perfect and still has the original carb angle and mounting flange, with the bottom screw farther away for easier mounting.
There is a problem with the belt drive. With a 33" belt, the motor will not start as there is not enough slip. A 34" belt will allow the motor to start, but when I let the clutch lever out (tension the belt) there is still too much slip. Seems I need a clutch lever with more throw and a bigger idler pulley. I'm determined to get it working as it is, but I'll do an automatic centrifugal clutch setup if I have to.
Also having some chain clearance issues. I can't use 4th, 5th, or 6th gear as the chain rubs on the inside of the chainstay. Looking for a 3-speed megarange freewheel. Do they exist?
Test running today I got a flat on the front tire... and had to walk the bike three blocks home.. man that was fun
Got some lights as well. Found a 5" 12V headlight and 2" taillight at the auto parts store for a combined $20. Seems like a good deal. Hooked up the headlight to a car battery and it is BRIGHT! Thinking of using a Tung-lin 12V bicycle generator but will have to convert it to DC if I will run an LED tail-light. Just got them today and haven't tried to mount them. More pics to come!
Attachments
-
 481.6 KB Views: 401
 -
 554.3 KB Views: 422
Last edited:
I used belt dressing and it made the belt grab much better. I should say though I have an automatic clutch so the tension is just set and left to be. I can make it more than tight enough. I saw some particles of the belt cause a dusting when it was over tight, or it was just the belt breaking in. It did not do that after a couple more rides.
MT
http://motorbicycling.com/showthread.php?t=29678&page=13 off roading post 129
MT
http://motorbicycling.com/showthread.php?t=29678&page=13 off roading post 129
You need some belt gards that hold the belt to forum when you let off the clutch. All lawn tractors have belt guide pins for that.
Your belt is to free and rubs on the pully in front creating drag. Harry had the same problum check out his build untill you get to were he put a guide on try page 60 on http://motorbicycling.com/showthread.php?t=28803
msrfan Briggs build also has a spot were they talk about the belt gard or guide.
Hope this helps..............Curt
Last edited:
An LED taillight shouldn't care if you are feeding it AC or DC. LED's don't care one way or the other. Just be sure to match the input voltage to what the LED is rated for.
Thanks for the suggestions on the belt guide. I put one on top of the belt mounted to the motor faceplate bolts. It worked! It slips and grabs the right amount.. which I would never have gotten working without your help. Thank you!!
I am going to order a Max-Torque clutch and heavier weights to see if I like running with an auto more. Might be better for long distance trips and have less stuff to go wrong. Not to mention CA requires an auto transmission for registration. Don't know how they check that, but a cop could be a jerk about it if it ever came to that.
Been busy, haven't gotten around to doing lights yet.. maybe today.
http://www.mfgsupply.com/gomini/gominiclutch/gominiclutchbelt.html
other belt clutches they have
http://www.mfgsupply.com/gomini/gominiclutch/gominiclutchutility.html
This is the place I got my belt type max torque clutch from. I got the one with 5/8 bore and also tapped into my crankshaft to use a bolt, as well as the two set screws and the key in the keyway. I had a time getting the key to fit right when I put the pulley on the outside furthest from the crankcase cover. I carved it so it matched the strange curved end of the keyway in my Briggs an Stratton 80202 0430 3hp 4 stroke engine. It would not have been necessary if the pulley was the other way next to the engine crankcase cover.
MT
The way that bike is sitting looks sick!!!!!Cool, I checked out msrfan's bikes, they are badass! The welder did a great job on my frame. Mocked up the bike... now I can start measuring for belts and other parts. Lots of room in front of the rear wheel! The stretch didn't alter the rear tire size requirements too much like I thought. I can still fit a 2.5" tall tire on the back rim, though with a max width of 2.2" and still have a quarter inch clearance per side at the chainstays.. Thinking of getting 2" wide rims front and back now
I couldn't quite believe my eyes when I saw that clutch arm made from an old micrometer. Looks good though.
First update in two years
Hello,
Sorry I did not get to doing any more updates.. I got the bike running somewhat with a Tecumseh H35 carburetor and the original muffler, then got busy with my other hobby- alcohol. It became a problem and so I quit.
I have so much time and money now!
Well, I didn't run the bike for a while, and there was this nasty stuff all over it. So I decided to do the restoration/fixing I should have originally done when I got the used motor.
Started by taking apart the carburetor. Soaked it in vinegar, cleaned out everything, put it back together. Now I know how it works.. fully.
Decided to take apart the motor. I just found out today that it was manufactured 3/1998. Not bad!! Upon taking apart the motor I found there was this black carbon gunk everywhere. On the valves, piston, compression chamber, around the valve springs, ports, etc. I decided to clean it.
Upon removal of the valve cover.. I saw the springs.. and wondered how to remove them. I've read threads on rebuilding the briggs 5hp and was terrified of dealing with the valves without the mystical "valve spring compressor". Needless to say, I went ahead and took em out anyway, figuring I'd find a way to get em back in there, somehow.
I soaked everything in vinegar. Cleaned it off, then soaked everything in vinegar again. That black carbon was still there in some places, but the valves were clean.
Decided to port and polish the engine while I had it open. Ground down some of the rough casting in the exhaust port, ground down the eyebrows about .035" or so, smoothed it all out and cleaned the carbon off the ports with a wire dremel attachment (run off my corded drill of course, I'm a cheap bastard with only one rotary tool).
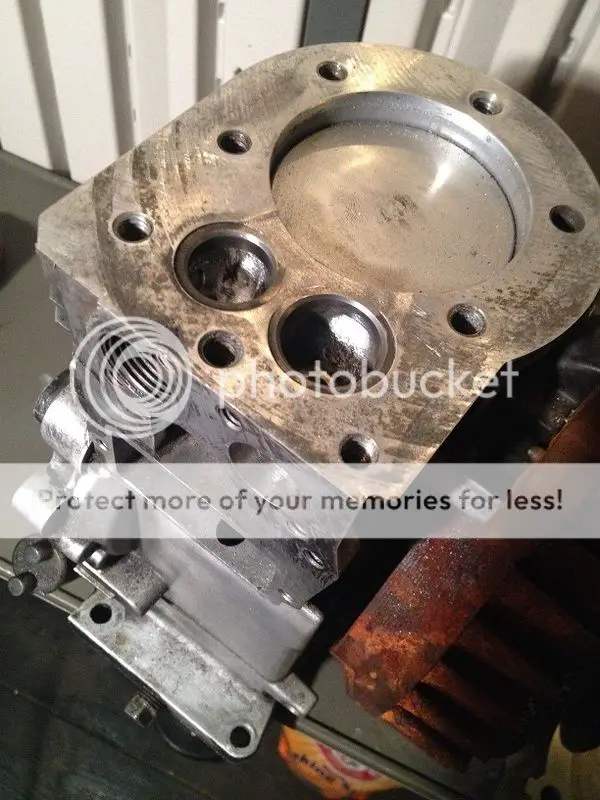
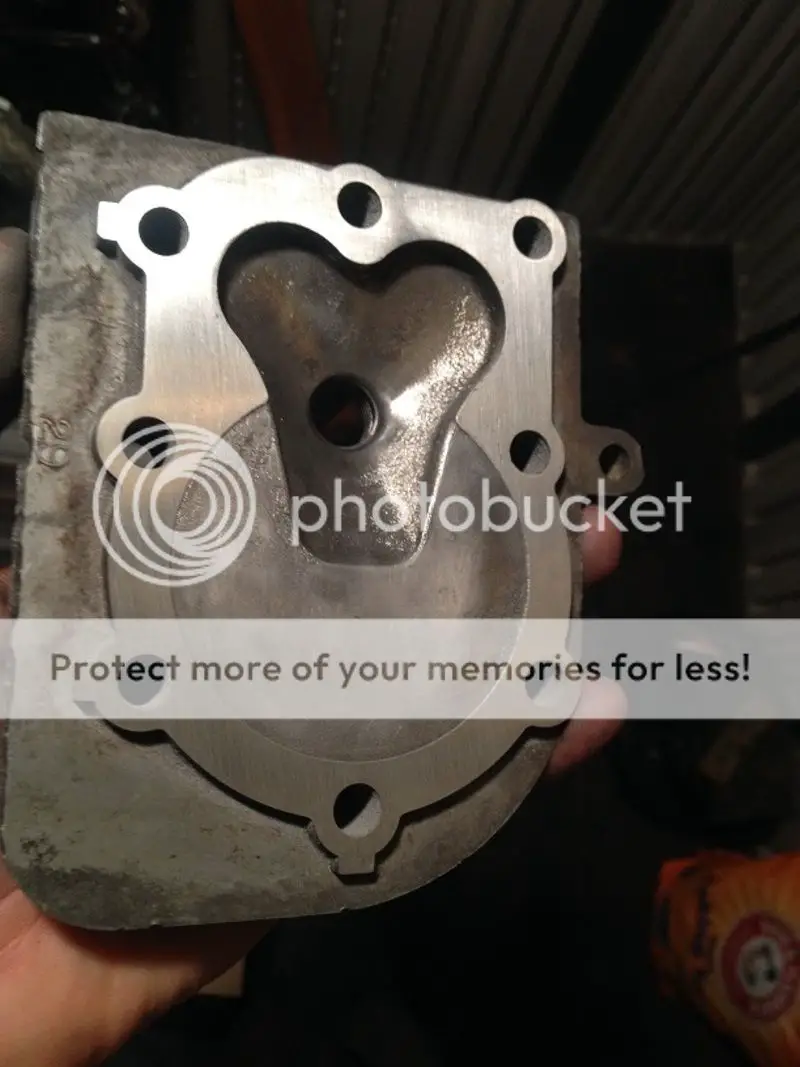
I cleaned the carbon off the head by using the same wire dremel bit. That thing is lovely!! cleaned it up real quick, what all the vinegar missed (most of it).
Sanded down the head around .015" to raise and make up for lost compression from removing eyebrow material and all that carbon. I duct-taped a piece of 120grit to an extra flooring tile- I checked the flatness with the side of a caliper before doing so. Pretty flat. Finished the sanding with 320grit.
Cleaned everything, and started to put it back together. Ah, time to compress the springs! This step was so easy.. I'm embarrassed at how terrified I was before.
I found a very easy way to do this. First, compress the spring on the edge of a small vice. Zip tie that side, then turn it around and zip tie the other side. Voila! compressed valve spring for pennies..
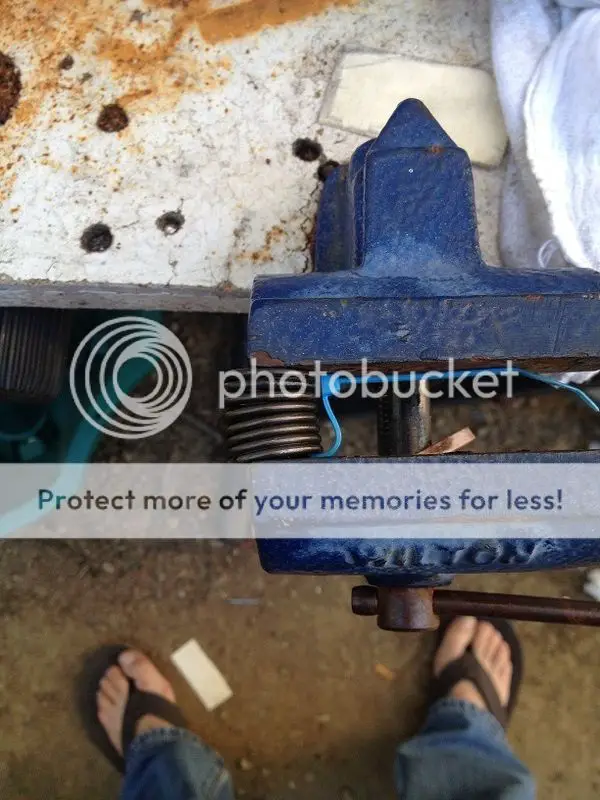
Then, use needle-nose pliers to insert the keeper and secure it. Make sure it's in the correct spot, then get in there with an Xacto knife and cut 'em, and pull em out with the pliers. Intimidating job DONE EASILY!! Heck, taking the damn springs OUT was the hard part.. took me like 15 minutes. So if you can take them out... you can DEFINITELY put them back in.

Damn 5-pic limit...
Hello,
Sorry I did not get to doing any more updates.. I got the bike running somewhat with a Tecumseh H35 carburetor and the original muffler, then got busy with my other hobby- alcohol. It became a problem and so I quit.
I have so much time and money now!
Well, I didn't run the bike for a while, and there was this nasty stuff all over it. So I decided to do the restoration/fixing I should have originally done when I got the used motor.
Started by taking apart the carburetor. Soaked it in vinegar, cleaned out everything, put it back together. Now I know how it works.. fully.
Decided to take apart the motor. I just found out today that it was manufactured 3/1998. Not bad!! Upon taking apart the motor I found there was this black carbon gunk everywhere. On the valves, piston, compression chamber, around the valve springs, ports, etc. I decided to clean it.
Upon removal of the valve cover.. I saw the springs.. and wondered how to remove them. I've read threads on rebuilding the briggs 5hp and was terrified of dealing with the valves without the mystical "valve spring compressor". Needless to say, I went ahead and took em out anyway, figuring I'd find a way to get em back in there, somehow.
I soaked everything in vinegar. Cleaned it off, then soaked everything in vinegar again. That black carbon was still there in some places, but the valves were clean.
Decided to port and polish the engine while I had it open. Ground down some of the rough casting in the exhaust port, ground down the eyebrows about .035" or so, smoothed it all out and cleaned the carbon off the ports with a wire dremel attachment (run off my corded drill of course, I'm a cheap bastard with only one rotary tool).

I cleaned the carbon off the head by using the same wire dremel bit. That thing is lovely!! cleaned it up real quick, what all the vinegar missed (most of it).
Sanded down the head around .015" to raise and make up for lost compression from removing eyebrow material and all that carbon. I duct-taped a piece of 120grit to an extra flooring tile- I checked the flatness with the side of a caliper before doing so. Pretty flat. Finished the sanding with 320grit.

Cleaned everything, and started to put it back together. Ah, time to compress the springs! This step was so easy.. I'm embarrassed at how terrified I was before.
I found a very easy way to do this. First, compress the spring on the edge of a small vice. Zip tie that side, then turn it around and zip tie the other side. Voila! compressed valve spring for pennies..

Then, use needle-nose pliers to insert the keeper and secure it. Make sure it's in the correct spot, then get in there with an Xacto knife and cut 'em, and pull em out with the pliers. Intimidating job DONE EASILY!! Heck, taking the damn springs OUT was the hard part.. took me like 15 minutes. So if you can take them out... you can DEFINITELY put them back in.

Damn 5-pic limit...
I took my fear of rebuilding engines and made it my b*tch. After this, nothing could stop me. Needed to set up a real throttle linkage. Found this little cable thingy from when I used to be into R/C planes as a kid. It is supposed to go on a servo arm to secure a cable for some rudder or something. It has a 3mm fine thread screw to secure the cable, and a knurled thumbnut that secures it to a hole on an arm. Well the non-threaded part measured .075" diameter, so I took a 5/64" drill (.078") and make the 1/16" hole in the throttle arm slightly bigger. That will be one and a half thou per side of play. Perfect. When securing the thumbnut onto the other piece, there was a gap of .087-.082 depending on how tight I put it. The throttle arm thickness was .057", so I needed a .020-.025 washer. Found something, put it on, red loctite on the thumbscrew, and set the slop. This thing is perfect. It rotates with the cable like it's got a ball bearing under it.

Had to open up the hole to 3/32" and countersunk it to make the cable go in easier.
Made a mount from angle aluminum for the end of the throttle cable. There were two bosses on the engine with .180" holes.. I just took a 10-32 tap and made em work. The tap is a cheap chinese cut tap but I wasn't going that deep anyway.. and it's only cutting .005" per side.. Mounted the angle on it and red loctited those screws. Easy.
The throttle cable was sticking in the sleeve, so I took it out, oiled it up, and shortened it. Getting a cable to protrude through the other side was the biggest PITA ever. I always have trouble with this. Got it to work though, and much shorter.
Only a half inch of travel:

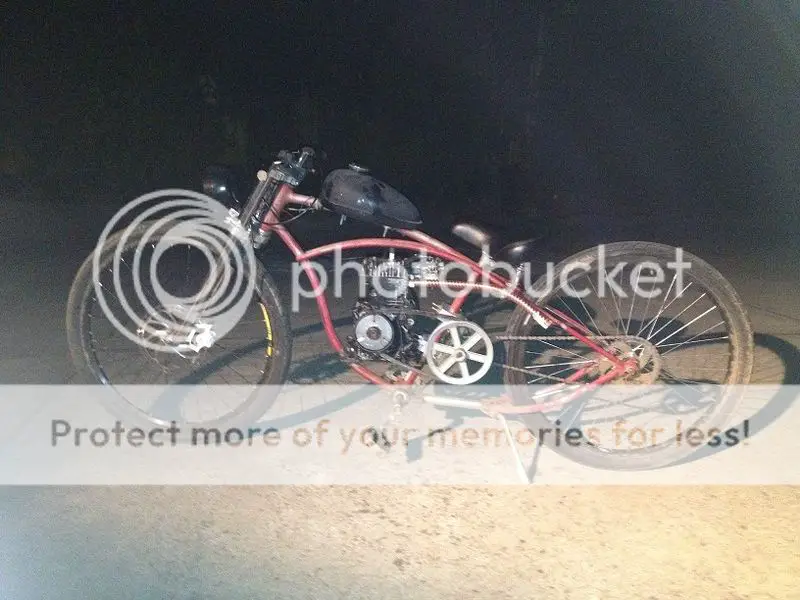
Mounted up the exhaust, put everything back together, took it out for a spin - pedaling. From my gear ratio calculator, 90 rpm pedaling will give me 3.65mph. That was about right. I think I got up to 4mph pedaling. I passed a couple walking, I was LITERALLY GOING TWICE AS FAST MUAHAHHAAA!!
I still need to adjust the rear sprocket, it's off center and is tightening the chain once a revolution.. The fuel tank needs a cleaning... I need a new airfilter.. grease the headset.. air the tires.. Enough for one day..
Wrong belt shown. I changed the weights in the Maxtorque clutch to the heavier ones. This engine doesn't seem to rev high enough for the clutch to really hook up. Probably the hardest part of this build was taking off the snap rings without snap ring pliers.. and putting the weights and spring back in.. but I did it.. and we'll have to wait and see how it works out.
If it runs like crap, I'm gonna order a knockoff Tav2 CVT.
If it still runs like crap, I will upgrade to a preddy 212. That will give me an excuse to buy a welder.

Had to open up the hole to 3/32" and countersunk it to make the cable go in easier.
Made a mount from angle aluminum for the end of the throttle cable. There were two bosses on the engine with .180" holes.. I just took a 10-32 tap and made em work. The tap is a cheap chinese cut tap but I wasn't going that deep anyway.. and it's only cutting .005" per side.. Mounted the angle on it and red loctited those screws. Easy.
The throttle cable was sticking in the sleeve, so I took it out, oiled it up, and shortened it. Getting a cable to protrude through the other side was the biggest PITA ever. I always have trouble with this. Got it to work though, and much shorter.
Only a half inch of travel:

Mounted up the exhaust, put everything back together, took it out for a spin - pedaling. From my gear ratio calculator, 90 rpm pedaling will give me 3.65mph. That was about right. I think I got up to 4mph pedaling. I passed a couple walking, I was LITERALLY GOING TWICE AS FAST MUAHAHHAAA!!
I still need to adjust the rear sprocket, it's off center and is tightening the chain once a revolution.. The fuel tank needs a cleaning... I need a new airfilter.. grease the headset.. air the tires.. Enough for one day..

Wrong belt shown. I changed the weights in the Maxtorque clutch to the heavier ones. This engine doesn't seem to rev high enough for the clutch to really hook up. Probably the hardest part of this build was taking off the snap rings without snap ring pliers.. and putting the weights and spring back in.. but I did it.. and we'll have to wait and see how it works out.
If it runs like crap, I'm gonna order a knockoff Tav2 CVT.
If it still runs like crap, I will upgrade to a preddy 212. That will give me an excuse to buy a welder.
Welcome back,been there and done that now it almost 20 years without a drink.
As far as the clutch heavier weights will make it engage sooner i think,maybe go to lighter one so it can rev a little higher before grabbing. Ether that get some stronger springs.
LOL done many engines without the tools,wished they would of had zip ties back then.
Yep got to have a welder,they now make one that can do both tig and mig. spend the money and get the top brand name one and a auto darkening helmet with adjustable shade lens. Will last for years,You are doing well keep it up...........Curt
Good suggestion curt. That motor should have no problem revving enough to engage the clutch. I was wondering if you lapped the valves and set the stem to follower clearance. If you have a leaking or floating valve, that will affect your rpms and power dramatically. Good job on the cleanup and porting. Cables are always a problem, and I like the way you made a pivot for the throttle arm. You may consider a small spring over the cable between the arm and angle bracket.
Curt,
It might engage sooner.. and I hope it will fully lock up at 3600. I remember it slipping a LOT.. coulda been anything.
I almost bought a $25 welder yesterday, but the guy did not call me back. I called him today and he said he forgot to call me back and now there is somebody else coming to look at it. It's probably all for the best as it's only an AC.. I'm looking for an AC/DC arc welder on the cheap.. I don't want to spend more than $100.
MSRFan, I did not do any valve lapping. I was unable to get the crankcase cover off because I could not find my 5/16" socket head. The exhaust valve needs it. I do not have the right polishing compound or the drill attachment for the valve, but I could probably figure it out next time. There is a throttle return spring attached on the other side of the throttle lever that pulls it back to idle, but the cable still sticks a tiny bit in the full throttle position. Almost like a cruise control, it snaps right back if I let off. Could be dangerous though!
Curt I think you are right. I had a problem before of too much slippage, but right now it hooks up way too fast, just above the high idle I have.As far as the clutch heavier weights will make it engage sooner i think,maybe go to lighter one so it can rev a little higher before grabbing. Ether that get some stronger springs.
Before it ran pretty good at low idle but did not want to transition to revving high too quickly, now it won't idle very low but it loves to rev up till the valves float. Being an open exhaust I won't be holding it up there often!! Nearly went deaf enjoying the WOT tone.
I'm going to put the clutch back to original and see how it runs. I kind of want to stop messing with the MaxTorque clutch as its a huge PITA to adjust it every time. If it runs halfway decent with the original settings, I will go and order a knockoff CVT and see if I can get better ratios when launching. I want to get a good launch with a cruise speed around 40mph without going to WOT.
Thank you for your help - I will keep you posted.
MSRfan, I would like to know more about valve lapping and setting and will read your posts on briggs builds soon. Gonna mess with the motor for now while I still have some daylight.
Here is a screenshot of my speed calc. MBing won't let me post the .xls file. Maybe 6.67 ratio is too tall?

Attachments
-
 129.5 KB Views: 202
Valve lapping is easy,but you may want to take the springs off again. I think you can still by a hand lapping tool its just a dart type suction cup with a wooden handle. You stick it on the valve and put some vale grinding compound on the valve and sping it between your hand back and forth,until you get a nice even ring around the valve and seat. Valve clearance is done before you put the springs back on,its the clearance between the push rod and the valve stem. You have to grind the valve stem until you get the right spacing. Don't know how old your motor is but the old Briggs were 8 thousands on intake and 10 thousands on the exhaust. So you have to be carefull not to take to much...........Curt
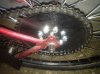
So I got some parts in the mail. Knockoff Tav2 CVT (asymmetrical), staton-inc jackshaft parts, and a rag joint to replace the even junkier sprocket I had on there. All #41 chain stuff.
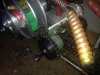
Well upon opening the CVT box, I realized then how big and HD the cvt really is. The plate only fit on the engine in one spot without interference from the JS, and I had to drill new mounting holes. Scribed everything with calipers, spotted the holes, and went right in there with a 5/16 drill for the 5/16 screws, hoping it would be close. The screws are .308", the holes measured .315 (hand drill).. and all the screws went in perfectly!! Scribing and spotting - good to .007" location accuracy
Installation of the rag joint was easy. The first thing that freaked me out was the center hole, but upon measuring it and the hub boss that holds the bearings I found they were one and the same: the OD of a standard freewheel thread. The ragjoint centered itself perfectly, and with the help of a nut driver in my drill, went on quickly. Did not even do the star pattern of tightening, being so lazy, and it still came out true to approx 1/32" side to side.
However, the sprocket appears to be ideal for bicycle-width chain, so the #41 chain does move around. No biggie it seems.
The CVT to JS chain was falling on different chain parts, so I moved the JS up a half inch so I could add the master link. Easy.
The larger sprocket made the chain hit the lower chainstay.. so found some angle steel and made a tensioner. It is pretty solid and will be the mounting point for my license plate and taillight in the near future.
Could not wait to take it for a ride!! Motor started fine on old gas, turned it off and tried to start again and gave me a hard time. Rode to the gas station and got some fresh gas, again had huge troubles starting with all the old gas in the float bowl. Finally got it flushed out and away I went!!
The low end torque of the CVT is unbelievable!! I even did a burnout on the pavement!!
The only problem is the same I had before, it seems the engine just does not want to rev under load. The CVT will shift up to 1:1 and with the motor running at the shift speed of 3600, I was going around 40mph. I can't say I really want to go faster.. it's plenty scary going 40.
Also the motor shook everything real good, shook one of the JS mount screws right off where the left pillow block bearing attaches to the plate. And my air filter fell off somewhere. I'm gonna go for a walk, see if I can find it.
Overall, very pleased with the overall setup. Need to find out how to get my engine to have more top end power, maybe adjust the CVT to shift later or something.. not that I don't have enough torque
Did not give it a go on the hills yet, gonna try to get it to shift all the way up first.
Still need to check the valve lash and lap the seats. I bet it's close to or right at no lash.. Whatever it takes.. this setup is perfect for the bike.
Well upon opening the CVT box, I realized then how big and HD the cvt really is. The plate only fit on the engine in one spot without interference from the JS, and I had to drill new mounting holes. Scribed everything with calipers, spotted the holes, and went right in there with a 5/16 drill for the 5/16 screws, hoping it would be close. The screws are .308", the holes measured .315 (hand drill).. and all the screws went in perfectly!! Scribing and spotting - good to .007" location accuracy
Installation of the rag joint was easy. The first thing that freaked me out was the center hole, but upon measuring it and the hub boss that holds the bearings I found they were one and the same: the OD of a standard freewheel thread. The ragjoint centered itself perfectly, and with the help of a nut driver in my drill, went on quickly. Did not even do the star pattern of tightening, being so lazy, and it still came out true to approx 1/32" side to side.
However, the sprocket appears to be ideal for bicycle-width chain, so the #41 chain does move around. No biggie it seems.
The CVT to JS chain was falling on different chain parts, so I moved the JS up a half inch so I could add the master link. Easy.
The larger sprocket made the chain hit the lower chainstay.. so found some angle steel and made a tensioner. It is pretty solid and will be the mounting point for my license plate and taillight in the near future.
Could not wait to take it for a ride!! Motor started fine on old gas, turned it off and tried to start again and gave me a hard time. Rode to the gas station and got some fresh gas, again had huge troubles starting with all the old gas in the float bowl. Finally got it flushed out and away I went!!
The low end torque of the CVT is unbelievable!! I even did a burnout on the pavement!!
The only problem is the same I had before, it seems the engine just does not want to rev under load. The CVT will shift up to 1:1 and with the motor running at the shift speed of 3600, I was going around 40mph. I can't say I really want to go faster.. it's plenty scary going 40.
Also the motor shook everything real good, shook one of the JS mount screws right off
where the left pillow block bearing attaches to the plate. And my air filter fell off somewhere. I'm gonna go for a walk, see if I can find it.Overall, very pleased with the overall setup. Need to find out how to get my engine to have more top end power, maybe adjust the CVT to shift later or something.. not that I don't have enough torque
Did not give it a go on the hills yet, gonna try to get it to shift all the way up first.
Still need to check the valve lash and lap the seats. I bet it's close to or right at no lash.. Whatever it takes.. this setup is perfect for the bike.
Attachments
-
 413.6 KB Views: 239
 -
 285.2 KB Views: 240
 -
 146.1 KB Views: 231
 -
 289.7 KB Views: 223
Last edited:
Most of these set ups I've seen went right from the CVT sprocket to the rear wheel. You Have a triple reduction with the belt and two chains. I would eliminate the jack shaft (along with all the extra problems it creates and the room it takes up) and go with a moped rear drum hub with bolt on sprocket. Your motor should pull it nicely once you get it tuned properly. Top speed would be improved also. Worse case you may have to purchase a larger rear sprocket. Bike looks great. Keep working on it and you'll get where you want it to be.