

Easy Rider 116cc chopper
- Thread starter galloping rigadoon
- Start date

Thanks Rebel. That makes sense, I'm embarrassed I didn't think of that...
Here's what I've got for the frame design so far. I'm going to build it back to front, and deal with the rake and forks when I get to them. For now I'm thinking of it as a street bike, and then will stretch the front forks after I finish the rest of the frame.
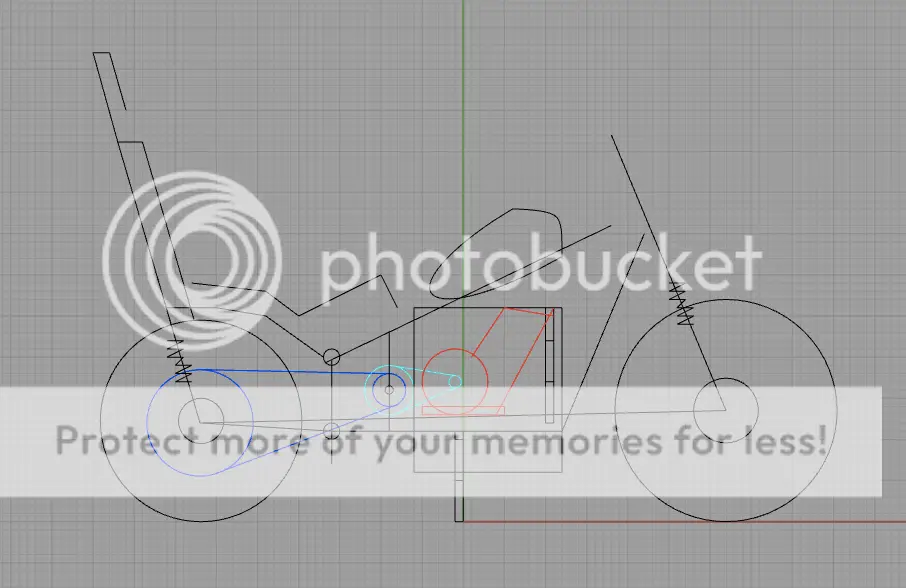
Some numbers
starting wheelbase is 65"
skid plate clearance is 11"
rear wheel 24.5" diameter
front wheel 27" diameter
still not sure about what gear ratios I'm going for
Here's what I've got for the frame design so far. I'm going to build it back to front, and deal with the rake and forks when I get to them. For now I'm thinking of it as a street bike, and then will stretch the front forks after I finish the rest of the frame.
Some numbers
starting wheelbase is 65"
skid plate clearance is 11"
rear wheel 24.5" diameter
front wheel 27" diameter
still not sure about what gear ratios I'm going for
Last edited:
That'll make some torque! Teeth are for electric start. I hope you can find a rounded tire for the rear. A car tire won't turn worth a hoot. Have fun!
Slowly but surely.
Finished sketching out the frame design:
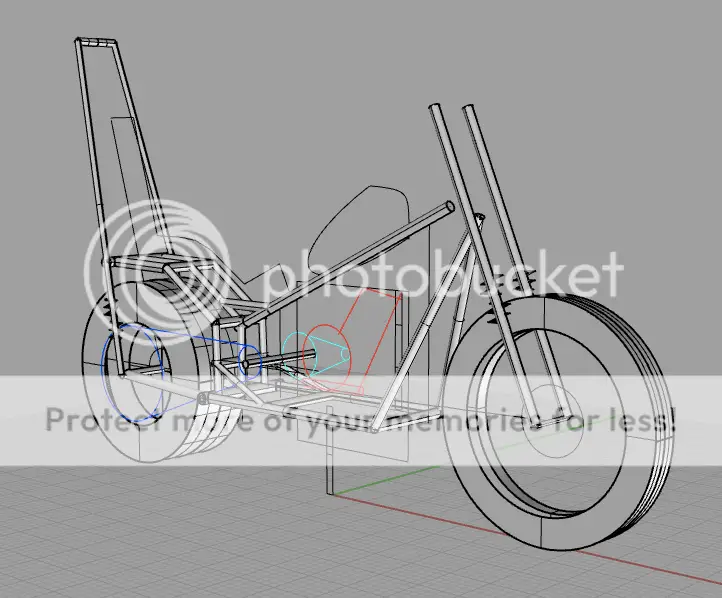
I got 1/8" thick 1" ID black iron pipe for my frame. Cut the first few lengths this morning. Going to weld the front triangle and the wheel arch first and then connect them, I think.
Finished sketching out the frame design:
I got 1/8" thick 1" ID black iron pipe for my frame. Cut the first few lengths this morning. Going to weld the front triangle and the wheel arch first and then connect them, I think.
Last edited:
Rolling chassis
Man, there was a lot between the last post and this one, but now the frame has both wheels on. Tons of work left, but I'm headed back to school and this rig is headed onto the back burner.
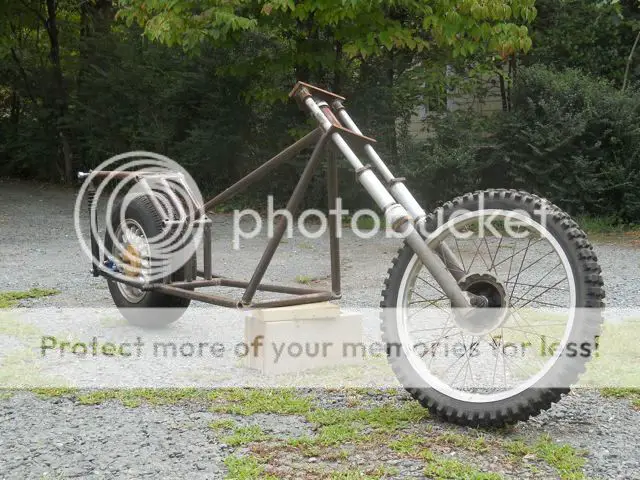
I painted it with some ~30 year old Rustoleum rusty metal primer after taking this picture. The frame looks more integrated painted, but it's an ugly red-brown color. Dunno what color I'm going to end up with. Somebody suggested getting the whole thing galvanized, which would be sweet.
Man, there was a lot between the last post and this one, but now the frame has both wheels on. Tons of work left, but I'm headed back to school and this rig is headed onto the back burner.
I painted it with some ~30 year old Rustoleum rusty metal primer after taking this picture. The frame looks more integrated painted, but it's an ugly red-brown color. Dunno what color I'm going to end up with. Somebody suggested getting the whole thing galvanized, which would be sweet.
hey bud that link u posted to the saw ... it does not say engine spins at 2500 it said clutch engages at 2500 !!! yor looking at 8,000 to 10,000 rpms buddy !!! that is one monster saw ! wanna sell it ?
I love that saw. I don't want to sell it.
But as the saying goes, everything is for sale.
I paid about $200 for the saw, plus some miscellaneous parts and a lot of TLC. I ought to sell it for a little more than the cost of replacing it, but they're pretty rare and I'm rather sentimental about this one by now. I think $700 would sway me, but I don't expect you to want to pay that.
rig
I'll let you know if I see another one on ebay or something though.
Update:
More than a year since my last post.
Coming up on two years since I started this project.
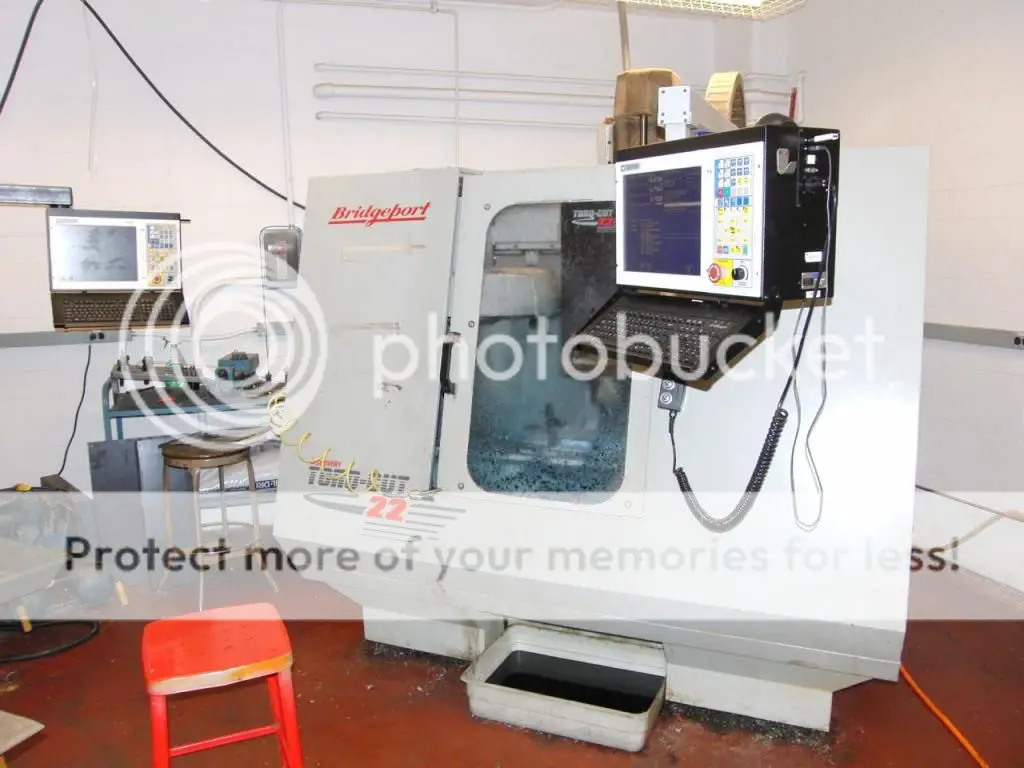
My goal is to get this thing moving by the time I graduate this spring so I can go on a road trip with it right after graduation. So to that end, I'm staying here on campus to work on it over Christmas vacation. As I write this, I'm sitting in the engineering lab next to a Bridgeport CNC as it cuts me some steel for my rear-wheel/freewheel bearing/hub plates.
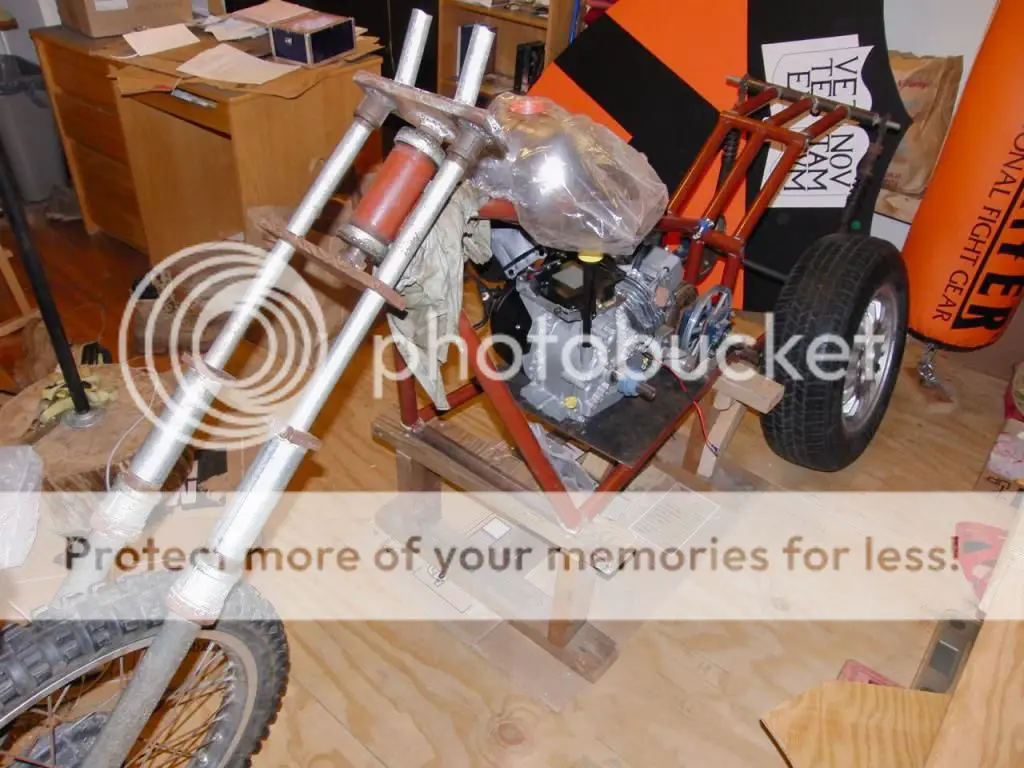
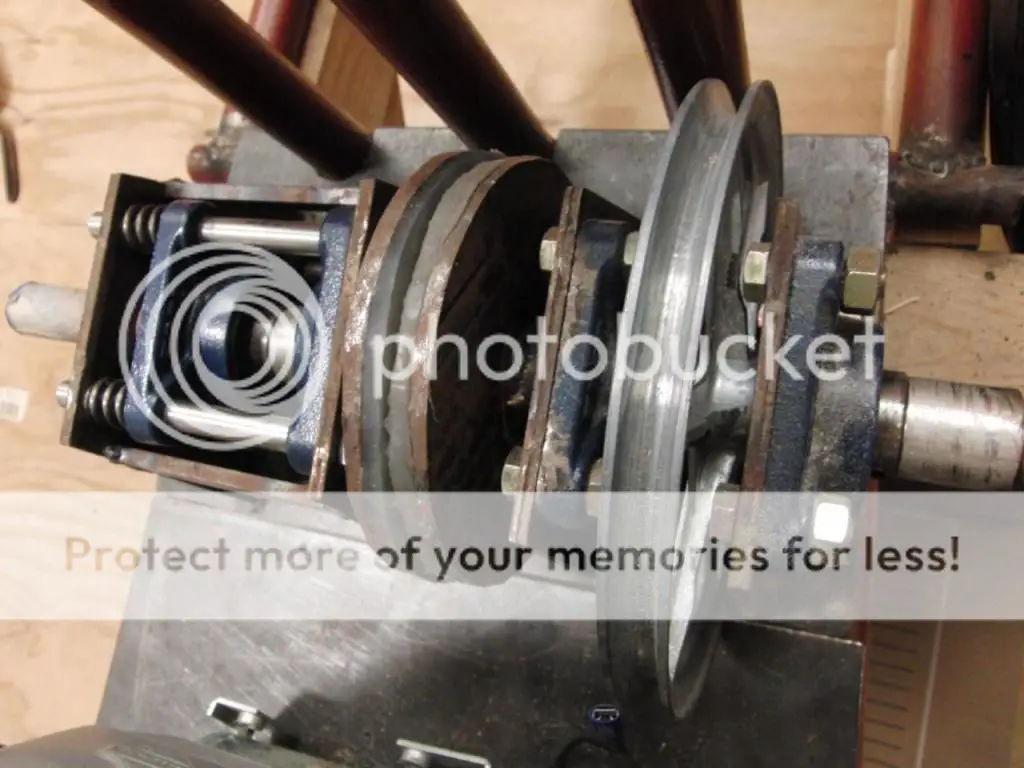
I haven't done anything in the last six months or so except think and draw plans, but I did a little welding stuff last fall/spring. I built the transmission, with a pulley from the engine to a spring-based clutch, to a 428 (I think, I'd have to look it up) motorcycle chain drive sprocket.
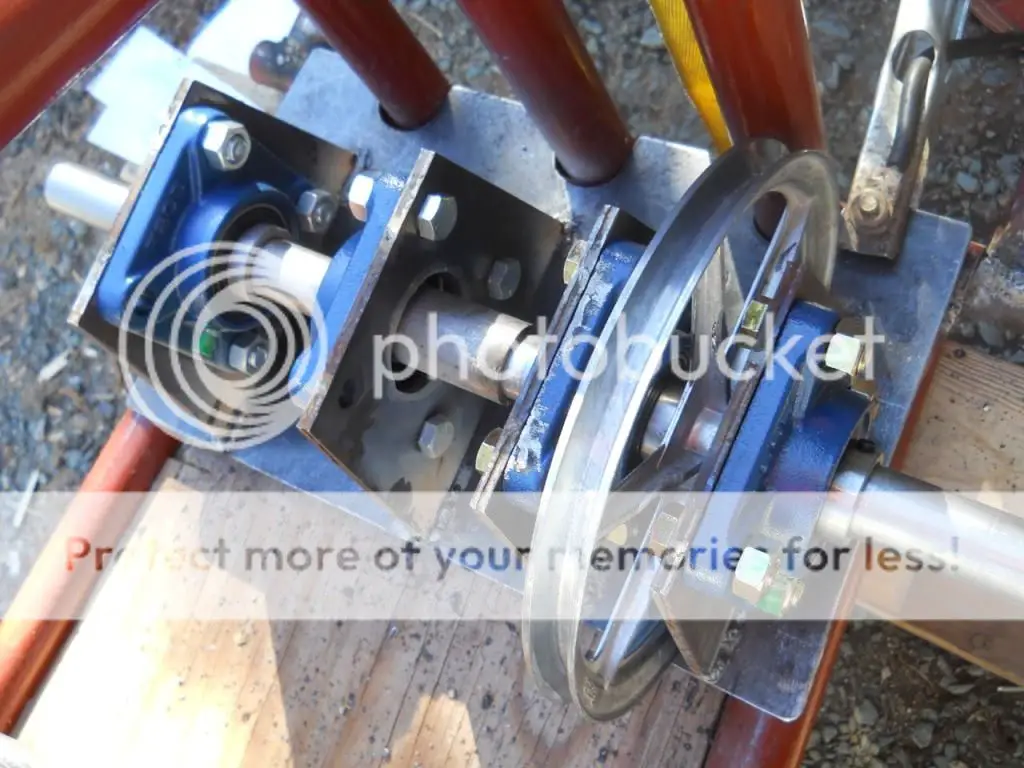
In that picture I'm still welding it together, but there are two clutch plates that mesh in between the two pairs of flange bearings, and the drive side flange bearings ride on a set of 1/2" stainless steel rails to allow back and forth clutch action. And then of course I also cut the extra length off of the jackshaft. As it stands, all the parts are there but I haven't permanently attached stuff in case my plans change.
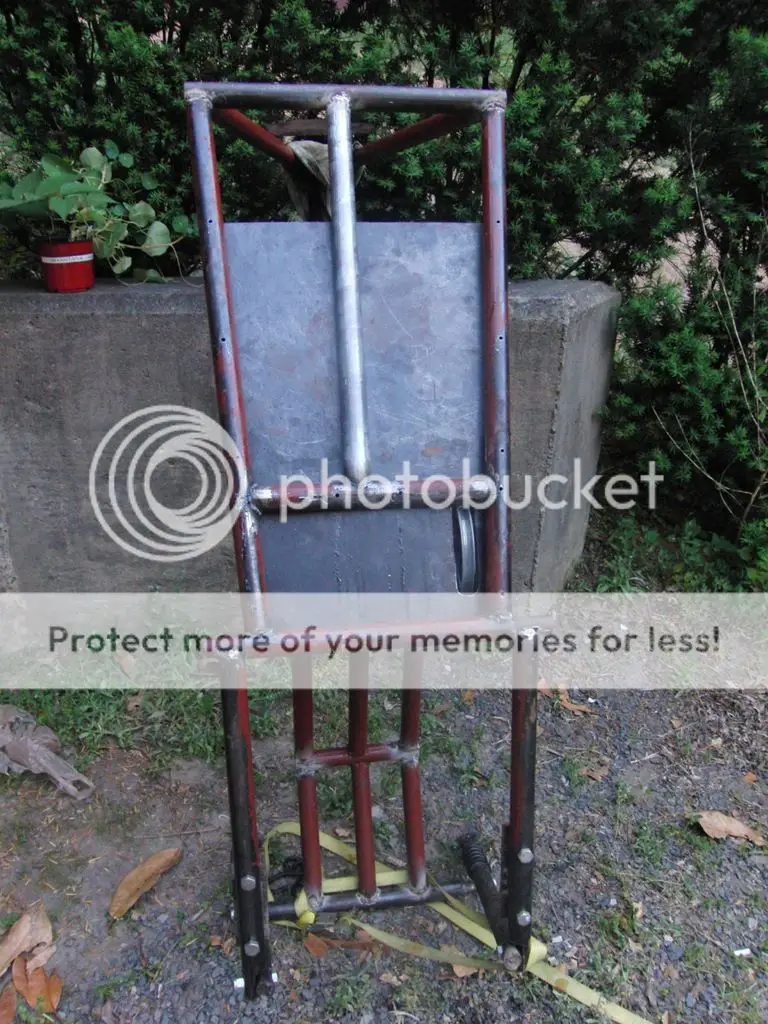
I made a nifty stand out of 2x4s so that it won't rest on the wheels (or tip over) when I'm working on it. Here you can also see the very ugly but also very rust-proof paint I put on it last summer.
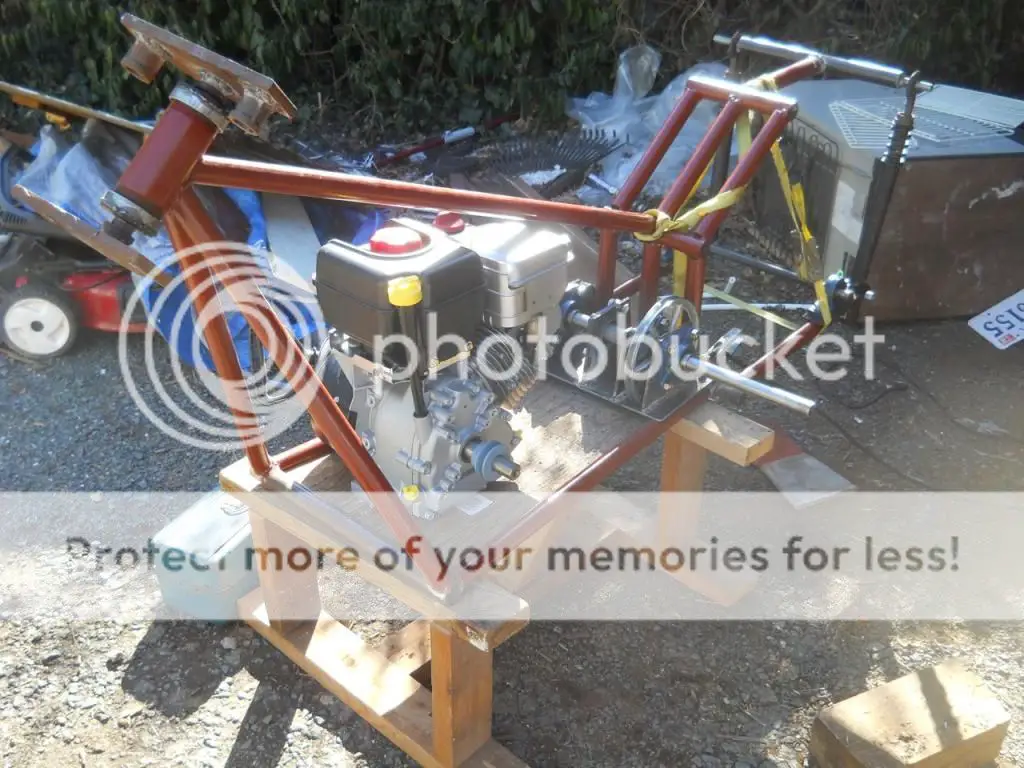
I have the bike in my dorm room now. I'll post some pictures when I get the front and rear wheels on, and I should have that done by January.
rig
More than a year since my last post.
Coming up on two years since I started this project.
My goal is to get this thing moving by the time I graduate this spring so I can go on a road trip with it right after graduation. So to that end, I'm staying here on campus to work on it over Christmas vacation. As I write this, I'm sitting in the engineering lab next to a Bridgeport CNC as it cuts me some steel for my rear-wheel/freewheel bearing/hub plates.
I haven't done anything in the last six months or so except think and draw plans, but I did a little welding stuff last fall/spring. I built the transmission, with a pulley from the engine to a spring-based clutch, to a 428 (I think, I'd have to look it up) motorcycle chain drive sprocket.
In that picture I'm still welding it together, but there are two clutch plates that mesh in between the two pairs of flange bearings, and the drive side flange bearings ride on a set of 1/2" stainless steel rails to allow back and forth clutch action. And then of course I also cut the extra length off of the jackshaft. As it stands, all the parts are there but I haven't permanently attached stuff in case my plans change.
I made a nifty stand out of 2x4s so that it won't rest on the wheels (or tip over) when I'm working on it. Here you can also see the very ugly but also very rust-proof paint I put on it last summer.
I have the bike in my dorm room now. I'll post some pictures when I get the front and rear wheels on, and I should have that done by January.
rig
Last edited:
Mr. Rig, I've been enjoying this thread a whole bunch and especially enjoy your creative know-how. If your road trip heads you toward the DC area you are welcome to stop and stay here for however long suits you. We've got the room and it would be great to cruise the countryside here with you. Keep up the good work!
Dan
Dan
Here are some pictures of the Bridgeport churning away at the steel plate:
And here is the bike set up in my dorm room:
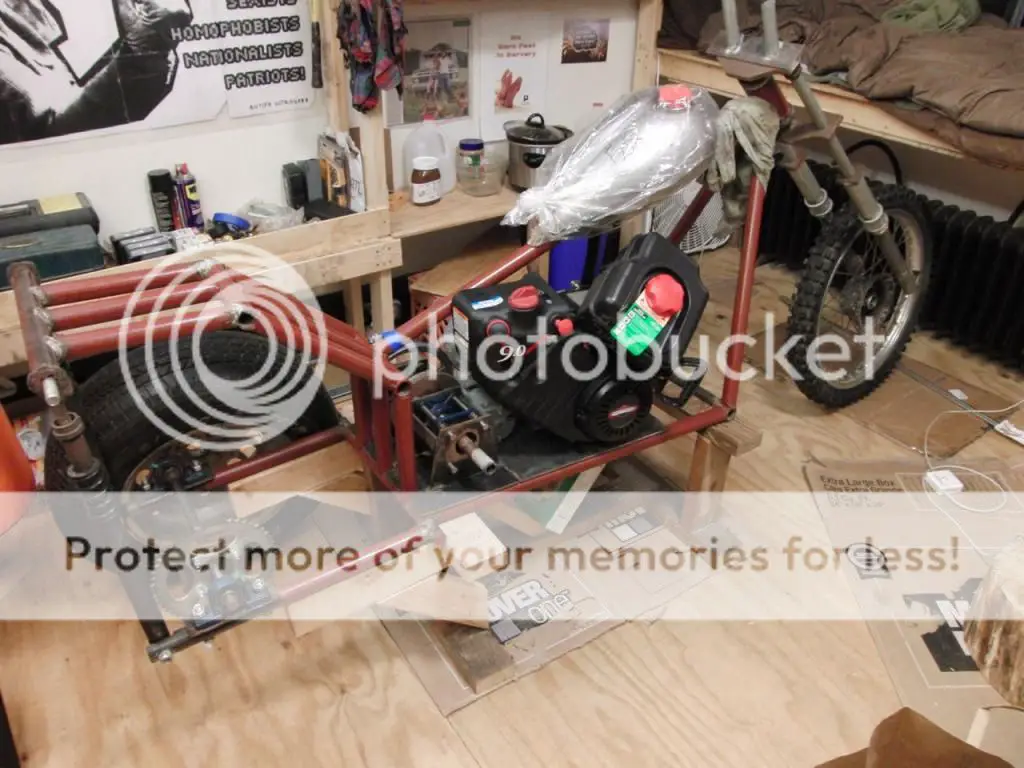
I wanted to take a picture to show the transmission the way it looks now, and I realized that there were a few other new-ish things. Mostly that I have a gas tank now (but I learned the hard way never to buy an unpainted gas tank very far ahead of installation, because I haven't painted it and it's rusted a little). The gas tank is a Paughco 2.2 gallon— closest I could get to a teardrop tank.
Not gonna do any more work for about two weeks. Well, I have one CNC program left and I'll do that after Christmas, but other than that I gotta get back to studying engineering, and not playing around with it.
Dan, I'll be delighted to take you up on that offer. I'll be in the area at some point and I'll let you know!
rig
And here is the bike set up in my dorm room:
I wanted to take a picture to show the transmission the way it looks now, and I realized that there were a few other new-ish things. Mostly that I have a gas tank now (but I learned the hard way never to buy an unpainted gas tank very far ahead of installation, because I haven't painted it and it's rusted a little). The gas tank is a Paughco 2.2 gallon— closest I could get to a teardrop tank.
Not gonna do any more work for about two weeks. Well, I have one CNC program left and I'll do that after Christmas, but other than that I gotta get back to studying engineering, and not playing around with it.
Dan, I'll be delighted to take you up on that offer. I'll be in the area at some point and I'll let you know!
rig
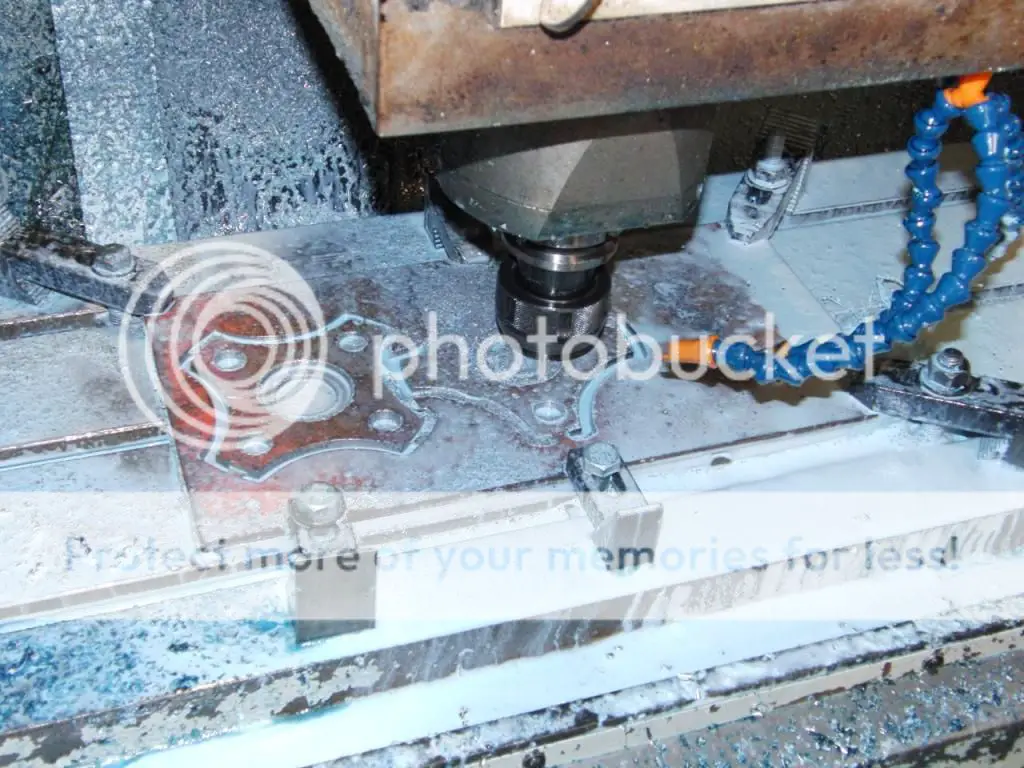
Ran the last CNC program on the Bridgeport today. So, ready to put the hub together. Here are the pile of hub plates, still stuck in the steel plate stock (the new lips for the front axle are there too):
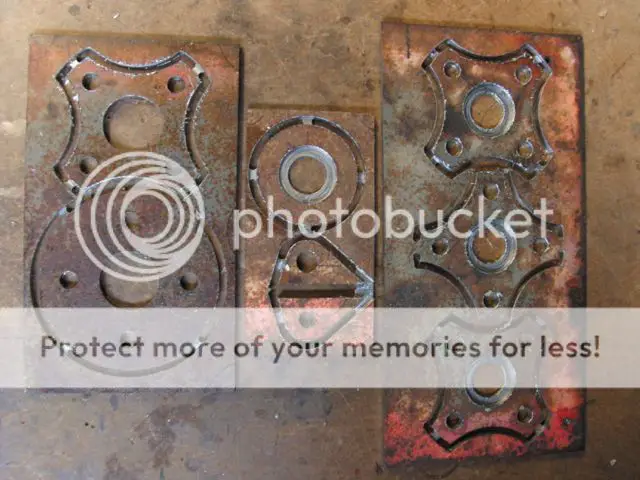
Then cut out the hub plates from the stock with the shop bandsaw.

Used an angle grinder, dremel tool, and the shop belt sander to deburr the plates and remove the milling tabs. Lower amount of burrs on the last program compared to the first two sure showed the difference between using a HSS and carbide end mill.
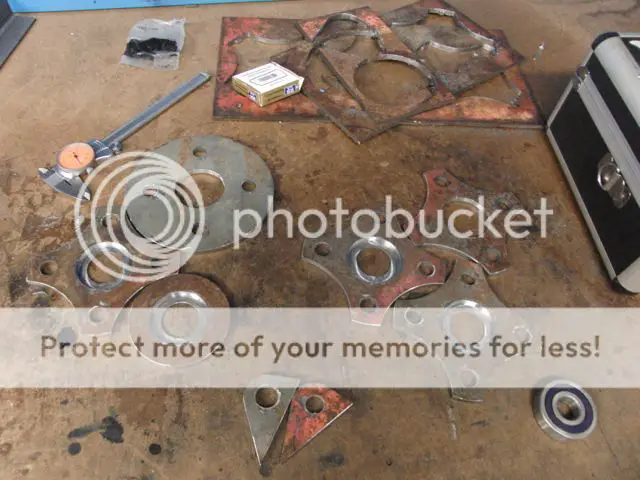
Unfortunately, the mill cut the holes for the 2" OD bearings 0.01" too small (in other words, somebody didn't think about tolerances in the CAD). So, that expensive dremel tool sure proved its worth. Took two hours or so of sitting in the shop and buzzing away, but got the bearings to fit without totally ruining the center tolerances of the part. Looks fantastic too, considering it was by hand.
Called it a day, cleaned up the bench, put my shop clothes back in my locker, and took the finished plates back to my dorm... where I figured out that the 9/16 holes were milled under spec too, which should have been obvious had I stopped to think about it. So the bolts won't fit. A few more hours with the now-treasured dremel tool are gonna fix that, TOMORROW.
rig
Then cut out the hub plates from the stock with the shop bandsaw.
Used an angle grinder, dremel tool, and the shop belt sander to deburr the plates and remove the milling tabs. Lower amount of burrs on the last program compared to the first two sure showed the difference between using a HSS and carbide end mill.
Unfortunately, the mill cut the holes for the 2" OD bearings 0.01" too small (in other words, somebody didn't think about tolerances in the CAD). So, that expensive dremel tool sure proved its worth. Took two hours or so of sitting in the shop and buzzing away, but got the bearings to fit without totally ruining the center tolerances of the part. Looks fantastic too, considering it was by hand.
Called it a day, cleaned up the bench, put my shop clothes back in my locker, and took the finished plates back to my dorm... where I figured out that the 9/16 holes were milled under spec too, which should have been obvious had I stopped to think about it. So the bolts won't fit. A few more hours with the now-treasured dremel tool are gonna fix that, TOMORROW.
rig
It's a little late to be signing on to this build and choppers are not normally my thing, but I especially like a couple of things about this build and this thread. First is our intrepid builder willing to take on a serious project and sticking with it. While learning engineering through your books and instructors, your hands are learning engineering by doing. One compliments the other, no doubt.
Another great thing about this build is the willingness of forum members to give support with their technical and practical experience. Taking the time to help each other is pretty cool. And do take Tinsmith up on his offer. I had the good fortune of sharing time in his semi-retired tinsmith shop over the course of a few winters where on Saturday mornings we made gas tanks, shared life stories and created a great friendship. And I've shared those country motorbike rides with Dan, waving hello to cows and horses in the beautiful Maryland countryside.
Good fortune with your build and with your life as an engineer. Good riding, too.
SB
Mr Galladoon, should you ever have a chance to stop by you'll need to check the hi-tech brain at the door. The methods I use to fabricate sheet metal are pretty much 19th century and so are some of the machines I use. I have had some young techies visit when the shop was up and operating and it was fun to show them how it was done long ago. The door is always open to anyone. Keep up your good work. And if we had old SB here when you visit you'd really feel like you were in a time warp.
Dan
Dan
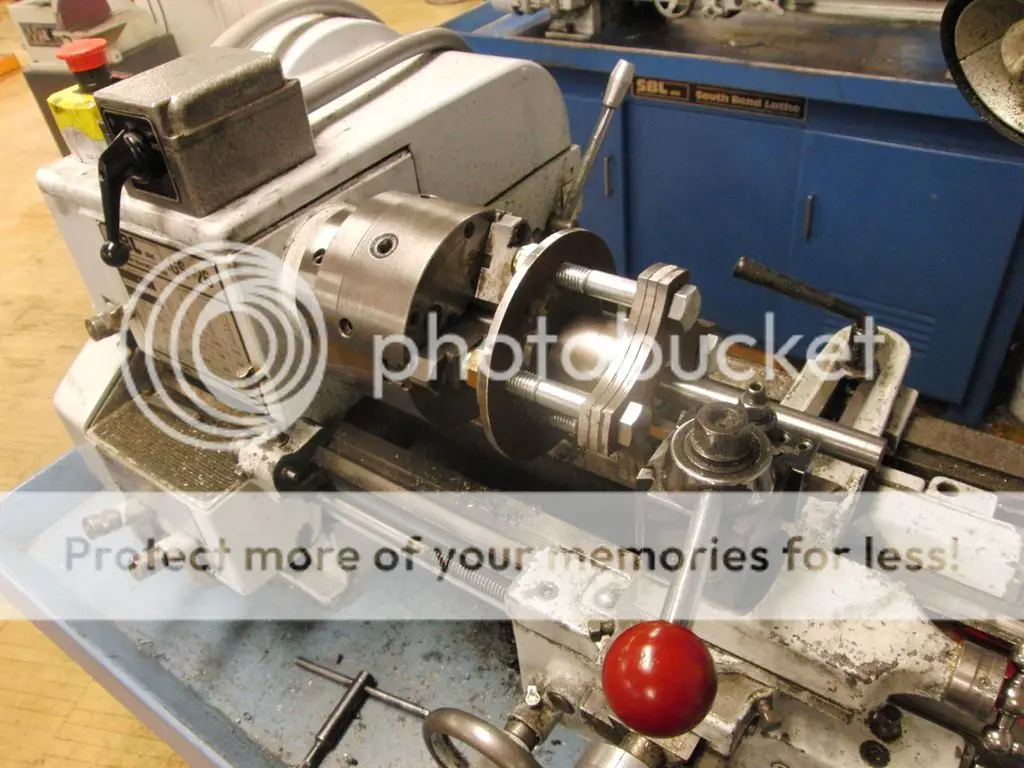
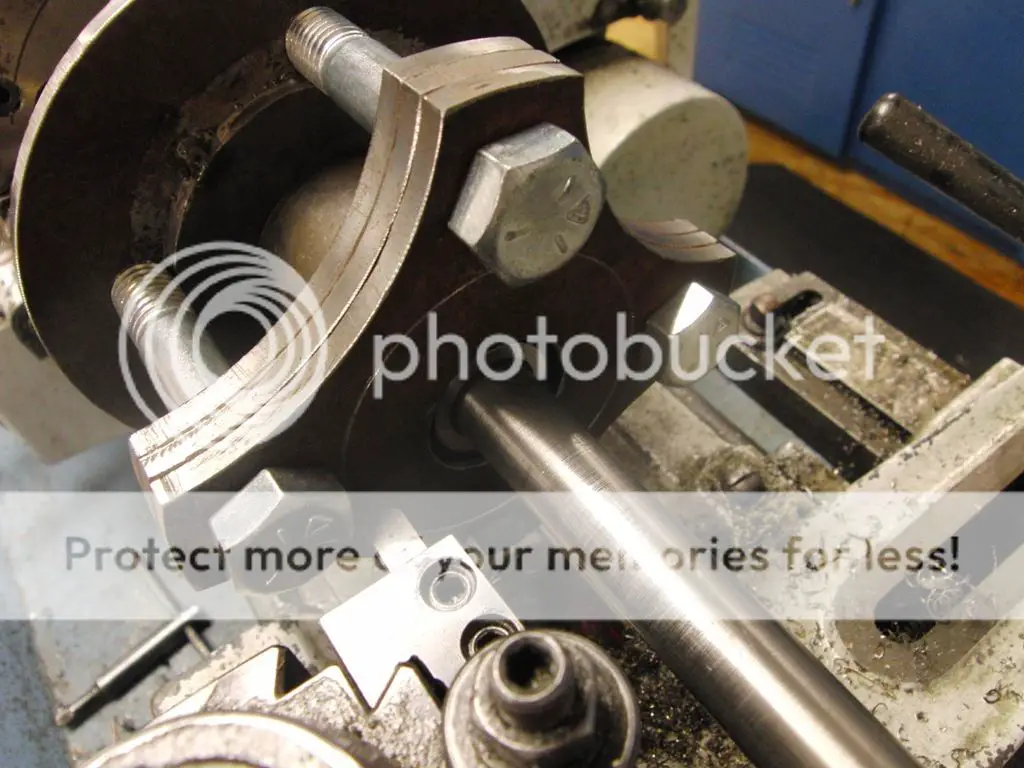
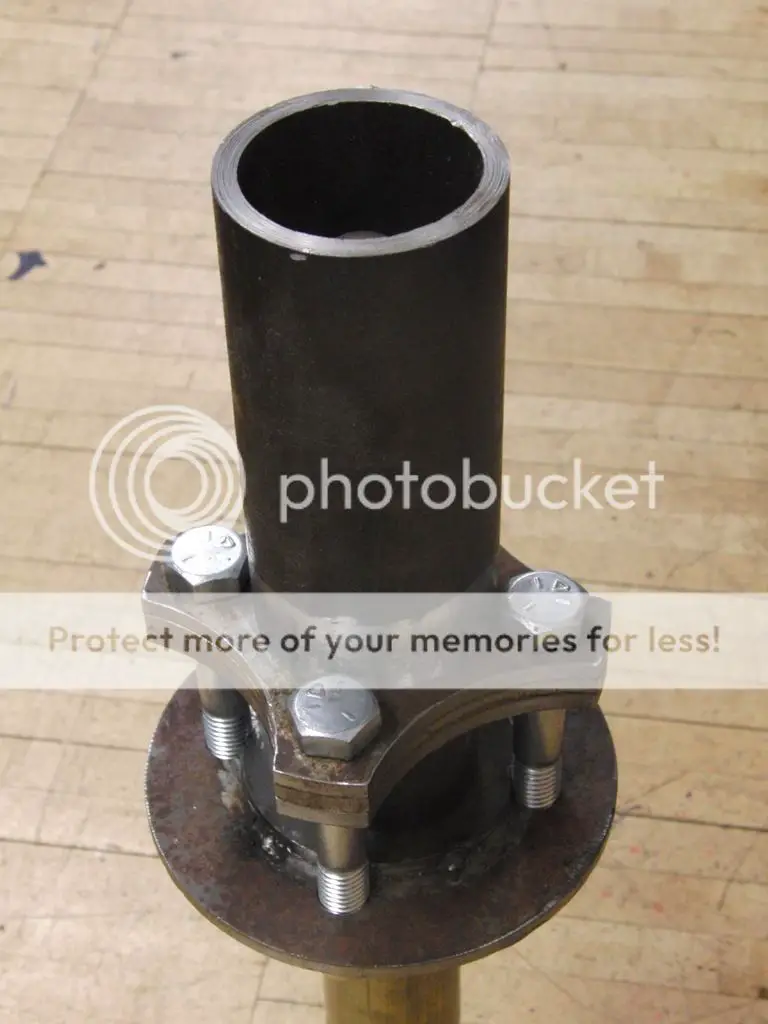
Progress. Put the back wheel on the bike yesterday (had to spend a while messing with bearing tolerances: precision bearings were 0.003" under 3/4", so did some gentle sanding of the axle on the lathe). But now the back wheel is on the frame, and spins for about five minutes. Actually haven't timed it, but think that's about right.
Slowly getting the roller ramp machined on the overrunning clutch for the freewheel. Did about one fourth of the final milling this morning, so maybe in a week or two I'll have squeezed in sufficient shop time to have it done.
Then the only parts left for the rear wheel assembly are the spacers to keep the wheel centered on the axle laterally. Then comes welding it all together— or maybe some transmission work first to avoid painting myself into a corner. Gotta make sure the sprockets match up!
rig
Last edited:
I'm back.
More importantly, I'm done with my final exams.
Two weeks until graduation, and it's going to be a race to get my rig running.
I didn't post about it in February, but here's picture of machining the overrunning clutch for the freewheel on the Bridgeport manual three axis mill. There's way more steel in there than is really necessary, but that's that.
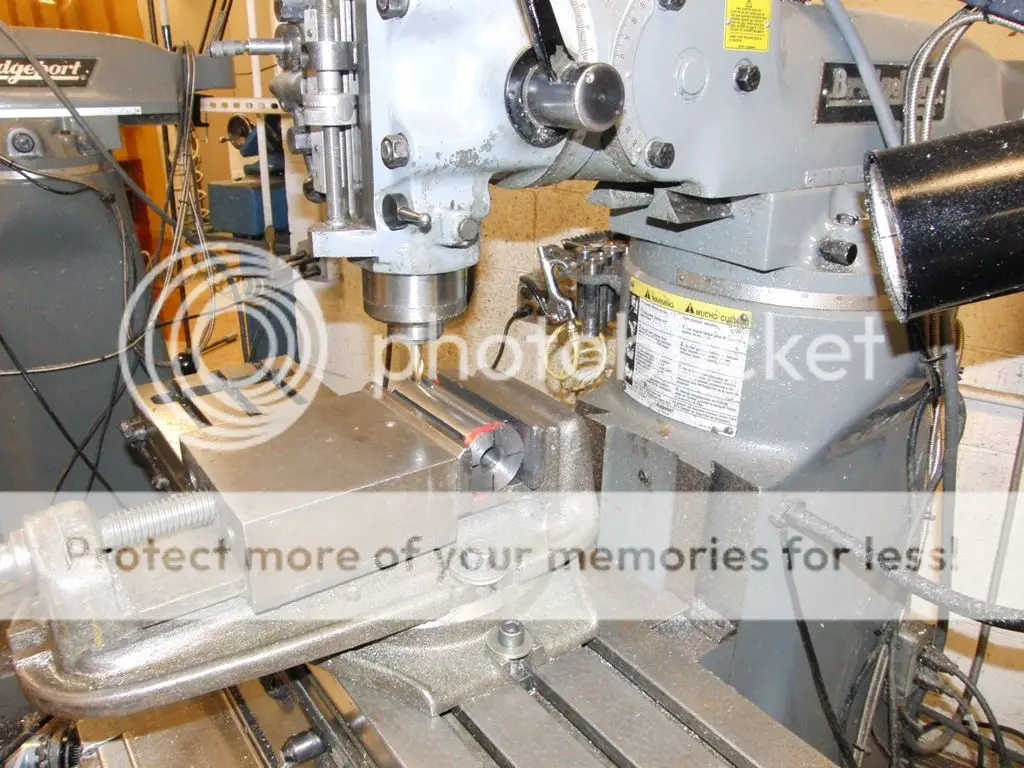
It's only partway done in the picture, but I finished it back in February. We'll see if it works— if it doesn't, I'm just gonna weld it solid and not have a freewheel. I'm going to try to get the front wheel on tomorrow. That will make it much easier to get the rig back and forth from my dorm to the machine shop, because I'm really not supposed to weld in here!
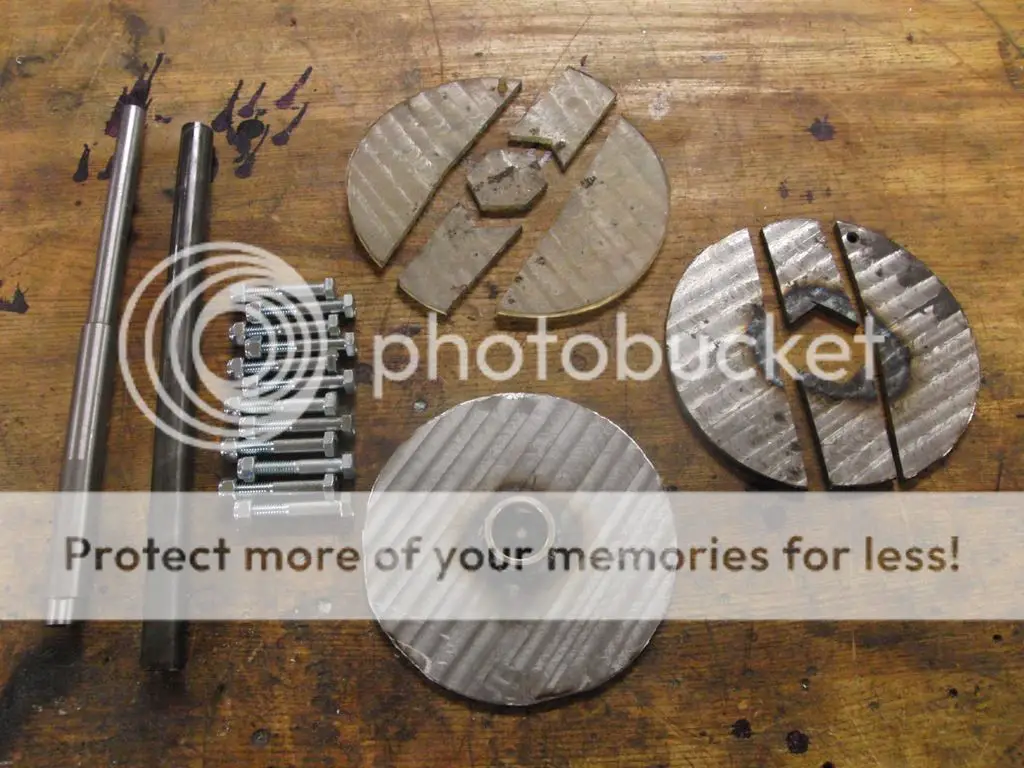
Still far from done; just to get the freewheel together I've got to lathe some spacers and then weld the housing pipe to the hub, cut the rollers from rod stock, make sure everything lines up and then weld it all together.
For the front end I've got to cut off the old lips and weld on the new ones. Alignment is going to be tricky. At least the temporary handlebars I've got will be pretty easy (and quick to remove, too, when I get a proper set made on a pipe-bender).
Then I've got to tack weld the skid plates for the engine and transmission onto the frame, drill bolt holes and install bolts, drill holes and bolt on the engine, weld in a bit more steel into the frame under the skid plates, get the clutch and clutch lever operational, make tensioners for the belt and chain, put petcocks on the gas tank, install the gas tank, sand and paint everything...
Then the bike will move, but it won't have lights or brakes. This is going to be fun.
rig
More importantly, I'm done with my final exams.
Two weeks until graduation, and it's going to be a race to get my rig running.
I didn't post about it in February, but here's picture of machining the overrunning clutch for the freewheel on the Bridgeport manual three axis mill. There's way more steel in there than is really necessary, but that's that.
It's only partway done in the picture, but I finished it back in February. We'll see if it works— if it doesn't, I'm just gonna weld it solid and not have a freewheel. I'm going to try to get the front wheel on tomorrow. That will make it much easier to get the rig back and forth from my dorm to the machine shop, because I'm really not supposed to weld in here!
Still far from done; just to get the freewheel together I've got to lathe some spacers and then weld the housing pipe to the hub, cut the rollers from rod stock, make sure everything lines up and then weld it all together.
For the front end I've got to cut off the old lips and weld on the new ones. Alignment is going to be tricky. At least the temporary handlebars I've got will be pretty easy (and quick to remove, too, when I get a proper set made on a pipe-bender).
Then I've got to tack weld the skid plates for the engine and transmission onto the frame, drill bolt holes and install bolts, drill holes and bolt on the engine, weld in a bit more steel into the frame under the skid plates, get the clutch and clutch lever operational, make tensioners for the belt and chain, put petcocks on the gas tank, install the gas tank, sand and paint everything...
Then the bike will move, but it won't have lights or brakes. This is going to be fun.
rig
So, didn’t end up doing much last week.
Over the weekend, packed up most of my dorm room stuff and moved the bike from my dorm to my new Batcave in the basement of the engineering wing. On Monday, welded in two new tubes to the frame to support the skidplates for the engine and transmission (not really necessary structurally, I think, but felt like they should be there). Tack welded the skidplates to the frame and then started drilling boltholes for a more modular permanent setup.
With the skidplates and transmission on, the bike is a lot heavier than just the frame. It’s also much harder to lift ergonomically because I can’t step inside of it to center the weight, and can basically only reach down and lift with my lower back. *Cue old-man grimace.* I can’t wait to get wheels on permanently so I never have to lift the damn thing again.
Today the machine shop was open again, so spent the shop hours on the lathe and Bridgeport manual mill, going back over a few things that needed changes. Lathed down the front axle a few thousandths because it wouldn’t fit through the hole on one side the lips, then made a new spacer tube for the front axle that has an ID with better tolerance. Picked up 5/16” bolts for the skidplates from the stockroom. Re-milled a new clutch plate because the old one was welded crooked, cut apart the old one and welded the new plate to the old collar. Fits on the old clutch axle and spins much more true now. Borrowed a 5/8” drill bit from the shop and drilled out the last two bolt holes in the rear wheel to fit the hub (my CAD from January didn’t perfectly match what BMW actually made). Then assembled the hub on the lathe with a short bit of pipe as a spacer where the wheel goes, in order to mark the circumference of the exterior tube of the roller ramp freewheel, so I know where to weld it tomorrow.
After shop hours, finished the second pass of drilling the skid plate bolt holes, but didn’t break the tack welds yet. Then assembled the rear wheel to mark where to weld the roller ramp to the axle. The wheel spins great on the bearings in the hub. A firm shove (by no means my hardest) sent it spinning for precisely four minutes and fifty-four seconds (my previous guess was pretty close!). Got a video of the wheel spinning!
Also de-burred the skid-plate holes and prepped all the welds for tomorrow by removing rust and mill scale with the grinder and dremel tool.
Seems not to like me posting that many images. Here's the video:
http://s1383.photobucket.com/user/thepowertoact/media/rig/CIMG4915_zpsyy0jxhjk.mp4.html
Cheers,
rig
http://s1383.photobucket.com/user/thepowertoact/media/rig/CIMG4915_zpsyy0jxhjk.mp4.html
Cheers,
rig