Indian Hiawatha

GoldenMotor.com

silverbear

The Boy Who Never Grew Up
Jul 9, 2009
8,325
670
113
northeastern Minnesota
Welcome to my build thread. Those who have followed the Indian Tadpole thread http://motorbicycling.com/f44/indian-tadpole-25692.html are familiar with what I'm up to. About a year ago Fasteddy sent me a picture of an early Indian motorcycle with two wheels up front. I called it a "tadpole" and learned later that it was an option from Indian on the first models, starting in 1903. It was called a tri-car. Fasteddy (Steve) and I have been gathering photos and what information we could on it since and we have each determined to build one.

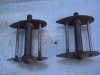
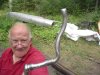
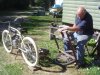
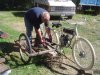
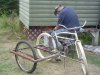
Steve got to work in Vancouver this winter and spring designing and fabricating the front end assembly for two tri-cars. His was to be the Camelback and mine would be inspired by a slightly later frame used on their board track racers... very much like a modified Worksman NB frame, which is the foundation of my build. He's visiting here in Minnesota for a time this summer so that we can make some progress on our builds. He's doing the welding while I've been putting wheels together and such.

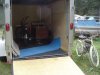
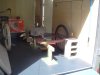
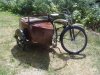
Since Steve's bike is to be a tri-car only he will continue with the original thread. In the interest of keeping the thread manageable in size (already 16 pages long) I'm breaking mine off from it until such time the tri-car assembly goes on it. My build is also different in purpose. Steve wants his as a tri-car only showpiece. I want mine to ride as dependable transportation and to follow my original idea of having a core bike which is convertible... converting from a two wheeled light motorcycle to a motorcycle with a sidecar (using a sidecar built last summer from a Grumman canoe)... and further converting to a tri- car with the two wheeled assembly up front. I expect that mostly mine will be used in the first two modes and will be my primary ride. As a tri-car it might get ridden in a fourth of July parade or something of that sort... showing off.

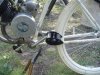
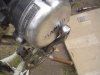
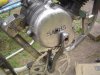
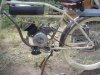
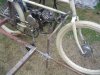
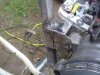
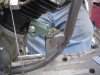
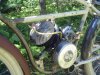
The idea was to make the core bike as well as I could with the best motor I could... a vintage German model 1932 Fitchel & Sachs 98cc 2 stroke engine with built in 2 speed transmission. The engine was designed for light motorcycles and that is what I want this build to be.

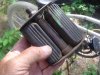
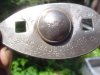
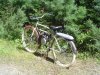
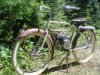
It is also veering off from original intent to look much like a 1909 Indian with the addition of some wonderful fenders from a 1939 Hiawatha with a great Indian head fender ornament. In my mind it is in keeping with the Indian theme and is still my "Indian", but in spirit only. It makes no attempt to look like any model Indian ever made which leaves me free to do what I want, which is how I work best.

I hope you like the build and enjoy seeing it come together. It is all on a pretty tight budget so a lot of things are scrounged and fabricated. Even if the cost is low, I'm trying my best to keep the quality high.

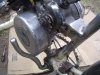
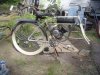
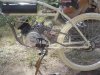
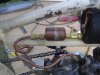
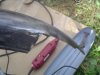
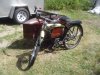
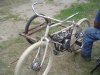
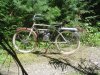
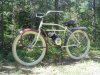
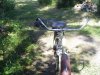
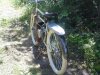
Here's where I am today with the bike mocked up with fenders bolted on, seat in place, rear rack from another model Hiawatha, a 1960's Seminole. The engine is in place with the mounts welded to the frame. I'll back up a little in a followup post on the making of the mounts and other details later. I'm truly excited about this build. Here we go...
Silverbear
 

Attachments

silverbear

The Boy Who Never Grew Up
Jul 9, 2009
8,325
670
113
northeastern Minnesota
A few more photos from today. The handlebars are old ones, not rusted up, but not real shiny either. I wanted them to be longer so we're going to experiment with welding on extensions. That's what the blue tape is... holding on an extra section of handlebar the same length as the throttle on the right and the old three speed shifter I'm using for a decompression control on the left side. A couple little connectors will get cut from handlebar stock and slit lengthwise soa connector can go inside the end of the original handlebar and also the extension. A wee gap will be left and ground into a V for the weld, then ground down smooth so the throttle and shifter deal can slide over. The weld will be hidden, in other words. Should work and the price is right.
SB
 

Attachments

harry76

Well-Known Member
Apr 16, 2011
2,557
47
48
Brisbane, Australia
Loving it Silverbear. That motor is truly beautiful, even better then the original Villiers and a way better option with the gearbox. I really love how you set up the motor, and it looks like a really neat setup where the drive sprocket is.... did you have to offset the engine to line up with the rear sprocket?

Those handlebars look really nice too.... looking forward to seeing more
 
  • Like
Reactions: Tom from Rubicon

silverbear

The Boy Who Never Grew Up
Jul 9, 2009
8,325
670
113
northeastern Minnesota
Thank you Ted & Harry.
The engine is centered in the frame, so there is no offset. If I need to make adjustment for aligning the drive sprocket to the driven sprocket on the rear wheel, the clam shell hub adapter allows for some lateral adjustment, one of the beauties of that kind of sprocket setups. Today I'll finish bending the pedal crank arms and then can make up both chains... for the pedal chainring and the engine drive sprocket. Very much wanting to see that all is well in that department... and will walk the bike along staring at the engine chain as it makes it's circuit (just realized I will need to set up the clutch cable and lever to do that and will need to purchase a set of brake and shift cables), perhaps ride the bike around under pedal power without the engine chain in place first.

Also on the agenda today is to finish cleaning up the frame and engine mount welds with the little rotary (dremel) tool. Down the line are so many little things... the decompression cable setup from the handlebar twist shifter to fabbing up something at the engine decompression fitting is one. Making up a throttle cable is another. Figuring out an engine shut off button and how to wire that to where on the engine. Set up a temporary gas tank with fuel line and fuel filter to the engine... anything that works temporarily so the engine can be fired up. Cobble up something for the exhaust. Then comes the long process over the winter of refining things.

The fenders will be worked on a little at a time. I've started tapping out the dents with a ball peen hammer and the seemingly endless process of filling in the dents with epoxy as body putty. Sanding down, giving more filler, sanding again, more filler... all made more difficult due to working with curved surfaces. I'll make them presentable, but they will never be perfect and a close look will reveal that there were dents. I'm considering having the frame powder coated, but probably not since the fenders will have to be done by spray can. My understanding is that body putty can't be powder coated. Does anyone know if that is true?

More to come...
SB
 
  • Like
Reactions: Tom from Rubicon

silverbear

The Boy Who Never Grew Up
Jul 9, 2009
8,325
670
113
northeastern Minnesota
Thanks, you guys. Your encouragement means a lot. Been working hard and making significant progress. Welds have been cleaned up and after several tries, some welding and grinding have a pedal crank in place. Now the sidecar frame can be fitted up knowing how far out the pedal rides. I want the sidecar in as clse to the bike as possible, leaving just enough room for pedal and foot to make a circuit. By the time this day is done we should have the sidecar frame attached to the Indian Hiawatha. After that fit up the sidecar to the frame and all the stuff needed to start the motor up for the first time... clutch cable, decompression cable, throttle and make up a cable for that, kill switch, pedal chain, brake cable to front brake and eventually to sidecar brake (dual pull lever).

First up I wanted to show you the original 1939 Hiawatha pedals I'm using. They were pretty much a mess and I'm glad I took the trouble and time to rebuild them. I took them apart, cleaned them up on the wire wheel, shot them with new paint and gave them better rubber from a newer (1950's) set of old pedal donors. I like 'em. A little thing, maybe, but something else that says "old and quality", contributing to the look and feel of an early motorcycle. Like the cool script from the manufacturer, they speak of another age when even little things were made well and designed with style. Nobody else may know the script is there under my foot as I ride along, but I know, just as I will know all sorts of little things about this bike and sidecar and will have memory of it all being made. Priceless, in my estimation.
(cont.)
SB
 

Attachments

silverbear

The Boy Who Never Grew Up
Jul 9, 2009
8,325
670
113
northeastern Minnesota
Coming up with a wide enough pedal crank was the next hurdle. Until the pedals are in place there is no way to fit up the sidecar frame. There has to be enough room for the pedal and your foot to make the pedaling circuit without running into the sidecar frame, yet you want the sidecar as close in as possible to keep the the whole rig as narrow as you can manage.

The only supplier of extra wide pedal cranks that I know of is out and will be for months. I didn't want to use a three piece crank for several reasons. First, with shipping and a bottom bracket adapter it would cost around $75.00 which I don't have. Also, I wouldn't be able to use my cool pedals since the threads would be wrong. Third is that I'm running a little bit smaller chain ring for engine clearance and I also like the quality of steel and chrome in the sprocket I have.

But I do have some salvaged pedal cranks from the department of dead donors. I don't have an oxy torch, so cold bends are all I can do. I use a picnic table outside for my workbench with the vice attached to it. A crank arm gets tightened down and I stand on the picnic table with a cheater bar ( a several foot long section of water pipe with a reducer inside the end from a chunk of handlebar. This gets slipped over the end of the arm to be bent.)

Cold bending requires some leverage and muscle power, but can be done even by a gimpy old fart. I tried the first two and couldn't get enough bend to clear the left side clutch housing. With each one I managed to screw up the threads at the center of the crank. Not good. I cut a section of old hand grip rubber so the end was gone and slit it lengthwise to slip over the threaded center section to protect the threads. Remember to do that and it will save some grief. The next try was a great old crank (wonderful chrome and no rust) on the short side, making it very had to get enough bend.

Finally I settled on a recent dump acquisition, a BMX type of trick bike I brought home to cut off the horizontal rear dropouts. As a matter of course the pedal crank and sprocket were salvaged for who knows what someday... which turned out to be the one for this build. The Hiawatha pedals would thread in, the arms were already bent outwards a bit and they were extra long. The bend on the right side was not a problem. the left one was. I could not get the bend low enough to clear the clutch cover. I could bend it wide enough, but the jaws of the vice dictate where the bend can be. Dang.

Then the light bulb (incandescent) in me head flickered to life briefly and I asked Steve if he could weld some extra metal on the outer edge of the arm where it was running into the engine. He said he could and he did. That's what he's showing in the photos. You have to look closely to see, since he did such a nice job welding and then grinding it out to blend with the crank.

I fitted up the crank into the bottom bracket and using the side grinder removed some of the original arm on the inside of that bend. That made the difference. Everything clears and all that remains is to re-bend the end where the pedals attach to make them parallel to the ground. I did bend them, but until the pedals are on the bike it is hard to tell if you have it all level or not. I'll tweak that later.

Now we can move on to fitting up the sidecar frame and attachments to the bike. Steve designed and made it all. Amazing work and rock solid. I've seen the one he did for his Monarch and this will follow suit and be even better since he has learned from the first one how to improve on it.

Sidecar frame making photos and commentary will follow.

You may have noticed that the frame modification and engine mount welds have been cleaned up and the engine looks cleaner, too. The little rotary tool is indispensable to me. What a great little tool for bike work. I used a cut off wheel for shaping the welds and finished them up with a little sanding drum and then sanding discs. For the engine I use little wire wheels to clean up the oxidation and grime of many years. When the engine is off the bike I'll do a more thorough job of it. I won't polish it, but just this initial cleaning up has made a world of difference. What a great looking motor. Can't get over it. Maybe in a week or so I can fire it up... woohoo!
(cont.)
SB
 

Attachments

silverbear

The Boy Who Never Grew Up
Jul 9, 2009
8,325
670
113
northeastern Minnesota
Photos show the modified pedal crank in place. I made up the #41 drive chain and it looks like everything will line up nicely. I have to do surgery on the fender for chain clearance. Pick up some lock-tite for the hub adapter and sprocket... line it up carefully and snug it all home. Nice having the horizontal rear dropouts for tensioning the engine drive chain. I'm hoping to dispense with a chain tensioner.

Also pictured is the gas tank I made for this frame last summer. I'll use it until Dan (Tinsmith) and I can make a coffin shaped one of copper this winter. I still like it and think it looks good. It is three tin cans soldered together. Two corn cans and a shorter mandarin oranges can, if I remember right. Covered in harness leather, who'd know? I made the copper gas filter from copper pipe fittings and the filtering element inside is stainless steel wool. Seems to work fine. Mostly I wanted to fill up the space behind the gas tank. I like it, too, and may use it on the final version unless I use a glass bowl type... maybe a nice old one from an outboard motor.
(cont.)
SB
 

Attachments

Last edited:

silverbear

The Boy Who Never Grew Up
Jul 9, 2009
8,325
670
113
northeastern Minnesota
And this brings us up to date. I cut the rear fender for drive chain clearance. The piece will be bagged, labeled and saved in case the fender ever wants to be welded together again... doubtful, but I am reluctant to chop up vintage parts. The rotary tool is the right one for this job. Very clean cut, right on line and a far cry from using tin snips. From Harbor Freight I get these little cut off wheels of metal with diamond coating on them. Great for this kind of work. My old Dremel died and this one from Harbor Freight cost twenty bucks. Works fine.

You can also see evidence of some body work on this rear fender... pounding out dents and the beginning of filling with JBWeld epoxy. It will end up looking presentable. Can't do much with the front fender until I have the leaf spring fork from Curtis Fox fitted to the bike. Don't know yet how the fender will fit, but fit it must, one way or another. Hope to get down to see Curtis early in September. That's it for now.
SB
 

Attachments

  • Like
Reactions: Tom from Rubicon

harry76

Well-Known Member
Apr 16, 2011
2,557
47
48
Brisbane, Australia
Id love you to share more of your fuell filter idea. On my Briggs build i dont have room to use the bowl type filter i had, and IMO yours looks as nice if not nicer then what ive found online.

I understand you have S/S wool inside, and soldered the two cups together. My question is what actually are those copper pieces? and where do you get them. Id also love to see the gear you need to solder. Ive never done it, maybe you could do a thread for that fuel filter.

Keep up the good work SB, your bike is looking awesome. And that motor is just a beauty
 
  • Like
Reactions: Tom from Rubicon

silverbear

The Boy Who Never Grew Up
Jul 9, 2009
8,325
670
113
northeastern Minnesota
Harry,
The filter is made from copper plumbing fittings I use a short section of 1 inch pipe with two end caps fit over the short pipe section. Each end is drilled out to accept a short piece of 1/4 copper tubing, such as used for gas line. These are soldered in place and will later accept 1/4" compression fittings to join to the copper line going to the carburetor. I soldered this one together with silver solder and a propane torch which is all I had at the time. Now I think I'd use a soldering iron as it is easier to control the heat. Stainless steel wool is not cheap to buy and I had to get a 10 foot roll, if I remember right. I don't know that you'd need to use silver solder, but it is what I had. Glad you like it.
SB
 
  • Like
Reactions: Tom from Rubicon

silverbear

The Boy Who Never Grew Up
Jul 9, 2009
8,325
670
113
northeastern Minnesota
I'm making some progress on bringing the rear fender back to life while Steve has been hard at it on the sidecar frame. He a=had made up beforehand while back in Canada a few of the pieces, but most of the frame came from the local dump here in the form of bed frames, odd angle iron and such.

Also pictured is Steve's trailer he hauled his 50's Monarch and Chris Craft sidecar in. It has to come out so the Indian sidecar can go inside. It is a flat surface and is needed to align the sidecar frame to the bike frame. Steve spent some time leveling the trailer so that he can tell if the the sidecar frame is level and parallel to the ground.
(cont)
SB
 

Attachments

silverbear

The Boy Who Never Grew Up
Jul 9, 2009
8,325
670
113
northeastern Minnesota
So Steve's Sidecar and Monarch sit outside as the Indian uses the flat floor of the trailer for leveling. His bike is electric by the way. I'm the beneficiary of many hours of thinking, dreaming, studying old photographs and trial and error experimentation which he lavished on this first successful sidecar frame. The deck on his Chris Craft is mahogany, by the way. It all looks even better in person.

My sidecar frame is coming along, but fitting it up to the frame is complicated by my wanting to use a 26" wheel. I'm running the electra cream colored tires and can only get them in 26". This brought some headaches in figuring out how to modify his design to fit the Worksman frame and the more elevated sidecar. But he figured it out...
(cont.)
SB
 

Attachments

harry76

Well-Known Member
Apr 16, 2011
2,557
47
48
Brisbane, Australia
Is the sidecar fixed to the bike or will it move side to side a little (lean over), and if so can you show bracket details. Im looking at throwing together a bicycle sidecar and have been doing a little research...... i how i love the job Steve did on his, what an artist.

Im looking at using the Villiers /Atco catcher as the sidecar and just learning how its done.

I was watching the build before but now im definitely keeping an eye on you guys and hope to learn a little.
 
  • Like
Reactions: Tom from Rubicon

silverbear

The Boy Who Never Grew Up
Jul 9, 2009
8,325
670
113
northeastern Minnesota
Steve will need to weigh in on the flexible mounting verses rigid mounting issue. I wrestled with that when I first attempted a sidecar back with a 1939 Elgin using a kiddie trailer modified to work as a sidecar. You look at photos of some of the very first bicycle sidecars in England (Watkins, I think it is) and they flexed. Everybody from the motorcycle world said to make it rigid. One is a bicycle moving along slowly by pedal power with a pretty light sidecar (usually) and the other a heavier machine moving at greater speed. With a motorbicycle we are in the shadowlands of in between. I made mine flexible, but never got to really use it since it and the bike burned up in a truck fire. I'll never know how it would have performed.

Steve's first attempt was also flexible since he was not going to be traveling at speed, just riding along with an electric wheel powering the bike. Very quickly he changed plans when it was simply not working out. They leaned, all right, but in toward each other when he didn't want them to. On the other hand his sidecar and frame were on the heavy side. I'll let him better explain what happened.

So he changed his whole mounting system, details of which are coming up...
(cont.)
SB
 

Attachments

  • Like
Reactions: Tom from Rubicon

silverbear

The Boy Who Never Grew Up
Jul 9, 2009
8,325
670
113
northeastern Minnesota
I meant to comment on the first three photos of the prior post. These are the clam shell clamps Steve devised to join the sidecar frame to the bike frame. He made the rubber inner piece which is what comes in contact with the frame, from hockey pucks. Using a drill press (thank you, Curtis Fox) and a hole saw attachment he cut donuts out of hockey pucks in two different sizes depending on what part of the frame was being attached.

Steve says these clam shell clamps he thought up were a real breakthrough for him, like the light bulb came on in his head. This means the bike doesn't have to have fittings welded to it, and allows the arms to be adjustable. Pretty cool!

He noticed a great difference in how well the hole saw worked between two different countries of origin of the hockey pucks. I had bought them at different times for making up four stroke motor engine mounts and a couple were Canadian, bought here at the border, and the others were Czechoslovakian bought in Maryland. He had clean cutting with the Canadian pucks and a miserable time with the others which were gummy from the heat of cutting. There's a difference!

The puck 'donuts' are then slit along one side so they can be fitted around the tubular frame. Clever! they are then sandwiched between two half round clams which come together and hold the puck tight to the frame by means of muffler clamps. We didn't have any at the moment, so right now are using hose clamps to temporarily hold things in place for the purpose of fitting up. One half of the clam shell is then welded to an attachment arm coming from the sidecar frame. You'll see better how it works in subsequent photos and Steve can explain how he made the clam shell (pipe slit down the middle, I think).
(cont.)
SB
 
  • Like
Reactions: Tom from Rubicon