

Hey o1, the drive will be set up like a shifter. I'm hoping the derailer will act quick enough to keep tension. No shifting, just single gear. Gonna go look for your trans. thread.
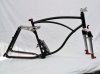
rear suspension
- Thread starter scratchbuilder
- Start date

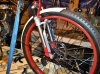
Well, this is the look...I have these vanilla fenders so I went with black..
Attachments
-
 303.8 KB Views: 139
Dude... Your bike looks SO good like that and so compact being a full suspension. I'm a little jealous!!!  those fenders really set it off!
I think a derailleur tensioner would be good. I have been thinking about the tension problem very deeply and I want it to work well. I'm going to take one of your side pics and photoshop a ruler and protracter on there to see exactly what the movement will be like. If you were able to make a shift kit style bottom bracket jackshaft but without a freewheel, it might be possible to utilize the original chain position the rear triangle was designed with. What do you think? Cause then the chain slack due to suspension movement would be minimal, and maybe it would be possible to do it without a tensioner and allow engine braking.
Another thought is making a tensioner that is somehow connected by a lever to the swing arm, like an adjustable suspension link in a car... A follower... That would adjust tension automatically (mechanically) following the suspension movement. I'm going to think hard about this, because this could be big for our needs in the MB world.
Here is a slack calculation I posted in another thread. This is a low level calc for pivot and shafts all in line and not taking sprocket sizes into account... If it even matters.

Subscribed.
those fenders really set it off! I think a derailleur tensioner would be good. I have been thinking about the tension problem very deeply and I want it to work well. I'm going to take one of your side pics and photoshop a ruler and protracter on there to see exactly what the movement will be like. If you were able to make a shift kit style bottom bracket jackshaft but without a freewheel, it might be possible to utilize the original chain position the rear triangle was designed with. What do you think? Cause then the chain slack due to suspension movement would be minimal, and maybe it would be possible to do it without a tensioner and allow engine braking.
Another thought is making a tensioner that is somehow connected by a lever to the swing arm, like an adjustable suspension link in a car... A follower... That would adjust tension automatically (mechanically) following the suspension movement. I'm going to think hard about this, because this could be big for our needs in the MB world.
Here is a slack calculation I posted in another thread. This is a low level calc for pivot and shafts all in line and not taking sprocket sizes into account... If it even matters.
Subscribed.
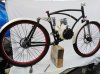
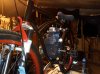
Thanks curt!..im thinking I might have a build I'm willing to spend money on...instead of scounching old parts. Hey 01..i seen your drive and lost track of my #1 reason for a shift- kit type drive...gear reduction! So I'm going with a shift kit drive. Only my wheel is a freehub so ill only be running the 32t..no shifting..so I can run a single speed chain. On the orange crate build I ran 11 clutch,to Js 32 with a16 freewheel back to a 46 rear. Good all round get up n go.The bike did turn out compact huh.. Gettin anxious to get her goin now! But got to order some parts.maybe I'll pedal around till parts come. Again thx guys!
01..ive only got a 9th grade education you lost me...lol ..like your double clutch trans..not seeing it work I scratch my head as to how it works. Oh wait I did past my GED by 4points..lol. Yeah this (pic) just wont work. Everything rubs cause I didn't envision this type drive. It looks like you say lots of chain slack with swingarm movement. Where as you say inline with bb a whole lot less slack..and derailer could handle it....
Attachments
-
 595.3 KB Views: 152
Last edited:
Oh damn.. I did not even think of the rubbing. My chain is real close like a 1/16" away from either stay so yea. But yea gotta jackshaft the pedal chain cause it wont clear with the stretch.
You'll figure it out. You're the scratchbuilder!!
I dont wanna hijack your thread but yeah the 2-speed works by having two chains for two gear ratios coming from the front jackshaft pulling the rear jackshaft. The front jackshaft is driven by the clutch on the engine with a 15t input pulley. The two sprockets are 11t on the front JS and they drive a 16t freewheel on the rear jackshaft on the right and a 10t clutchbell on the rear jackshaft on the left. So between the 10t and 16t that is the speed jump, 160%, since they are driven by the same size sprockets. So the rear jackshaft has the freewheel and the cent clutch shoes mounted solid. When you first start moving its just like any other bike, front engine clutch engages at 2200 and you start moving. When the rear jackshaft is spinning under 1900rpm (under 27mph, first gear) the 2nd gear centrifugal clutch is not engaged, so the 16t freewheel on the right is driving the bike. When the jackshaft reaches 1900rpm, the 2nd gear clutch engages, locking together the left side chain and the rear jackshaft (basically locking the front and rear jackshafts with some ratio) and since this ratio is a higher gear than the freewheel side, it now overrides the freewheel which starts spinning, and is the new ratio. First gear power transfer is engine to front JS, JS to JS on the right chain, then JS to wheel. top gear is all the chains on the left with the chain on the right freespinning.
My old setup with single speed was 8:1, 3.2" to 7" belt and then 12t to 44t. Was good but could not climb hills without a 15mph start. Now it will start on an incline. I kinda want to go back to a belt primary cause now Im getting oil slung on my leg every time I lube it. And these clutches have to be lubed like once an hour.
Yeah that orange crate build sure was pretty unique...
Wow thanks 01. Got it. Must be kool to drive. Parts ordered for the drive. I'll work on my exhaust, n intake. I'd like to get akg's weld able intake,but its never 'in stock' I gues its hand grinder,drill,n file...
Last edited:
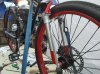
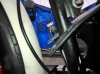
I think I came up with a way to mount my fender brackets. A strap of alum. provides the mount possibility. I was thinking just self tap to fork tube, wrong! Put a longer axle, then cap it with an acorn. Love the challenges these builds provide. Any others ways of 'how to mount fender brackets where no mount is,gladly accepted!
Attachments
-
 477.3 KB Views: 104
 -
 526.9 KB Views: 103
Last edited:
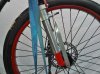
The red bracket above the wheel i drilled a couple holes in it and then made a L bracket down to the top of my fender, out of 1/8" aluminum.Then regular fender brace on the back,using all stainless button head 3/8 bolts and lock nuts.................Curt
This is the pic I should have posted showing how the added alum. piece will be used. The forks never were intended for mounting fenders. Yeah stainless buttonheads...ive got one of those hardware stores around the corner that carries a nice selection of fasteners'.
Attachments
-
 611.5 KB Views: 148
Hey curt, sooo far those wire braces are doing there job on del rio'..I won't have the clearance I'd like...i like fat tires! Well I done painted the engine..trying to get that look...
Attachments
-
 577.9 KB Views: 126
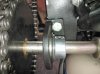
Got my googies from SBP.! And sprocket from Staton. So I was gonna find someone to heat bend my crank arms, when an idea came to me, to just slice the backside and bend to position and weld..they are excellent!
Attachments
-
 280.9 KB Views: 111
 -
 491.4 KB Views: 135
Last edited:
Dude........... DUDE!!! that thing is badass. It's gonna fly!! Gotta make me a chain guard for the left side like you got.
Thx..im still fender-izing the bike..but I could go for the hot rod look..but I'm gonna have rack gas tank/battery box in the soft pouch. I don't ride w/o all the legal crap. Lol..around the block yeah...i got a ticket couple months ago in a town next door for ridin my bicycle on the sidewalk after leavin the swap meet..it was the cops write em up day,anyway...400$$$..in court it was dropped to 280...280. I haven't even been ? in my town. So I got to send for lic.plate #2.
Wellll,I will share my flubs I got everything buttoned up,brought her down from the table,gave it ten pulls to get oil up,hit turned it on and varoom, rolled out for a test run down the drive....and rahupzzoop, my Js mount was a weakness. Now that I see what took place,its like duh...crankside bearing hanger was supported on what I now see as just an 1&1/8x 3" tab that just bent down under the pull of the chain to drive the crank sprocket. Thankfully its reparable. Maybe should have used 1/4 with a gusset underneath. The first 20' where promising
Attachments
-
 382.3 KB Views: 109
 -
 440.5 KB Views: 107
Last edited:
Glad no big damage. Sure you will fix it up.
I have used channel shaped 7/32" thick weldable steel stock I got a the hardware store to first weld it to the frame tubing. The edges of the channel metal, fits almost 180 degrees from one edge on the tube to the other edge of the tube on my bikes frame.
Then I can weld to and bolt to that for other bosses, brackets and the like.
On the 2 flat sides and especially on the 1 larger area flat of the channel stock that once welded to the bikes round tube, I can then weld square hollow stock that is very strong.
Just an idea. Gussets for sure helps.
I was once told to not weld to the top or bottom of the tubes, but the sides. The reason was that the frame should be left to flex this minute amount on that axis, so weld to the sides of the tubes was how I came up thinking to use this channel stock. Some how though I think my engine platform alone and gussets make it more rigid anyway. One thing it does is spread out the weight to avoid cracking the frame, which for my off roading I've pushed it I know.
MT
Attachments
-
 185.1 KB Views: 104
Last edited: