Pseudo Board Tracker - My New Project

GoldenMotor.com

Three-Wire

New Member
Aug 12, 2010
64
0
0
Goddard, KS
So my Nel Lusso is running like a top. I rack up miles on it every weekend and everyone who sees it loves it. It was a blast to build and a hoot to ride - it was also intended to be a one-off project... Well, the bug has bitten pretty hard I guess because I want to build more bikes! I learned alot and want to try building some different styles - This will be a build log for one of them.

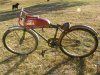
Looking around this website and googling in my spare time, I've really taken a liking to some of the board-tracker bikes and replicas I see being built. There's something about the look of those bikes that really appeals to me, and I'd like to have something along those lines.

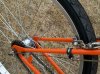
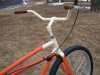
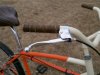
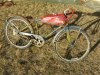
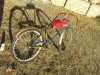
I have the skills to do it right, and build up a frame & tank and do alot of the custom work required to make an authentic bike, but I can't invest the time right now and some of those skills are really rusty. So, this will be my interpretation of the board-tracker theme with salvage parts and some custom work to get everything to fit together.

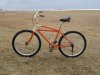
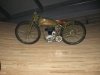
I lifted the picture from some photos ChopperDave made available. This is the kind of look I want, but my build will be a very different color and obviously have some different components.

It'll be a longer-term winter project that progresses as I have time to build and money to buy components, but I've got some of the basics already in hand. I'll have some questions, and hopefully some new ideas that are worth sharing... My intent it is to document this build like my last, and hopefully benefit someone else with the same questions.

Be patient, and stay tuned!
 

Attachments

Last edited:

Three-Wire

New Member
Aug 12, 2010
64
0
0
Goddard, KS
My wife and I went to a swap meet a few weeks ago and came home with two ratty looking frames to motorize. She likes my Nel Lusso enough to want her own bike, and I thought we might find better options at the swap meet than at WM.

She picked up a late '50's Monark frame that fits her well, and I got the guy to throw in a Schwinn Heavy Duty for peanuts. After seeing Venice Motor Bikes 26" BMX-style build, I knew this frame would work and could give me the look I wanted.

I picked up a $20 gas tank with petcock and cap from an old Yamaha DT100 that is just about the right size for this frame. I also found an old Troxel seat that I'll refurbish and should look about right when mounted. In the pictures, the seat and tank are just set on the bike as a quick mockup...
 

Attachments

Three-Wire

New Member
Aug 12, 2010
64
0
0
Goddard, KS
I want to put a SBP shift kit on it and run through a SRAM I-motion 3 speed disc brake hub, but I don't think there's enough room in the frame. Venice's BMX build looks tight enough that he had to remove part of the spark plug boot to make things fit. When I get an engine for it, I'll make the final call.

Either way, A SBP expansion chamber exhaust should help distract from the straight downtube and improve performance a bit.

If the jackshaft won't fit, I"ll just rebuild the CB-110 and go with a MM hub adapter, smaler sprocket, and front/rear side-pull brakes.

The fenders will go. They might be bobbed or replaced with shorty's but that decision will come much later.

I'd like to put a Felt Abraham Linkage fork on it, but I may try to find something unusual off ebay...

Frame stripping starts this evening so we'll find out how much work will be involved.

I'm open to suggestions!
 

scotto-

Custom 4-Stroke Bike Builder
Jun 3, 2010
6,505
24
38
Ridin' inSane Diego, CA.
Outside of the shredded wheat bisquit looking saddle, that bike looks promising and the tank is plus for what you have in mind. Keep it coming, it looks like a fun build!
 

curtisfox

Well-Known Member
Dec 29, 2008
6,046
3,948
113
minesota
Maybe cut the down tube and have a curved one from a passthrough welded in its place. Give you more engine room.....Curt
 

Three-Wire

New Member
Aug 12, 2010
64
0
0
Goddard, KS
Maybe cut the down tube and have a curved one from a passthrough welded in its place. Give you more engine room.....Curt
That's a good idea, but I'm trying to keep this mostly bolt-on. If i start cutting tube, this will become a large project... next year i'll have the ability to gas weld but i don't have tanks or time right now.

Thanks for the comments!
 
Last edited:

Three-Wire

New Member
Aug 12, 2010
64
0
0
Goddard, KS
Thanks Venice. Looking more closely at your BMX pictures, I think there is enough room if I angle the plug forward, and maybe get a billet intake manifold to lower the carb... I'll get busy sourcing parts.
 

Three-Wire

New Member
Aug 12, 2010
64
0
0
Goddard, KS
This project is not dead... I got some time to work on it today, and I've been gathering stuff for the build. The SBP HD shiftkit came today, and I've got a truss-rod fork i picked up from ebay on its way. We'll see what it looks like on the bike...

Did the bondo work on the gas tank today while the weather was nice. It'll turn out really well with a coat of paint. Stripped the seat down to parts and will take it to school for media blasting next week. Tomorrow, I figure out how to mount the tank and maybe the seat. Pics tomorrow.

Still need to decide on a hub setup - leaning towards Sturmey 70mm drum front and a 90mm drum/internal 3-speed rear. Suggestions?
 

Three-Wire

New Member
Aug 12, 2010
64
0
0
Goddard, KS
I discovered some damage while stripping the frame and getting it ready for primer... Please see this thread and weigh in!

Picked up a front wheel with a Sturmey 70mm Drum hub from the forums! Just need a rear wheel and shifter hardware. And an engine, or course... We'll see what this weekend's sales bring.

Front tank mounting is finished! Trying not to weld on this project, so it's not very elegant but should work fine. I cut up an old seat post and lashed it to the top tube and the front tube with several wraps of safety wire. It's encased in JB Weld to lock everything in position and protect the wire, but the load is all carried through the wire. Welding would be a much cleaner way to mount it, but I don't have time or supplies this year.

Tank is secured to the cross-post with hose clamps. I was thinking about using a hose clamp at the rear as well, but I've got a more elegant idea to try tonight.
 

Attachments

curtisfox

Well-Known Member
Dec 29, 2008
6,046
3,948
113
minesota
I would try and weld it. You could cut the bottom half off and replace it with bottom halfs from another. Save a lot work. It looks bowed out that could be also pulled in in the proses. Just make sure you leve a small gap for weld to be between useuly the thickness of the metal.....Curt

Maybe should have replyed to the other post?
 

Three-Wire

New Member
Aug 12, 2010
64
0
0
Goddard, KS
curtisfox, replying here is fine! Thanks for the feedback. The bow is intentional, and from the top the tubes look fine.

I think I'm going to shelve this project until January... After a couple days reflection, I'm not happy with the fuel tank mount execution. It's fine in principle, but the JB Weld looks like crap. The previously hidden damage to the frame will require welding to repair, and if I'm going to weld I might as well do the mounts right!

I've got torches and regulators at home to do the welding, but I've promised myself not to get bottles until after we come home from vacation in January. They'll be too much of a distraction from school and I can't afford to lose focus now.

This will give me a chance to shop for the right rear wheel/transmission too. If another frame comes along, or I somehow get an opportunity to weld before then, you'll be the first to know! Thanks for following...
 

corgi1

New Member
Aug 13, 2009
2,272
3
0
KCMO
that tunnel in the tank pic could have a downward baffel to add cooling air th the head
 

curtisfox

Well-Known Member
Dec 29, 2008
6,046
3,948
113
minesota
curtisfox, replying here is fine! Thanks for the feedback. The bow is intentional, and from the top the tubes look fine.

I think I'm going to shelve this project until January... After a couple days reflection, I'm not happy with the fuel tank mount execution. It's fine in principle, but the JB Weld looks like crap. The previously hidden damage to the frame will require welding to repair, and if I'm going to weld I might as well do the mounts right!

I've got torches and regulators at home to do the welding, but I've promised myself not to get bottles until after we come home from vacation in January. They'll be too much of a distraction from school and I can't afford to lose focus now.

This will give me a chance to shop for the right rear wheel/transmission too. If another frame comes along, or I somehow get an opportunity to weld before then, you'll be the first to know! Thanks for following...
You have a torch. How about a stick of nickle silver brazing rod. Fill them up and putty over should be good as new. Nickle is a lot stronger then regular bronze. And with the new water clean up flux?
 

Three-Wire

New Member
Aug 12, 2010
64
0
0
Goddard, KS
Hey guys, sorry for the long pause. I had to finish school and get the rest of my world back in order.

In the mean time, I've decided to abandon this frame for this project because I found another, better frame to use. That thread will start sometime this month after I finish my wife's bike, but I wanted to have some conclusion to this thread.

In the end, I got impatient and just JB Welded over the hole in the dropouts and ground off the gas tank mounting monstrosity. A little paint and some salvaged components and I've got myself a decent cruiser for the local springtime pub crawls / family rides.

This build wasn't an entirely lost cause, though... I did learn how to lace and true wheels, how to wrap my own grips, as well as using my first internally geared hub. I also learned alot about how awful Krylon is for this type of painting and I won't use it again on a bike. Next time I think I'll try farm implement paint or appliance epoxy.

Anyway, here is the final product. As for the board tracker / tribute racer idea, that flame still burns bright and the important components are in-house for its creation... Stay tuned!
 

Attachments