Motor prep work

GoldenMotor.com

Fizzbane

New Member
Apr 4, 2010
73
0
0
Canada
I just purchased a pk-80, a SBP expansion chamber, Jim's Billet head, new air filter, spark wire, etc. Some good upgrades. also ordering shift kit soon.

For starters i would like to know where, and if i need to, add/clean and re-grease any part of the engine. If so, what grease is recommended? (Wondering about the drive gear and clutch gear mash up spot)

Since i am replacing the head, Is it also recommended i replace the studs as well? idk what size studs they are(nor how to measure them properly) so any indication on replacement size would be great (engine is Pk-80, from zoombicycles). Will a new head gasket be needed even with the motor never been used?

What amount of torque is needed on my head studs?

I will be replacing all engine hardware with sbp hardware kit, will new gaskets be needed for magneto and clutch? im assuming not...

I also want to use the universal front mount from sbp and need to know stud width(of pk-80). If anyone could let me know that would be greatly appreciated.

As well I would love to know of any other motor prep work that should be done to ensure a long and relatively hiccup free life to my motor. Bike prep work is also welcomed, tho i got the bike completely overhauled at the local shop, full tune up. Its a kuwahara mountain bike, just want to use it for round town cruising. but fairly fast cruising.

ps - Hard rubber in between mounts and frame, yes or no?

technically 2nd build but first build I am taking time on.

Much appreciated!

--Fizzbane
 

BarelyAWake

New Member
Jul 21, 2009
7,194
21
0
Maine
Sounds like you've got a pretty good idea of things, there's not much more to add lol but I'd recommend a quality marine grade bearing grease (lasts forever), a lil on the clutch drive gears (no more than a gob the size of a pencil eraser so it won't fling into the pads) and don't forget the lil ball bearing clutch actuator & pushrod uses. If you're planning on tearing down the motor a gasket set can't hurt - usually the head gasket is no problem if the engine hasn't been run (even if it has... usually) but a set is cheap enough and provides excellent templates for making your own out of quality materials. The base gasket in particular never likes to come off intact even with a new motor and you'll need one if ya wanna do this: http://motorbicycling.com/f13/basic-porting-16646.html

Even if ya don't wanna get that deep into it - I defo recommend port matching the intake and exhaust manifolds, the SBP mount flange is FAR better than stock, but it and the gasket could still use a touch.

I'd not recommend rubber mounting, while there's some polyurethane variants that'd work it entails welding etc... or an entirely different mounting system like Manic Mechanic offers (neither option will work w/a shiftkit BTW). There's been much debate on this topic ofc - but just putting something between the stock mount points and the bike's frame doesn't work out as it isolates the engine's vibration (not eliminates) and the mount fasteners tend to sheer.

If yer going shiftkit then much of the vibration will "disappear" anyway as it's usually from the rear sprocket not being perfectly centered (impossible with the kit one) and the tensioner and not so much the engine. I've not even bothered to get soft handgrips for my shiftkit ride 'cause I don't need 'em :D Coupla tips 'bout the shiftkit tho if ya want 'em;

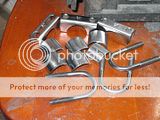
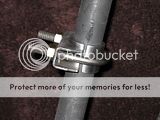
I took some pipe with the same inner diameter as my seatpost tube's outer diameter & cut it up to make steel "pads" to diffuse the crush/crimp of the pipe clamps (the "pads" and the clamps were later tack-welded);

(click to view)


and it's not really the "optional" modification to grind the tabs a bit on the clutch cover to reverse the fasteners so the nuts are accessible - if ya don't you'll hafta pull the shiftkit/engine every time ya wanna mess w/the clutch a bit... but it's an easy mod;

 
Last edited:

taddthewadd

New Member
Mar 1, 2009
337
1
0
43
Visalia, California
When I replaced all of the engine hardware I replaced one screw at a time so that tension was always on the gasket so I didn't have to replace them. I am talking about the clutch cover etc. Another thing to do is make sure the acorn nuts on the head are not bottoming out. Sometimes the studs are too long and so the nut bottoms out before touching the head. You can either shorten the studs or do what I do and buy regular non acorn nuts.

I am not sure what size your studs are. I think mine were 8mm but I have heard of 7mm. Maybe next time you are at the hardware store buy 4 7mm and 4 8mm nuts. They are cheap and then you can replace the acorns. Or just wait, I am sure someone here will post all of the stud sizes.
 

Fizzbane

New Member
Apr 4, 2010
73
0
0
Canada
Even if ya don't wanna get that deep into it - I defo recommend port matching the intake and exhaust manifolds, the SBP mount flange is FAR better than stock, but it and the gasket could still use a touch.
@BarelyAWake: I have pat's custom made steel air intake manifold. Does the exhaust manifold need to match that manifold or just the engine cylinder exhaust port? Im not planning on going into the cylinder if i dont have to. I do not have the skill nor what i am assuming is an extreme amount of patience. plus no dremel tool.


I'd recommend a quality marine grade bearing grease
@BarelyAWake: Any recommended brand? or exact product? (always nice to go with something reliable)

I will def do the "easy clutch access" mount as well as get some pipe to defuse the force.

Anyone know how many lbs should be on head studs?
 

flybytaco

Metal Molding Madman
Oct 17, 2009
1,170
8
0
seekonk MASS
the only thing i can recomend is chamfering the ports always sharp chunks in them nobody ever looks and they end up grinding into the piston I have never ran any engine without doing that first other than that have a blast u got a sweet combo
 

Fizzbane

New Member
Apr 4, 2010
73
0
0
Canada
Motor just arrived and it seems the exhaust port is smooth as a babies behind. i shouldnt need any fix there right?

I believe I have two base gaskets on my motor...looks a lot like 2 stacked. Is this recommended or should one be removed? 66cc slant head, with (Hopefully) Jim's billet head (currently lost in mail -__-) 3/8" reach plug.

Anyone know stud pitch on pk-80? thanks.
 
Last edited:

BarelyAWake

New Member
Jul 21, 2009
7,194
21
0
Maine
@BarelyAWake: I have pat's custom made steel air intake manifold. Does the exhaust manifold need to match that manifold or just the engine cylinder exhaust port? Im not planning on going into the cylinder if i dont have to. I do not have the skill nor what i am assuming is an extreme amount of patience. plus no dremel tool.

@BarelyAWake: Any recommended brand? or exact product? (always nice to go with something reliable)

I will def do the "easy clutch access" mount as well as get some pipe to defuse the force.

Anyone know how many lbs should be on head studs?
The custom intake outa be fine, but I'd check the gasket fosho - manifolds only need to match their individual ports, not each other as the intake and exhaust cylinder ports are different anyway... The only thing you really need to do is the gaskets (the rest is picky performance stuff) tho I'd heartily recommend gettin' a Dremel at some point anyway, they're just too handy for far too many other things ;)

Any quality brand marine grease is awesome, the "marine" stuff is just a bit tackier and lasts longer than standard grease (it's a serious pain to wash off hands heh) but it's not critical, any quality brand name will do. We get it in like 5 gallon buckets here at the marina and we jus' call it the "peanut butter" which isn't terribly clever and it means I can never remember what it's bedanged brand name actually is heh, prolly Yamalube or Quicksilver (Mercury's brand).

As for all the torque ranges & patterns etc., Norm has laid it all out in glorious detail here: http://motorbicycling.com/f3/engine-top-end-rebuild-engine-stand-211.html :D
 

Junster

New Member
Jun 2, 2009
445
0
0
Washington St.
If you do remove the cylinder hopefully you'll have enough gasket left to make a pattern. If not pull the head bolts and use a layer of grease on the block to transfer the pattern to the gasket paper. I made a hole punch from plumbing nipple to cut the bolt holes in the paper. Just grind one end sharp. It works better than trying to cut them out. Use 1/16" charcoal colored garlock gasket material. The blackish colored gasket material is better for higher heat. Make sure you put the gasket on the engine case first so you can make sure the transfer ports are completely clear. They are the two bulges on the sides. A good seal at the cylinder bottom is critical. Use some 220 wet sandpaper on a piece of thick glass and lap the top of the cylinder and the bottom of the head very flat if you take the cylinder off. You'll have alot less head gasket problems. Keep the paper very wet. Your studs are 8mm. The stock ones do stretch alot but once they finish stretching they are strong enough. Just carry a 1/4" ratchet and socket to retorque them with or replace them with better ones. Get good 8mm nuts and discard the acorns. Unscrew the engine case clutch cable mount. The hole goes right thru to the clutch shaft. pack grease in that hole with a screwdriver or a grease gun needle. Don't go crazy but it's ok to put in a good amount. Don't screw the cable mount back in to far. It is possible to screw it in far enough to bind the shaft. The torque for the head bolts is about 12lbs. I use moly graphite grease cause it slowly impregnates the metal with graphite. It's esp good for the clutch gears under the motors right side cover. With the clutch cable off you can rotate the clutch arm and pull the shaft it's attached to out. If you take a dremel and sand the back edge of the flat off just enough to round it slightly the clutch will be way easier to work. It's the edge that pushes the small stub shaft that releases the clutch. If it's sharp like it comes it drags hard on the small shaft. It's alot harder to explain than to do. Once you pull it out it will become clear. When you get your shift kit look at this mod, http://motorbicycling.com/f42/great-shift-kit-mod-18635.html It makes the shift kit mount very strong and makes the whole engine case stronger. I am also a fan of no rubber mounting for the motor. Letting the motor flex around is just bad and I think it makes things viberate worse. Sick bike has a great engine bolt kit for 10 and a exellent tank petcock for 10 more. The teflon'd clutch cable is alot stronger and easier to pull then the stcok cable also. Good Luck
 

Junster

New Member
Jun 2, 2009
445
0
0
Washington St.
BTW the zoom motors come with 2 base gaskets to adjust the cylinder height. If you replace them with the 1/16" black paper it will be the right thickness and alot better seal. If you look you probably have two head gaskets too. Lapping the head flat will let you goto one gasket and more compression. But it will start easier with two till it's broken in well.
 
Last edited:

Fizzbane

New Member
Apr 4, 2010
73
0
0
Canada
almost positive on the double base gaskets.definitely looks like 2. not so much on the head, but who knows. Ill be tearing it down shortly. when my billet head arrives.(hopefully it does...usps says it is lost...)

Thanks for the bolt pitch. i appreciate it!