Ok , time for some results.
I have 2 very similarly equipped gas bikes.
Both bikes are running 6 volt systems . Panasonic headlights and LED tails.
Same switches control the electrical system on both bikes.
Both bikes are running UB6130 6V/13AH battery's from Radio shack.
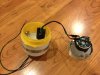
Bike #1 runs the 6 volt generator and 6 volt mini charger from Wonderful Creations.
A good system with no faults so far ( 100 + miles ) $49... Nice guy , good customer relations.... Parts fit as advertised and were a no - brain'r to install .
Bike #2 is running the DIY rectifier from the white wire....
Works great , have had zero issues , was fun to build, $8.99 from Radio Shack, And a little elbow grease.
Bike #2 has around 50+ miles on the clock as we speak.
So far I have not had any charge problems with either bike. I've had both machines on extended night runs ( 3+ hours ) and have always maintained a good usable charge.
( no dimming ).
My conclusions are:
If you can solder , and enjoy building SMALL parts, save some money and build the DIY.
If you are uncomfortable with the above mentioned tasks run the Wonderful Creations kit.
Both work as advertised.......
A side note :
The Wonderful Creations kit is available in a 12 volt format . A bit more $$$ though.....
An advantage ?
Depends on your needs and lighting system....


 752.2 KB Views: 298
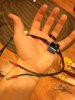 313.8 KB Views: 307
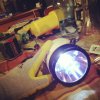 552.8 KB Views: 272