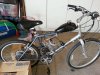
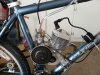
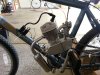
Bike Berry Flying Horse First Timer build

GoldenMotor.com

BigBlue

Member
Nov 29, 2011
781
0
16
California
Here's a good installation guide that will help you avoid problems down the road. Most people have problems because they fail to setup the engine properly. Take your time and be open to listen to others advice. Sometimes saving a few bucks now will cost you double or more down the road.

https://docs.google.com/document/d/1GcesQihc7-mm3hJGf7UPiqOaRXZ8ekUT99QUZq2qXXE/edit

One tip not mentioned with Ron's guide, try to keep your carburetor as level as possible. Vibration can ruin a frame by causing fractures and may also cause fuel foaming.

Good Luck,

Chris
AKA: BigBlue
 

Risingsunn

Member
Nov 24, 2012
191
5
18
Maricopa Arizona
That is an amazing guide! Thank you very much. I will take a lot of tips from it. Some of it though I may not do, such as removing the cylinder and milling the head. Though I am sure it will help a lot, I am just not comfortable doing that am am afraid that I would make it worse than it it may be as stock.
I will be replacing the plug and wires at your suggestion though and was on my way to replacing most (if not all) of the studs. The torque specs are good to know too. Now that I am going to be doing more tonight than I thought I have to run out and grab my friends torque wrench....
 
Last edited:

biknut

Well-Known Member
Sep 28, 2010
6,631
409
83
Dallas
I just wanted to see what the rear wheel looked like. That's a good bike, but the only option for that rear wheel is the rag joint.

The rag joints work fine after hours of set up. Forget about equal torque on the bolts. You have to do whatever you have to do to get the sprocket true. Some bolts will be tighter them others.

Remember you have to worry about up and down movement, and also back and forth. It helps to get the rear wheel off the ground so you can turn the wheel as you check the true. If you can spin the wheel, you can wrap a wire around frame to use as a pointer to check for runout. In time you can get it almost perfect. It took me about 3 hours.

You've got to get it pretty close to perfect or you'll throw the chain.
 

Risingsunn

Member
Nov 24, 2012
191
5
18
Maricopa Arizona
Will do Nut, I will take a pict and video of how it is now and post when I get back from Home Depot. Have to make a run to Autozone now to. Need to get some gasket material. The intake gasket fell apart when I took the intake off (thin paper) and the one at the base of the cylinder. It just kind of fell apart when there were no nuts holding it together. Should be easy get back together but there were actually 2 thin paper gaskets there. So I would just prefer to get some better ones on there while I have the thing apart.
 

crassius

Well-Known Member
Sep 30, 2012
4,032
158
63
USA
I also picked up some Homelite 2 stroke oil from Home Depot.

I was also thinking about replacing the intake and exhaust studs too with bolts vs studs. Would that cause any issues?
buy your 2-stroke by the gallon & save some money, you'll use a LOT

DO NOT get bolts that will bottom out in the holes, this will ruin the barrel - measure carefully
 

BigBlue

Member
Nov 29, 2011
781
0
16
California
The torque specs are good to know too. Now that I am going to be doing more tonight than I thought I have to run out and grab my friends torque wrench....
You probably already know this, but some people do not know the difference. Just make sure you use inch/pounds and not foot/pounds when torquing the head.

That is a great guide. If just every NOOB would use it, it would eliminate a lot of frustrations and unnecessary headaches. Acorn nuts and an O-ring on my carbruretor is all I had to deal with in 2004. Seems the engines are having more and more quality control problems.

Good Luck,

Chris
AKA: BigBlue
 

Risingsunn

Member
Nov 24, 2012
191
5
18
Maricopa Arizona
So I ended up getting some Fel-Pro Cork-Rubber gasket material at Auto Zone, that was all they had. I traced it using the existing crappy paper one that was on there. Cut it out the best I could and tried to put it on. It was a horrible fit. So I put the paper one back on and doesnt even look like it was made for this engine. It barely covers everything and just looks bad. Jonny suggested RVD and I am sure that would work but I now have all this gasket material and I may as well make one. I need to make an intake one also.
Does anyone have a decent template for the gasket on the Flying Horse?

EDIT: I just went on BikeBerry site and the gaskets they sell are the same ones that are on here!
 

Attachments

Last edited:

maniac57

Old, Fat, and still faster than you
Oct 8, 2011
4,484
22
0
memphis Tn
I suggest you upgrade the stock chinese chain that comes with these kits. It is junk and WILL break at the worst possible time. You need some good #40 roller chain and a grinder to clearance the inside of the engine case. Your bike looks like it will be a great motorbike! Good luck and welcome to a great hobby/obsession.
 

Risingsunn

Member
Nov 24, 2012
191
5
18
Maricopa Arizona
Sounds good Maniac,
Right now though, until I get it running, I am only doing to basic functional upgrades. When I have it going and get some more cash I will slowly start buying upgrades, for it seems just about everything!
 

maniac57

Old, Fat, and still faster than you
Oct 8, 2011
4,484
22
0
memphis Tn
Sounds good Maniac,
Right now though, until I get it running, I am only doing to basic functional upgrades. When I have it going and get some more cash I will slowly start buying upgrades, for it seems just about everything!
I hear ya! I squeeze 11cents out of every motorised dime myself. You should see what I ride!. Just be aware of the problem and don't venture too far from home till you get a better drive chain. Trust me on this one, until you replace the kit chain you will not be reliable for long distance riding.I've had the welts on the back of my leg to teach me this lesson. I've been told bikeberry upgrades the chain but I don't know for sure, An easy way to check is to try bendint the kit chain sideways before you install it. A good chain will not deflect much over a foot, but a cheap one will bend a big curve. It's a must upgrade for dependability. My two cents.
 
Last edited:

Risingsunn

Member
Nov 24, 2012
191
5
18
Maricopa Arizona
So I decided to make a new template myself. I took the original rough design and traced it on a piece of printer paper. I then erased the areas where it didn't fit and only kept the cylinder hole in the middle and the holes for the studs. I cut it out with an exacto knife and put the basic template on the engine. With the knife, I trimmed the loose paper off to fit the shape of the hole in the engine block. Once I was happy that it was as close as I could get it, I took the paper off and taped it to the top of the gasket material to use as a guide. Once that was done, I put the new rubber cork gasket on the engine and retrimmed it again to be a more precise fit. Though it is not perfect, it is a MUCH better material and fit then the paper one that came on it.
The intake gasket was even worse. It was partially covering the port and the thin paper just fell apart as I tried to remove it. I had to scrape the remains of it off the intake pipe. For a new template, I am simply going to put the intake pipe on a copy machine, print a couple of copies, and cut them out as a guide similar to what I did above. The exhaust gasket looks to be made of a hardier material and should work the way it is. If I run into any issues I can make a new one the same way.
 

Attachments

Last edited:

Risingsunn

Member
Nov 24, 2012
191
5
18
Maricopa Arizona
So I got the motor mount in yesterday and am working on mounting the motor. I am a little concern though, if the engine mounts are completely flush with the frame the carb is not perfectly level, will this cause any issues?

I am going to go completely off the subject for a minute here:
Today is not a good day for me. Our main vehicle is a 2003 POS Chrysler Voyager. Last night the damn thing died in an intersection and I ended up towing it home with our other vehicle. It seems that there is a very good chance the timing chain broke. We are not sure how much its going to cost to fix it but at this point almost anything is more than we can afford. Not to mention we are only ONE payment away from getting it paid off!! So right now I am just kinda hangin' my head wishing this wasn't happening or happening a couple of months down the road AFTER Christmas and AFTER it is completely paid for. Hopefully there is only minor repairs to be done, but there is also a good chance that the engine may be toast. Which would also suck because we just replaced the engine last year! Sigh....
 

JonnyR

New Member
May 13, 2012
1,203
1
0
37
ronkonkoma, new york
for next time or if y ou have a lack of power you could have used black RVT to to make the base gasket and it would have worked great the one you made will be a great gasket but i hope it isnt to thick and lowers the compression of the engine

as far as the van goes if it didnt make noise like it ate the valves it shouldnt be to bad to fix some times the timing chain goes and takes all the valves out when the piston hits them and they are still open
 

biknut

Well-Known Member
Sep 28, 2010
6,631
409
83
Dallas
So I got the motor mount in yesterday and am working on mounting the motor. I am a little concern though, if the engine mounts are completely flush with the frame the carb is not perfectly level, will this cause any issues?

I am going to go completely off the subject for a minute here:
Today is not a good day for me. Our main vehicle is a 2003 POS Chrysler Voyager. Last night the damn thing died in an intersection and I ended up towing it home with our other vehicle. It seems that there is a very good chance the timing chain broke. We are not sure how much its going to cost to fix it but at this point almost anything is more than we can afford. Not to mention we are only ONE payment away from getting it paid off!! So right now I am just kinda hangin' my head wishing this wasn't happening or happening a couple of months down the road AFTER Christmas and AFTER it is completely paid for. Hopefully there is only minor repairs to be done, but there is also a good chance that the engine may be toast. Which would also suck because we just replaced the engine last year! Sigh....
What you have to do is make the rear mount flush on the seat post. It needs to fit exactly right on the seat post tube. Everything else you just have to deal with it. Front mount, carb, all of it.
 

biknut

Well-Known Member
Sep 28, 2010
6,631
409
83
Dallas
So I decided to make a new template myself. I took the original rough design and traced it on a piece of printer paper. I then erased the areas where it didn't fit and only kept the cylinder hole in the middle and the holes for the studs. I cut it out with an exacto knife and put the basic template on the engine. With the knife, I trimmed the loose paper off to fit the shape of the hole in the engine block. Once I was happy that it was as close as I could get it, I took the paper off and taped it to the top of the gasket material to use as a guide. Once that was done, I put the new rubber cork gasket on the engine and retrimmed it again to be a more precise fit. Though it is not perfect, it is a MUCH better material and fit then the paper one that came on it.
The intake gasket was even worse. It was partially covering the port and the thin paper just fell apart as I tried to remove it. I had to scrape the remains of it off the intake pipe. For a new template, I am simply going to put the intake pipe on a copy machine, print a couple of copies, and cut them out as a guide similar to what I did above. The exhaust gasket looks to be made of a hardier material and should work the way it is. If I run into any issues I can make a new one the same way.
You can try a cork gasket, but I don't think it will work. It will probably squeeze out, but maybe not. I've never tried one, but I have had some of the paper ones do that to me.
 

Risingsunn

Member
Nov 24, 2012
191
5
18
Maricopa Arizona
VICTORY!

After about 6 hours work on it yesterday, I finally got everything put together. Some kind person was nice enough to post a much better instruction set than came with my engine. http://www.zoombicycles.com/downloads/usermanual.pdf. The instruction sheet and even the DVD that BikeBerry sends out are inadequate at best. There is SO much more detail that they don't even begin to cover, that the Zoom Bikes manual does. I think I would buy from them in a heartbeat if they weren't in Canada.
Anyway, I went over everything twice just to make sure everything was connected using their manual. Put about a cup of gas in the system and started petaling like mad. After about 6 tries it finally fired up and I let out on the clutch to go. I gave the engine a little gas and it revved but I was still just coasting. Come to find out the master link on my chain had popped off and my chain was lying on the ground about 15 feet in back of me! I picked up the chain and found everything but the clip for the master link. DOH!
Today, when I looked, I was unable to find the clip. I went to my local Lowe's Home Depot and Sears but no one had any masterlinks. So I went back to Home Depot and bought a couple of C clips as a TEMPORARY solution.
I took it out again, and it took a good 10 times before it would start. Though it doesn't seem to want to idle at all. I took it for a short ride around the block and tried adjusting the idle without any luck so far. Then I took it out again and laughed all the way, this is the coolest thing I have ever done...
I am very happy with the progress so far and thrilled that it actually started up. I know that I have a lot more work to do before everything is close to done but I have a good place to start from.
Here is what I am going to be researching in the forums today:

1) Idle. Still not sure why it isn't, I adjusted the idle quite a bit without luck. Perhaps it needs be be run a little more before adjustment will work?
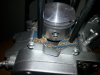
2) Chain. I need a new master link for starters. Perhaps a couple of spares also. I have also read a few threads on opinions of #41 chain vs the 415 chain that comes with it. Still not decided yet.
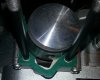
3) Chain tension. I removed as many loose links as I could and it still quite floppy, the chain tensioner helps but I don't want it to take up as much slack as it is. I forget which post I read it in but it was suggested to put a small shim between the frame and back engine mount to move the engine forward just enough to take up some slack. I like that idea as it would also give my air filter (missing in the pictures) a bit more room to breathe (pardon the pun).
4)Vibration. Do all these things vibrate this bad? I am sure I have to tighten things down a bit more but the way it is now I am sure my wife would get more enjoyment out of the movement then I do. We'll see if that clears up as things come together more.
5)Clutch arm(at least I think that is what it's called the thing that the clutch cable connects to). I tried to pull it off the rod that it's connected to but it would not budge, even with a hammer. Though it is not part of it, there is NO way that thing is coming off. I am thinking about bending it in just a little so it is not sticking out too far and so that the movement is smoother.
6) Noise. This thing is quite noisy too. Mine sounds like a line trimmer or maybe even a little louder. I thought with the exhaust pipes they would be quiter. Before I ever installed the engine I was looking at some stuff you put in the pipe itself like fiberglass that helps quiet it. Also saw a post about plastidip on the gear cover too.

Like I said, I know things are a bit sloppy right now, but it's running! That was my first goal, now to get it into shape...

Also, my van still sits outside, we still haven't found someone to help us look into it. If it's something serious we are just going to sell it as a parts car and get a different vehicle. Even in great shape running Bluebook on it is under 2K.
 

Attachments

Last edited:

maniac57

Old, Fat, and still faster than you
Oct 8, 2011
4,484
22
0
memphis Tn
I had a problem popping master link clips too, so I left off the clip and tack welded the link instead. It cannot come off anymore and runs past the tensioner much better. I would bet yours hit the tensioner which forced it to fly off. I kept popping mine when I would roll the bike backwards. The chain tension is critical to making the bike stay together so keep after it until it's right. As far as Idle, you must break the motor in before you worry about tuning. It needs several tanks of gas run through it before it will be stable enough to tune. Vibration is simply a fact of life with these motors, so get used to it. I always go over my bike after every ride for loose or broken bolts. Lastly, your clutch arm is pressed onto the shaft so it will need to be pressed off. I have never heard of bending one, but if done right, it should work. You might search for the clutch cable roller thingy I saw here somewhere...sorry I don't have more info. Someone should know where it is. Mods? A little help?
 

biknut

Well-Known Member
Sep 28, 2010
6,631
409
83
Dallas
Your bike looks pretty good. Good job.

I'm working today on a new flying horse motor. It's my second one this year. I've found them to be superior, to other brands I've tried, but all the china girl motors usually some minor assembly issues.

It's become my practice to pull the gears, and magneto rotor off of my new motors to inspect the keys and seals. These are both areas where the factory often drops the ball.

Today I replaced the key on the magneto rotor and the clutch gear. The one on the pinion gear was ok. Both of the seals were ok. The last one I replaced one key, and the seal on the magneto side was installed crooked, so I replaced it with a new one.

Another common problem from the factory is, they don't always install the gears very well. Sometimes the key will bind when they try to install the gear on the shafts, and they don't get them on all the way. On my motor today, both the clutch gear, and the pinion gear weren't on all the way. I'm pretty sure the clutch gear would have come loose in a short time. Now that I've corrected these deficiencies, they won't become an issue or cause damage down the road.

These are some of the things that give the china girls a bad reputation, but can be easily avoided

I recommend you make a list of parts to order for spares. A couple of master links is good and also a half link will come in handy. Another thing you need is a gear puller. All of the venders sell them, and they only cost about $4.

Be advised you need to lube your pinion gear every so often, or it will wear out pretty fast. A spare pinion gear is a good part to have on hand too. Order some jets. get a 66, and a 68. Stock is about a 70.