Ordered a CNS, how do I know which version it is?

GoldenMotor.com

greaser_monkey_87

New Member
Mar 30, 2014
397
0
0
USA
Based on the fact that it appears that the mixture screw is not capped off, I'd say a v1. Which is good, because they are more tuneable than the later versions and you may actually be able to get it to run properly.
 

Davezilla

New Member
Mar 15, 2014
2,705
10
0
San Antonio Texas
This is the older version I'm thinking V1 because it don't have the EPA stamp on the side of the bowl and the idle mix screw is uncovered so you can adjust it, and it accepts the 6mm Dellorto jets... I got the same carb not too long ago and it works really well, but you'll have to either get a CNS intake manifold by Manic Mechanic or you'll need to find a way to seal it up at the top of the clamp, there's a Huge gap there that lets air right in if not sealed, the plastic spacer that comes with the kit don't work. I used RTV and let it cure overnight and no leaks. If there's not enough room in your frame to use the air filter, the stock Yamaha PW80 carb inlet tube will go around the frame just right so the filter will be off to the side and out of the way.
I needed to jet mine down to a 66 jet to get the mix right and it responds really well to idle mix adjustments and needle hight adjustment, this carb is Not for newbies because it does take some extra effort to get it to work right, but once it's right it'll work great...

Here it is installed on mine with the PX80 intake tube and the filter that comes with the carb..


Last edited:

fischer550

Member
Mar 24, 2014
234
0
16
Fort Collins, CO
unfortunately my issue is that I cannot simply bolt on a bigger intake, and I need to tune it right before I use the RTV sealant to seal it on permanently, any ideas on how to solve this issue? Cause I can't tune it right with an air leak
 

Davezilla

New Member
Mar 15, 2014
2,705
10
0
San Antonio Texas
It has to be sealed and free of air leaks or it will not tune. There is no way to properly tune anything that's leaking air.
The only choices here are to either use the CNS intake so you can remove the carb and get it back on without leaking or to RTV seal the void in the carb clamp area, you can still remove the carb but you'll be removing the carb and manifold together... As I mentioned before, this carb is Not for newbies or someone just starting out, It does work and it works well once tuned, but it takes some extra effort to get it there.

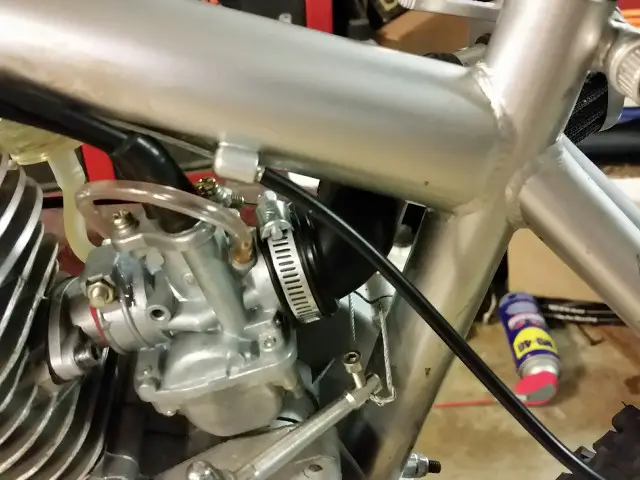
The CNS intake from Manic Mechanic solves this issue because it's a larger diameter to match the carb and it has the step down to engage the rubber seal in the carb. This intake is very short but it's got the right outside and inside diameter to let the carb mount without leaking. Here's a link to one of these intakes so you can see what I'm talking about, the price is pretty much the same wherever you get it, but it will save you a ton of frustration for sure... http://www.pistonbikes.com/product-p/mmimcns.htm

In order to use this carb, I'd say to start with a #66 jet or even a #64 in your case to compensate for the altitude before installing it and see what it does, This particular carb takes the Dellorto 6mm jets and I think Pistonbikes also sells the jets for this one too....

That should get you really close to where you need to be, and the idle mixture adjustment is really nice for tuning in the low end, then the midrange can be dialed in by raising or lowering the needle which is accessed from the top of the carb... It can be a tedious job to get one of these to work right on a China Girl engine, but once it's right you'll really like it.
 

Greg58

Well-Known Member
May 1, 2011
5,353
2,575
113
65
Newnan,Georgia
The spacer can be replaced with a copper spacer you can make, I made a couple that worked good. Use the flat oring to seal against the intake then add a little sealer to the compression gap and it will seal. Be warned as Dave said it can be tough to tune, it will be pure luck if it is right as it comes. The link below is the spacer I made. The jet on my 48cc is at 66.

http://motorbicycling.com/album.php?albumid=259&pictureid=1661
 
Last edited:

Davezilla

New Member
Mar 15, 2014
2,705
10
0
San Antonio Texas
That was good thinking on the copper sleeve... Do you fill it with sealant at the split to keep it from leaking? or does the gap close all the way once installed? It also looks like you annealed the copper which helps it seal even better... I like the idea and have a good stock of copper sheet over here, I might just "borrow" that idea and try it out on mine... I sealed mine up by ditching that plastic spacer that came with the carb kit and used a section of silicone hose, then stuffed the void at the back of the clamp with rtv and let it cure overnight. It works great and don't leak, but I do have to remove the manifold and carb as one unit to avoid wearing out the silicone spacer I made.
 

Davezilla

New Member
Mar 15, 2014
2,705
10
0
San Antonio Texas
Thanks dave, I actually have an idea that might work. Maybe if I wrap the intake in the right amount of electric tape, the carb will seal to it.
People have done that successfully too, just be careful tightening the clamp since it's cast aluminum and part of the carb outlet, it can crack if overtorqued, and you'll see that huge void right at the top of the clamp where air can leak right in, that area still has to be dealt with. I stuffed that area with RTV and let it cure overnight before running it.

If you use the electrical tape method you might want to also remove or install the carb and manifold as one unit to avoid disturbing that connection because it can wear out or work it's way loose after taking the carb off the intake a few times, and don't forget about that fragile cast aluminum clamp, you don't want to repeatedly loosen and tighten that clamp because it's very prone to cracking.

i've been just taking the intake and carb off that way when tuning to avoid the risk of cracking that clamp and it works ok by using a stud and nut on the fuel inlet side and an allen bolt on the left side to mount the intake manifold, the stud and nut is also a good idea if you need to remove and install the carb a few times during the tuning phase to avoid wearing out the threads in the aluminum on the cylinder.