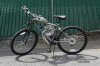
I just finished my first build. I picked up a cheap Roadmaster mountain bike from Walmart ($74), and bought a 2-stroke engine kit from thatsdax. I had to make a couple slight modifications (received a few VERY helpful pointers from threads on here of others who have build the same bike), so I thought I would detail everything here in case anyone else is trying the same build.
Modifications:
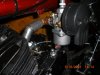
1. I had to replace the front mounting studs with longer bolts, since the frame tubing is taller than normal. Bolts worked better than longer studs or threaded rod would have, since I was able to manipulate the motor into place, then put the bolts in.
2. I had to grind a couple small notches in the frame for the front mounting bolts. The frame was just a hair too wide for the bolts to fit, one on either side of it. One I ground a couple notches in the frame, everything just barely fit. I also had to elongate the holes in the saddle part of the front motor mount, since the bolts were still pushed outward slightly by the frame.
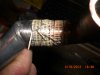
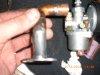
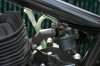
3. I had to add a 45 degree 1/2" copper street elbow to the intake in order for the carb to clear the frame. I read a couple people on here say that they soldered the elbow on, so I got out my plumbing tools and started soldering - or should I say, TRIED to solder. It wouldn't work. Came back here to read some more and saw somebody who said they SILVER soldered their elbow on. Cost me $16 for a little tube of silver solder, and another $7 for a flux to work with it, but it worked like a charm! I had no idea that it was possible to solder steel and copper together - guess I learned something new! I also had to put a couple turns of electrical tape around the new elbow to make the carburetor fit snugly. I also painted the whole thing silver to match.
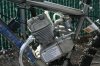
4. I had to bend the exhaust pipe slightly. At least, I think I bent it slightly. The left crank just barely rubbed on the muffler, but before it was completely tightened down. We clamped the pipe in a vise - hard enough to dent the pipe, even with wood blocks - and pulled on it pretty hard. I'm still not sure that we bent it, though. ThatsDax claims that the pipes are easy to bend. He's dead on with everything else I've heard from him, but there is no way that these pipes are easy to bend. I guess the right way would have been to forget about the nice chinese chrome, get out the oxy/acetylene torch, and bend it right. If I had to do it again, I would just grind a tiny bit off the very corner of the left crank arm. I just barely rubbed, and it would have been easy to take a little bit off the corner of the arm without hurting anything.
5. I had to bend the chain tensioner mount a little bit. Actually think I may have messed it up at first by not having it straight. Not really sure - I though I had it straight, but the chain jumped up on the edge of the tensioner wheel the first two times I tried to start it. Actually twisted the plastic wheel cockeyed on the bearing that it rides on. I straightened things out again, and hopefully things will stay put now. NOTE: Make sure that they tensioner wheel is straight in line with the chain, and also not tilted to the side. I'll be ordering a new tensioner from thatsdax, just to make sure it doesn't take a dump on me 20 miles from home.
Five things to work around - not bad for a $74 bike from walmart.
Thank you to all those who have shared their knowledge here on the forum. I had a thousand questions answered before I ever asked them.
Modifications:
1. I had to replace the front mounting studs with longer bolts, since the frame tubing is taller than normal. Bolts worked better than longer studs or threaded rod would have, since I was able to manipulate the motor into place, then put the bolts in.
2. I had to grind a couple small notches in the frame for the front mounting bolts. The frame was just a hair too wide for the bolts to fit, one on either side of it. One I ground a couple notches in the frame, everything just barely fit. I also had to elongate the holes in the saddle part of the front motor mount, since the bolts were still pushed outward slightly by the frame.
3. I had to add a 45 degree 1/2" copper street elbow to the intake in order for the carb to clear the frame. I read a couple people on here say that they soldered the elbow on, so I got out my plumbing tools and started soldering - or should I say, TRIED to solder. It wouldn't work. Came back here to read some more and saw somebody who said they SILVER soldered their elbow on. Cost me $16 for a little tube of silver solder, and another $7 for a flux to work with it, but it worked like a charm! I had no idea that it was possible to solder steel and copper together - guess I learned something new! I also had to put a couple turns of electrical tape around the new elbow to make the carburetor fit snugly. I also painted the whole thing silver to match.
4. I had to bend the exhaust pipe slightly. At least, I think I bent it slightly. The left crank just barely rubbed on the muffler, but before it was completely tightened down. We clamped the pipe in a vise - hard enough to dent the pipe, even with wood blocks - and pulled on it pretty hard. I'm still not sure that we bent it, though. ThatsDax claims that the pipes are easy to bend. He's dead on with everything else I've heard from him, but there is no way that these pipes are easy to bend. I guess the right way would have been to forget about the nice chinese chrome, get out the oxy/acetylene torch, and bend it right. If I had to do it again, I would just grind a tiny bit off the very corner of the left crank arm. I just barely rubbed, and it would have been easy to take a little bit off the corner of the arm without hurting anything.
5. I had to bend the chain tensioner mount a little bit. Actually think I may have messed it up at first by not having it straight. Not really sure - I though I had it straight, but the chain jumped up on the edge of the tensioner wheel the first two times I tried to start it. Actually twisted the plastic wheel cockeyed on the bearing that it rides on. I straightened things out again, and hopefully things will stay put now. NOTE: Make sure that they tensioner wheel is straight in line with the chain, and also not tilted to the side. I'll be ordering a new tensioner from thatsdax, just to make sure it doesn't take a dump on me 20 miles from home.
Five things to work around - not bad for a $74 bike from walmart.
Thank you to all those who have shared their knowledge here on the forum. I had a thousand questions answered before I ever asked them.
Attachments
-
 108.2 KB Views: 2,208
 -
 154 KB Views: 4,704
 -
 84.3 KB Views: 1,802