

Here's my problem I keep breaking the studs off my rear motor mounts. I have fixed them twice and they keep breaking Why?
How do I fix a broken motor mount?
- Thread starter Ron-P
- Start date

I changed ALL my motor mount bolts to studs.....So no bolts , just using nuts on the studs.....I bought some long 6mm bolts, cut off the head and tapped/threaded that end of the bolt,used some red lock tight and bottomed out the stud in the motor and let it set up good.....I haven`t broke a motor mount yet....(knock on wood),lol....
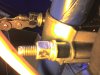
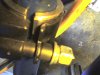
Running stock hardware but the fit is dead on to the seat tube with a solid mount. Also based on a post I read here on the forum I went out of my way to prevent side forces on the studs. I made up some spacers so that when the washers and nuts where tightened they did not deflect outwards from the seat tube due to fit interference. All force on the stud is lateral not sheer. The good fit of the concave bracket and clamp are doing most of the work as originally intended. I used the same approach on the front as well with several bushings to keep the studs straight.
Also on the front mount you can see a split bushing I made to match the diameter of the down tube to the motor mount, again the concave mount is doing it's job properly. Although my pic looks funky the studs are quite straight.
Also on the front mount you can see a split bushing I made to match the diameter of the down tube to the motor mount, again the concave mount is doing it's job properly. Although my pic looks funky the studs are quite straight.
Attachments
-
 102.4 KB Views: 169
 -
 107.2 KB Views: 168
Last edited:
A lot of people over tighten the stock bolts an either break or strip the bolts....Ya If you can get your motor to fit into the "V" Of the fram, it shouldn`t take a whole lot of bolting strength to hold it in place.....Meh, it is what it is, the really amazing thing is that when the motor fits the frame properly it locks in and nests almost by itself before the nuts are even tightened down. The stock design is brilliant in it's simplicity.
ARRRRGGGHHH!!!!
Rather than wait for a decent frame mount engine kit, which were out of stock some time ago, I bought a cheapo off of eBay. As recommended on these boards, I started to replace the frame mount studs before they broke before I even started assembly. Yeah, well one snapped off while I was trying to remove it. I have since gone through 1/2 a cylinder of propane, 6 drill bits, and two Bolt extractors. The tip of the second bolt extractor is now lodged in the engine mount. It is really super hard metal,and no amount of heating/punching/grinding/drilling seems to be having much effect.
My next step is to go buy a tap & die kit @ Sears, drill a new hole in the engine block, and then create a mounting adapter plate.
Any thoughts on this? Here's a picture of my engine block.
What I ended up doing on a last ditch effort or part out the motor was grind that stuff flat and move over as little as possible to some fresh alum. and drill and tap a new hole, and on the motor mount, I had to oval out the holes so the studs would go through it.....Right or wrong it worked and still was working when I sold the MB....There is someone selling a motor mount U BOLT kit that might be what you need....I`m using one now just because it really holds the motor good and tight.....
Woohoo!ARRRRGGGHHH!!!!
My next step is to go buy a tap & die kit @ Sears, drill a new hole in the engine block, and then create a mounting adapter plate.
Stuartracing - I started out with the plan to do the same thing as you describe, although I didn't read your post before I did it. I bought a Craftsman tap & Die kit and a smaller grinder bit for my Dremel tool.
I just went out into the garage and had a few hours of "Grinding Therapy". I actually have a new hole tapped in the general vicinity of the old one. I'm thinking (hoping), that with a little bit of all thread and a whole lot of Lock Tite, I should be able to mount this booger.
Since I live in LA, I'd like to thank 3-in-1 oil, the Dremel tool company, Craftsman, and most importanly my Mom for taking me to acting classes. I'd also like to give a special "Shout Out" to the Benz-o-Matic company for never giving up on me even when I thought they were out of gas.
I'd also like to thank my small keg of home brew that kept me company during the darkest hours.
Thats some funny stuff there,lol...Thanking all your sponsors....Take a pic. when you get it done....Woohoo!
Stuartracing - I started out with the plan to do the same thing as you describe, although I didn't read your post before I did it. I bought a Craftsman tap & Die kit and a smaller grinder bit for my Dremel tool.
I just went out into the garage and had a few hours of "Grinding Therapy". I actually have a new hole tapped in the general vicinity of the old one. I'm thinking (hoping), that with a little bit of all thread and a whole lot of Lock Tite, I should be able to mount this booger.
Since I live in LA, I'd like to thank 3-in-1 oil, the Dremel tool company, Craftsman, and most importanly my Mom for taking me to acting classes. I'd also like to give a special "Shout Out" to the Benz-o-Matic company for never giving up on me even when I thought they were out of gas.
I'd also like to thank my small keg of home brew that kept me company during the darkest hours.
One thing that I forgot to mention, was that I was getting absolutely nowhere with titanium drill bits and EZ out extractors.
What really did the trick after the EZ Out broke off inside the bolt was using my Dremel tool. I'd grind for a bit with the tip of a cone shaped grinder, then take what I think was an engraving bit, and deepen the hole.
Repeated this process, along with heating with a Benz-o-matic.
What really did the trick after the EZ Out broke off inside the bolt was using my Dremel tool. I'd grind for a bit with the tip of a cone shaped grinder, then take what I think was an engraving bit, and deepen the hole.
Repeated this process, along with heating with a Benz-o-matic.
Ya once an easyout breaks it`s almost lights out....Those things are hard....Lowes sells a pretty cool screw ext. kit....It`s not like the easyouts, if this one don`t get it out than your screwed so to speak,lol...It works in a totally different way....I bought one just to have it just in case....Check it out....One thing that I forgot to mention, was that I was getting absolutely nowhere with titanium drill bits and EZ out extractors.
What really did the trick after the EZ Out broke off inside the bolt was using my Dremel tool. I'd grind for a bit with the tip of a cone shaped grinder, then take what I think was an engraving bit, and deepen the hole.
Repeated this process, along with heating with a Benz-o-matic.