Tinsmith's in frame gas tank for cantilever Schwinn.

GoldenMotor.com

silverbear

The Boy Who Never Grew Up
Jul 9, 2009
8,325
670
113
northeastern Minnesota
Ever since I saw Bairdco's first copper gas tank I have wanted to make one. I have some experience with soldering and am encouraged to go ahead and try it from past success in making juice can gas tanks. With those it was just soldering a copper filler and gas outlet to a tin can, so most of the skill involved had more to do with the leather covering stitched on than in any real fabrication.
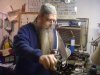
I knew an in frame copper tank would be a whole new ball game. My friend Tinsmith kindly offered to help and share his shop with me. His own gas tank experience is limited to a steel in frame tank he is just finishing up for a stretched industrial worksman project ((awesome bike), but he has many years worth of tin smithing knowledge and figured it might transfer over into making something out of copper. I'm grateful for his help.

The bike I want to make a tank for is a 53 Schwinn with a cantilever frame. My current ride this winter is a 51 cantilever Schwinn and I want one for it, too. I don't weld, so that's why I am interested in copper, something in reach for the rest of us. Besides, I think they look cool. Copper is the poor man's gold.

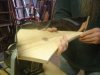
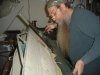
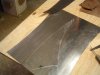
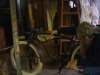
Tinsmith (Dan) suggested we make a prototype tank out of tin since it is less expensive than copper. The first photo shows a sheet of electroplated tin, which accounts for the shiny finish. A cardboard template was scribed onto the tin and cut out with tin snips. The slightly burred edges were passed through a rolling machine (not shown) to flatten out the burs and smooth up the edge. This could also be done with a file.

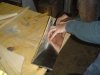
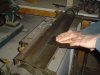
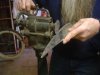
His plan was to make flanges on the side pieces to give a surface to solder the top and bottom to. To make the flange, which I believe is 3/16 of an inch and is at a 90 degree angle, he uses a specialized tool called a burring machine which is operated with a hand crank. He passes this through several times, bending just a little bit with each pass. Each time stretches the metal a little at a time. There is skill involved in this, applying just the right amount of hand pressure... try to bend too much in one pass and the metal will kink. So, even though a machine helps make the flange an even 3/16", a keen eye, an understanding of the material and light touch are in order.

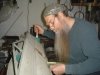
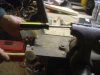
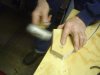
Dan had already made a kind of wooden template which I will show better in photographs with the next post. It follows the contour of the side pieces and gives him a solid form to tap the tin against to get an accurate 90 degree bend in the flange. Again, he is slowly stretching the metal, a little at a time, as there are complex curves involved. A more linear tank would be simpler to make, at least out of tin or copper.

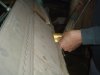
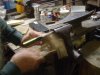
He tried a test fitting at this point with both sides cut and flanged and with the top piece of tin held in place. Looking good! I'm already beginning to think the tin version may be just as good as the copper. I was surprised and pleased at how nice it looks, almost like a chrome tank. It could be clear coated with Top Flite, the gas resistant paint 2door has recommended or it could be painted. I can see a nice decal on there with clear coat maybe.

Tinsmith, please make any comments you wish to correct me or clarify anything I have said here. And thank you for sharing with all of us your skill and love of tin work. It may be a couple weeks before we have another shop session. Dan has a job and also a very cool 4 stroke Worksman project. Maybe he'll let me open up a thread on his project to share that, too. Thanks, buddy. See you in a couple weeks!
SB
 

Attachments

2door

Moderator
Staff member
Sep 15, 2008
16,302
175
63
Littleton, Colorado
The wood block and mallet method is called 'hammer forming' and can be mastered with some practice. The harder the wood, the better the finished product. The trick is to calculate what is called, set back and bend allowence. The radius of the bend determines how much material you have to work with and how much you have left to work with after forming. This is an old technique that has been used to form metal into complex shapes for a long time. Compound curves can be acheieved with a sand bag and a soft mallet. The old timers used a leather bag filled with lead shot. The challenge here is to make identical left and right halves of a project. That's where the talent and artistry comes in.
Your friend, Dan, looks like he has both. Thanks for sharing, Silver.
Tom
 

bairdco

a guy who makes cool bikes
Aug 18, 2009
6,537
264
63
living the dream in southern california
my last tank i made a "buck" for the sides out of wood. i cut the copper sides about a half-inch larger, then centered the buck and pounded over the edges with a rubber mallet.

with copper, it's really easy to get edges on small curves, 'cause the copper's so soft.

corners ain't so easy. i had to snip those and solder them together.

the tin looks cool, and once you start with a copper tank, you'll be amazed at how easy it is to solder. much easier than sheet metal, in my experience.
 

fishguts

New Member
Sep 7, 2010
313
0
0
southeastern MA
Cool project - keep the photos coming and those whiskers out of the rollers!

I've done some hammer forming over wooden bucks in steel and it really is amazing how far you can stretch the metal and how tight you can make the corners. Yep, you need to keep the buck slightly smaller than the finished piece to allow for metal thickness and space for inside corners. Copper should be even easier.

Looking forward to seeing your project come together.
 

silverbear

The Boy Who Never Grew Up
Jul 9, 2009
8,325
670
113
northeastern Minnesota
I wish I could post a follow up to this thread right now, but it will have to wait another week and a half or so until the next shop session. Thanks for the interest and clarification about hammering bends and the use of a "buck" as a form. I think that next summer I'll be making a copper tank for a Worksman newsboy and a Panther. I can see that taking the time to make a good solid buck out of something like oak would be a good investment of time. With the use of the burring machine the quality of the buck is less important (I'm guessing) as it does most of the bending for you and the buck is more for final shaping where it wants to crimp. I'm also guessing that the copper is more forgiving and that the tin needs something like the burring machine to do most of the flange work. It occurred to me that a burring tool could possibly be made from a can opener if there was a way to dull the edge of the cutter wheel. Give it some thought, please.
I'm also looking forward to the soldering part of this project, learning from someone who has made countless reproductions of tin chandeliers, candle holders and such. Dan knows the tools of his trade from a tradition of tin-smithing which goes way back to a time when there was no electricity, there were no propane torches and no local hardware store. How was it done? How will he do it? I can hardly wait for the next class to be in session. See you there...
SB
 

jose Pinto

Member
Aug 29, 2010
111
4
18
64
Portugal
I wish I could post a follow up to this thread right now, but it will have to wait another week and a half or so until the next shop session. Thanks for the interest and clarification about hammering bends and the use of a "buck" as a form. I think that next summer I'll be making a copper tank for a Worksman newsboy and a Panther. I can see that taking the time to make a good solid buck out of something like oak would be a good investment of time. With the use of the burring machine the quality of the buck is less important (I'm guessing) as it does most of the bending for you and the buck is more for final shaping where it wants to crimp. I'm also guessing that the copper is more forgiving and that the tin needs something like the burring machine to do most of the flange work. It occurred to me that a burring tool could possibly be made from a can opener if there was a way to dull the edge of the cutter wheel. Give it some thought, please.
I'm also looking forward to the soldering part of this project, learning from someone who has made countless reproductions of tin chandeliers, candle holders and such. Dan knows the tools of his trade from a tradition of tin-smithing which goes way back to a time when there was no electricity, there were no propane torches and no local hardware store. How was it done? How will he do it? I can hardly wait for the next class to be in session. See you there...
SB
Silverbar, good night, you'll excuse me but I had an idea that can solve your problem and run the edge of the plate let's see seeu can convey what I think. The pictures show Mr implement the border on the sides of the deposit because they are not straight lines and iregulares is not possible to take a machine-brakes, but if the fold is made in the face surrounding the sides of this deposit can now be Bending machine made on a total length of the perimeter of the deposit, just after hitting the edge for this bend then weld the sides, I know this is a bit tricky let's see if you get the idea right
 

silverbear

The Boy Who Never Grew Up
Jul 9, 2009
8,325
670
113
northeastern Minnesota
Jose,
If I understand you correctly you are saying that instead of putting the flange on the side pieces, instead put the flange on the top, end and bottom pieces which are flatter. Flat pieces can be bent with a machine brake which would make the flange in one easy bend all at once.
I remember Dan talking about this, thinking through how to go about this little project. I think it had to do with wanting to make the top, end and bottom as continuous as possible by being one piece and not sectioned which would then make for more problems in joining those sections together. I think that was it. If I'm wrong about this I'm sure that Dan will clear it up.
Keep in mind, too, that this tank is an experiment with the idea that by the time we're done we'll have a much better idea of how to go about it. Some people are able to see a project in their head in it's entirety from beginning to end and some of us just begin and let the project kind of reveal how it wants to be made as we make it. Dan and I are both the kind of artisans who let the project unfold with a rough idea of what we want to do and then improvise along the way. Once a first version is done then you stare at it creatively to see if there are better ways to go about it. And once you use it other ideas to make it better may come along... perhaps a better way to mount it. Some things you can not know until you try it out.
So, please keep in mind that this tank is a prototype and I don't know that a tank for this type of frame has been made from tin before this one. So as much as showing how to go about making this particular tank we are sharing the creative process of how to think it through, trying to understand how the tank wants to be made. I think Dan and I both are anxious to see how it works out and how to make the next one just right.
SB
 

Tinsmith

Well-Known Member
May 15, 2009
1,056
259
83
Maryland
SB,
While I don't "splain" things as well as many of you SB is correct. Jose is correct that since the top, end and bottom are straight cuts I can bend the flang in a barfold easily. But since there isn't a straight profile to this tank, when those pieces are shaped to fit the side profile they will get pretty funky with all the stretching and compression. They can be hammered and worked out but I don't think they will finish out as nicely as the way we are attempting. Like SB says, we're just gonna see where this goes and make changes as needed. It's not rocket science but the metal will show us what will and won't work. If it works out the first time I'll be peasantly suprised. Hopefully we can come up with something that will be helpful to others. We won't be at it this weekend, but plan on the next weekend. Maybe we can get all the parts made and tacked together to see how it will fit. Then we'll have to see how well we can keep it tight together while it is soldered. Then we can go for broke. Dan
 

buzbikebklyn1

New Member
Jun 3, 2009
207
0
0
Brooklyn N.Y.
Beautiful workmanship, very nice.
You don't see hand formed metal work like that every day.
I don't see the difference it might make by making the flanges on the sides or top and bottom, besides the structural advantages , this is hand work, an art form to its self...
It should have some of its metalworkers quirks to it.
That old flandgeing machine is very cool, how old is that thing?
Again... very nice.
BBB
 
Last edited:

jose Pinto

Member
Aug 29, 2010
111
4
18
64
Portugal
SB,
While I don't "splain" things as well as many of you SB is correct. Jose is correct that since the top, end and bottom are straight cuts I can bend the flang in a barfold easily. But since there isn't a straight profile to this tank, when those pieces are shaped to fit the side profile they will get pretty funky with all the stretching and compression. They can be hammered and worked out but I don't think they will finish out as nicely as the way we are attempting. Like SB says, we're just gonna see where this goes and make changes as needed. It's not rocket science but the metal will show us what will and won't work. If it works out the first time I'll be peasantly suprised. Hopefully we can come up with something that will be helpful to others. We won't be at it this weekend, but plan on the next weekend. Maybe we can get all the parts made and tacked together to see how it will fit. Then we'll have to see how well we can keep it tight together while it is soldered. Then we can go for broke. Dan
my dear friends, I'm hoping that your project is a success, just made a comment in the sense in my view make the implementation easier, with everything ahead, we look forward to seeing the final
 

silverbear

The Boy Who Never Grew Up
Jul 9, 2009
8,325
670
113
northeastern Minnesota
This past Saturday Dan and I got some more work on the tin prototype gas tank.
Dan had cut a couple pieces of wood on a band saw to the same shape as the sides of the gas tank. This is not so much to act as a buck for tapping out the final flange bend, although it is useful for that, too. It's primary function is to give a backing to the tin for the soldering to come later. Unlike copper, tin has more tension and resistance to bending... spring in other words. Final shaping of the form was done with a belt sander.
If you don't have access to either of these tools, the form can be cut out with a jig saw and final shaping done with a sanding block by hand.
We already had a top piece cut from our last session, but in thinking about this little tank over the past couple of weeks, he thought it would be better if the top piece could be continuous, covering the top, front end and part of the bottom all in one piece.
The next photos show him marking and then making the bends of a machine I forget the name of (a brake?) which is designed to bend a flat piece to your choice of angle. Lacking this tool you could use a sharp edged table or workbench with a piece of steel or wood clamped above so the piece you want to bend is sandwiched between. This needs to be a clean bend. As he went, Dan checked the accuracy of the bend with the side piece to give it a bit more angle if needed.
(cont.)
 

Attachments

silverbear

The Boy Who Never Grew Up
Jul 9, 2009
8,325
670
113
northeastern Minnesota
As a side note, you will also notice in the previous post that the piece Dan is bending has at it's end a flange bent into a shape coming back on itself. Take a look and you'll see what I'm talking about. This flange is there so that the bottom piece has something to fit into, avoiding an impossible butt joint. Again there is a specialized tool for this in a tinsmith's shop, something you and I will never have. A couple photos show it in use. Dan can clarify what it's called; I forget. He said that without such a tool the bend can be improvised with something to act as a form for the tin to be bent around. He demonstrated for me with a screwdriver clamped into a vise, tapping the tin around the screwdriver below the tip. It wouldn't have to be a screwdriver... you get the idea. More will follow through the day as I have time to continue this thread.
(cont.)
SB
 

Attachments