

Silverbear, I sent the pulley set up today and PM'd the tracking number and charges. Let us know when it arrives. Thanks.
"kindalikeawhizzer"
- Thread starter silverbear
- Start date

msrfan,
Thank you so much!
Curt,
my guess is that 3" is as small as you can go due to the bearing housing of the transmission. No need for two of the same thing, and nice to know that a larger one can be made. Thanks!
You guys are alright!
SB
Thank you so much!
Curt,
my guess is that 3" is as small as you can go due to the bearing housing of the transmission. No need for two of the same thing, and nice to know that a larger one can be made. Thanks!
You guys are alright!
SB
Was doing some checking today found my suspicions were right. The A& B weld in pulleys not the same as regular ones. I stuck a belt in a 3" one and it went down to about 2 1/2". So I would have to by a 4" pulley to get a 3 1/2" size. So that means the clutch I did for you will prolly be 2 1/2" insted of 3". Just a tad lower gearing, always fun . LOL.........Curt
Good deal. (The clutch Curt is referring to is for my 50 Panther which has a Qmatic transmission which has a chain final drive we're converting to belt final drive. He took a clutch I had and removed the sprocket, then welded a pulley in it's place.) Thanks, Curt!
SB
SB
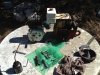
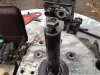
It felt like Christmas this past week when first a package arrived from Curtis Fox containing the drill and tap guide he made and loaned to me. Then the cupped pulley msrfan made came in the mail followed by yet another little goody for the CVT modification, the split collar. And with warmer weather it is time for some engine and transmission work.
First off I drained the oil from the crankcase and switched the drain plug to the opposite end of the engine. Since it sits at a tilt in the cantilever frame the drain plug needs to be at the lower end of the engine. Now it is. Second, I cleaned up the head where I had drilled and tapped it in order to thread in a compression release valve purchased on ebay and which was designed for a chainsaw motor. I threaded it in tight after dousing the threads with JBWeld and then added more JBWeld to the topside of the head as a sealer. Then the head got tightened down.
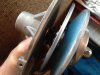
Curt's drill guide is very cool. The guide which msrfan gave a link to a few posts back and which is pretty expensive does not come up to Curt's. You can see in the photo that the guide slips over the 3/4" crankshaft and has three different inserts. One is for a pilot drill bit to start the hole. Next insert has been drilled to guide the bit for the bolt hole and the third insert is for the tap to fit inside. There is just no way to misalign drilling and tapping the crankshaft. Even so, I decided to do the operation first on the spare 5 horse Tecumseh engine which is the same model engine as the one going on the bike, although without the tin work and pull start assembly they sure look different. If I ever need to replace the engine with the spare the crank will be tapped and ready. So, both engines are all set for a bolt at the end of the crank. Cool. Before I send the kit back to Curtis I'm going to drill and tap the crankshaft on my 147cc Jacobsen 2 stroke which is for another build, an upgrade actually. Many thanks, Curt... what a great job you did!
Over the weekend I'll post more photos and some commentary regarding the CVT and msrfan's awesome cupped pulley. Things are coming along!
SB
First off I drained the oil from the crankcase and switched the drain plug to the opposite end of the engine. Since it sits at a tilt in the cantilever frame the drain plug needs to be at the lower end of the engine. Now it is. Second, I cleaned up the head where I had drilled and tapped it in order to thread in a compression release valve purchased on ebay and which was designed for a chainsaw motor. I threaded it in tight after dousing the threads with JBWeld and then added more JBWeld to the topside of the head as a sealer. Then the head got tightened down.
Curt's drill guide is very cool. The guide which msrfan gave a link to a few posts back and which is pretty expensive does not come up to Curt's. You can see in the photo that the guide slips over the 3/4" crankshaft and has three different inserts. One is for a pilot drill bit to start the hole. Next insert has been drilled to guide the bit for the bolt hole and the third insert is for the tap to fit inside. There is just no way to misalign drilling and tapping the crankshaft. Even so, I decided to do the operation first on the spare 5 horse Tecumseh engine which is the same model engine as the one going on the bike, although without the tin work and pull start assembly they sure look different. If I ever need to replace the engine with the spare the crank will be tapped and ready. So, both engines are all set for a bolt at the end of the crank. Cool. Before I send the kit back to Curtis I'm going to drill and tap the crankshaft on my 147cc Jacobsen 2 stroke which is for another build, an upgrade actually. Many thanks, Curt... what a great job you did!
Over the weekend I'll post more photos and some commentary regarding the CVT and msrfan's awesome cupped pulley. Things are coming along!
SB
Attachments
-
 248.8 KB Views: 244
 -
 261.7 KB Views: 264
 -
 252.3 KB Views: 249
 -
 154.7 KB Views: 233
 -
 226.6 KB Views: 281
Last edited:

Yes. And don't forget the cool, cool bike that's waiting at the end.
Heck, it's already cool. And it can only get better.
Heck, it's already cool. And it can only get better.
I believe this is the best web site on the internet. What a great community!
Bluegoat, thanks for the kind words, sir. I do hope it turns out cool.
And now that we have slapped each other on the back, it is time for SHOW&TELL !!!
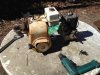
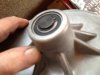
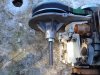
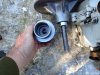
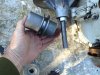
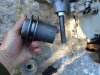
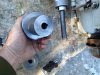
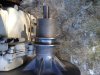
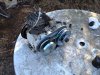
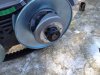
A couple of weeks ago I thought I wasn't going to be able to use the Constant Velocity Transmission. Bummer. I posted photos describing the problem and forum members gave it the "creative stare" offering suggestions. Curtis Fox and msrfan saw the solutions and right away Dale (msrfan) set to work making a cupped pulley on a lathe. A few days ago it arrived in the mail and now it is on the bike.
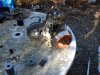
In the photos below and on the next post you can see the original housing and shaft. Also pictured is the extended shaft with a split collar on the front side and a lock collar on the back side holding the shaft snug in the bearings. There are several views of Dale's cupped pulley housing which rides on the extended shaft and is keyed so that the two are locked together. The pulley itself is free to slide on the housing so that it can be aligned with the sheave on the rear wheel and then welded in place. It appears that the pulley needs to be right where the transmission bearing is located, which is the reason for the cupped housing sharing the same space. Great solution to the problem! The shaft is long enough that I have temporarily placed an additional pulley to assure myself that at a future time I could have a belt running to a generator or alternator for powering lights and horn. Don't know that I will, but I could.
This has been a major hurdle in the build and I am relieved to know the transmission is going to work... "with a little help from my friends", as the Beatles sang.
SB (photos cont.)
Bluegoat, thanks for the kind words, sir. I do hope it turns out cool.
And now that we have slapped each other on the back, it is time for SHOW&TELL !!!
A couple of weeks ago I thought I wasn't going to be able to use the Constant Velocity Transmission. Bummer. I posted photos describing the problem and forum members gave it the "creative stare" offering suggestions. Curtis Fox and msrfan saw the solutions and right away Dale (msrfan) set to work making a cupped pulley on a lathe. A few days ago it arrived in the mail and now it is on the bike.
In the photos below and on the next post you can see the original housing and shaft. Also pictured is the extended shaft with a split collar on the front side and a lock collar on the back side holding the shaft snug in the bearings. There are several views of Dale's cupped pulley housing which rides on the extended shaft and is keyed so that the two are locked together. The pulley itself is free to slide on the housing so that it can be aligned with the sheave on the rear wheel and then welded in place. It appears that the pulley needs to be right where the transmission bearing is located, which is the reason for the cupped housing sharing the same space. Great solution to the problem! The shaft is long enough that I have temporarily placed an additional pulley to assure myself that at a future time I could have a belt running to a generator or alternator for powering lights and horn. Don't know that I will, but I could.
This has been a major hurdle in the build and I am relieved to know the transmission is going to work... "with a little help from my friends", as the Beatles sang.
SB (photos cont.)
Attachments
-
 175.7 KB Views: 214
 -
 135.8 KB Views: 207
 -
 273.9 KB Views: 210
 -
 265.5 KB Views: 224
 -
 233.5 KB Views: 229
Last edited:
And more photos...
Attachments
-
 229 KB Views: 234
 -
 234.4 KB Views: 202
 -
 238.8 KB Views: 216
 -
 252.3 KB Views: 211
 -
 260.2 KB Views: 227
And the last two...
I had a particular order I wanted for these to appear, but Picasa rearranged them instead in the order they were taken. Use your imagination, I guess.
SB
I had a particular order I wanted for these to appear, but Picasa rearranged them instead in the order they were taken. Use your imagination, I guess.
SB
Attachments
-
 289 KB Views: 206
 -
 236.6 KB Views: 253
Hey SB the Picassa photo order may not suit you but you sure ordered the right parts from the right guys! Very impressive to get 3 guys on the same page of a problem & come out with the solution, especially when each are located at a considerable distance from each other...anyway a "special" bike should involve special & talented friends, which you all are. Rick C.
Looking good sb. Are you leaving that collar on the shaft? If so, just wondering why.And more photos...
Curt, that drill guide is the bomb!It felt like Christmas this past week when first a package arrived from Curtis Fox containing the drill and tap guide he made and loaned to me. Then the cupped pulley msrfan made came in the mail followed by yet another little goody for the CVT modification, the split collar. And with warmer weather it is time for some engine and transmission work.
First off I drained the oil from the crankcase and switched the drain plug to the opposite end of the engine. Since it sits at a tilt in the cantilever frame the drain plug needs to be at the lower end of the engine. Now it is. Second, I cleaned up the head where I had drilled and tapped it in order to thread in a compression release valve purchased on ebay and which was designed for a chainsaw motor. I threaded it in tight after dousing the threads with JBWeld and then added more JBWeld to the topside of the head as a sealer. Then the head got tightened down.
Curt's drill guide is very cool. The guide which msrfan gave a link to a few posts back and which is pretty expensive does not come up to Curt's. You can see in the photo that the guide slips over the 3/4" crankshaft and has three different inserts. One is for a pilot drill bit to start the hole. Next insert has been drilled to guide the bit for the bolt hole and the third insert is for the tap to fit inside. There is just no way to misalign drilling and tapping the crankshaft. Even so, I decided to do the operation first on the spare 5 horse Tecumseh engine which is the same model engine as the one going on the bike, although without the tin work and pull start assembly they sure look different. If I ever need to replace the engine with the spare the crank will be tapped and ready. So, both engines are all set for a bolt at the end of the crank. Cool. Before I send the kit back to Curtis I'm going to drill and tap the crankshaft on my 147cc Jacobsen 2 stroke which is for another build, an upgrade actually. Many thanks, Curt... what a great job you did!
Over the weekend I'll post more photos and some commentary regarding the CVT and msrfan's awesome cupped pulley. Things are coming along!
SB
Without the one on the back side of the transmission there is a bit of wobble of the shaft at the bearings. With it there's no wobble. Maybe that's why on the original shaft there was a nut at the front side and directions for a certain amount of footpound pressure. With the cupped pulley there is nothing firm for it to butt up against without the collar there. So it seems to me anyway.Looking good sb. Are you leaving that collar on the shaft? If so, just wondering why.
SB
Thanks, Rick!Hey SB the Picassa photo order may not suit you but you sure ordered the right parts from the right guys! Very impressive to get 3 guys on the same page of a problem & come out with the solution, especially when each are located at a considerable distance from each other...anyway a "special" bike should involve special & talented friends, which you all are. Rick C.
SB
Yeah, you're probably right. I had a similar problem on the 5/8'' keyed shafts of my homemade 2 speed trans. I fixed it by drilling and tapping 5/16'' X 18 holes and inserting button head bolts in each end. Still had to Loctite the threads. Looks like you should be fine with that setup.Without the one on the back side of the transmission there is a bit of wobble of the shaft at the bearings. With it there's no wobble. Maybe that's why on the original shaft there was a nut at the front side and directions for a certain amount of footpound pressure. With the cupped pulley there is nothing firm for it to butt up against without the collar there. So it seems to me anyway.
SB
Good. I'm glad you think it will be okay. It will be something for me to keep an eye on.Yeah, you're probably right. I had a similar problem on the 5/8'' keyed shafts of my homemade 2 speed trans. I fixed it by drilling and tapping 5/16'' X 18 holes and inserting button head bolts in each end. Still had to Loctite the threads. Looks like you should be fine with that setup.
SB
If worse come to worse you can take one of the 5/8" to 3/4" bushings i sent with the clutch and slip it over the jack shaft and drill and tap it for a bolt........Curt, that drill guide is the bomb!.....Thanks msrfan. Yep thought about it for a couple days,come to me about 3 am SB knows that time well when the pillow will not let you alone until you salve the unsalved, was going to make three and it come to me make one with what ever inserts needed. I had already sent him a bushing for his clutch and some key stock to change it form 5/6" to fit the 3/4" clutch form Fastenal. and now when he is done with it,it may be handy for me as can make any kind of insert that fits 3/4" hole in the guide.......Curt