Silverbear's Greyhound motor mounts

GoldenMotor.com

silverbear

The Boy Who Never Grew Up
Jul 9, 2009
8,325
670
113
northeastern Minnesota
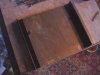
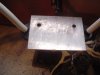
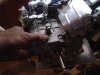
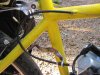
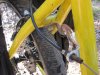
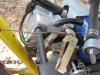
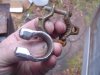
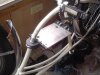
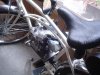
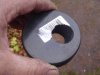
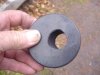
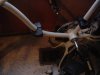
Once I saw how much motor mounts cost for the four stroke motors I've been thinking about how to make one for the Greyhound. This is what I came up with for my 51 Schwinn cantilever framed bike. The hockey pucks came to mind from something I saw a long time back using one for the rear mount on a China girl. I don't know who thought of it first and don't recall now how it was done, but credit should go to that person for being the first to use a hockey puck. For those who do not live in hockey country, the puck is a very hard rubber disk meant to take a lot of punishment and responsible for knocking out a whole lot of teeth all over the north land. This is not soft rubber. So the idea was to use two of them, one on each down tube and to drill the 1" hole at the same angle as the tube so that the flat of the puck would be parallel to the ground. I used a spade bit and realized it was every bit as difficult boring through that puck as it would have been with a fairly dense wood. With those drilled I laid out the U bolts, traced them onto the pucks and drilled holes from side to side. Then I used a sabre saw to first cut off part of the disc so that it would have a flat face on one side. Then I cut from the flat edge to the angled hole in the center. I did not cut through the whole disk. Tried them for fit. Since the curved edge has not been cut through it is possible to spread the puck open to fit it around the frame. Look good to me...
Cont.
 

Attachments

silverbear

The Boy Who Never Grew Up
Jul 9, 2009
8,325
670
113
northeastern Minnesota
Then I fit the U bolts. The mounting plate I'm using is something I had on hand. It is very heavy aluminum which I cut from something which was at one time part of a bleachers support, and something my brother and I built into a dock for our boats. This is a leftover and is a quarter inch thick. It will not bend. I cut two pieces of steel angle from a sign post and will bolt those to the underside of the plate and then U bolts to the other angle of the steel. That is yet to come when I have a better idea of how the engine needs to sit. I cut the plate purposely wide with the understanding that the Greyhound engine has to sit off center for the drive chain to line up. I cut the plate 6 inches wide by 9 inches long. I think the length is about right and the width can be cut down if need be. Once I know how far back or forward the engine needs to be I can drill those holes and then extend them from side to side as slots in order to get the chain alignment right. The two big holes drilled in the plate were already there and have nothing to do with what we're doing. I don't think they'll interfere with anything. So that's what I have in mind and I hope i works OK. Under the rear mount I will incorporate a tip from Mike Simpson to put a stop of some kind on the frame under the mount so that under torque it can't work it's way down. What I will use is a seat stay spread open to fit around the frame tube and then pulled back in tight with a long bolt and nut and once re-bent a shorter bolt.
I've thought about this mount a lot and I think it is going to be plenty strong enough. If you see something I should do differently, I welcome your thoughts on this. Once I have the transmission I can proceed with mounting the engine.
SB
 

Attachments

silverbear

The Boy Who Never Grew Up
Jul 9, 2009
8,325
670
113
northeastern Minnesota
Hey Elmo,
The second of my posts and set of pictures shows what I have in mind. I think it will work. If not, then is will be back to the drawing board. I had to buy a 1" bit for close to five bucks and the U bolts and lock nuts, four flat head screws and lock nuts came to about seven dollars more. The hockey pucks were about five dollars for two. So, not counting the bit it would come to about $12.00, assuming you had something to salvage for angle and for a plate. My kind of price range.
SB
 

Fossil

New Member
Mar 15, 2008
228
2
0
Guthriesville Pa
This is what my mount looks like with the engine bolted down. Note that my original design was too narrow so I had to fold part of the right hand side out to have room to mount the engine. I didn't figure the proper offset when I had the steel plate bent. Glad I used 3/16" cold rolled steel. It is still very solid.

Jim
 

Attachments

silverbear

The Boy Who Never Grew Up
Jul 9, 2009
8,325
670
113
northeastern Minnesota
This is what my mount looks like with the engine bolted down. Note that my original design was too narrow so I had to fold part of the right hand side out to have room to mount the engine. I didn't figure the proper offset when I had the steel plate bent. Glad I used 3/16" cold rolled steel. It is still very solid.

Jim
Thanks for the photo, Jim, and for all of the good advice. I'll post photos of the final mount setup tomorrow. It's interesting all the different ways of doing things solving the same problems from different angles.
SB
 

Fulltimer

New Member
Aug 13, 2010
1,321
3
0
77
Saint Augustine, FL
Hockey pucks are very strong. I uses them for bump stops on the back of my Jeep. They have been on for over a year now and have taken a beating but are still like new.

Terry
 

fm2200

New Member
Nov 16, 2008
258
1
0
new york city
Silverbear thanks for sharing your engine mount idea, I'm going to try to make the same homemade mount. The hockey pucks are very durable, I going to try and drill those holes in the pucks but I have never done it. Your idea is a real original, let us know how it comes out.
 

fm2200

New Member
Nov 16, 2008
258
1
0
new york city
The alternative to your puck idea is to take ordinary duct tape wrap it around the bike tube then sandwich a 20 gauge sheet metal strip and make a u shape out of it. Then wrap a few more layers of duct tape then U bolt it. I would then weld a small plate on the underside of the engine mounting plate to bolt directly to the U bolt.
 

silverbear

The Boy Who Never Grew Up
Jul 9, 2009
8,325
670
113
northeastern Minnesota
Thank you for the complement, but the idea of using a hockey puck was something I saw on this forum some months ago where it was used in a similar way I believe (hard to remember) as the rear mount on a China girl. If I have any talent it is in recognizing other people's good ideas and then adapting them to my own use. I hope someone will remember who posted that so we can give credit where credit is due.
I'm working on the mount today and discovered in consultation with Jim Davis that I had mine what is probably too low, so am in the process or raising it up, drilling some new holes and trying to determine if I need to make a longer plate. I think the pucks will be plenty strong enough. With shop tools like a drill press a person could do a better job. But I think with even just hand tools we can make this mount work. If it does then the idea could be applied to any of the four stroke industrial engines I would think. I'll post some photos later.
I don't know about the duct tape and am not sure I follow your idea completely. In my experience duct tape tends to break down as it weathers, but maybe I've just used cheap duct tape. Ha!
SB
 

Elmo

New Member
Sep 3, 2009
748
4
0
Mississippi
Silverbear you were looking for ideas on throttle linkage so I thought I would load mine. I used part of an old sidepull brake. I used the side with the adjuster and bolted it to the brake mounting hole on the rear triangle. I silversoldered a piece of mechanics wire on the end of the cable to hook to the carb. It is bent with a 90 down and another 90 out. I used a brake lever for a throttle but any throttle would work. I had reservations about whether the wire was strong enough but it has lasted 1100 miles with no wear or other problems. this will give you another view of what can be done. It is ugly but you could make a better looking one with your talent for making good looking parts.
 

Attachments

silverbear

The Boy Who Never Grew Up
Jul 9, 2009
8,325
670
113
northeastern Minnesota
Silverbear you were looking for ideas on throttle linkage so I thought I would load mine. I used part of an old sidepull brake. I used the side with the adjuster and bolted it to the brake mounting hole on the rear triangle. I silversoldered a piece of mechanics wire on the end of the cable to hook to the carb. It is bent with a 90 down and another 90 out. I used a brake lever for a throttle but any throttle would work. I had reservations about whether the wire was strong enough but it has lasted 1100 miles with no wear or other problems. this will give you another view of what can be done. It is ugly but you could make a better looking one with your talent for making good looking parts.
That's a nice straightforward setup, Elmo. The old Schwinn doesn't have a spot for a rear caliper brake to fit , but if I stare at my junk long enough there will be something that works on the same princple as an anchor point. Something from all my brake junk should work. I like the simplicity of your mechanic's wire soldered to the cable directly. Is that like bailing wire? A stiff wire made of steel? I must have something. I suppose coat hanger is too thick and a pot metal. I'll be scouting around. And then I guess the spring could be pretty much from anything so long as it is strong enough to pull the throttle back and not too stiff. That's what I like about the way you do things... straightforward, simple and using what you've got. Once I get the motor on the bike I'll figure the best way to route things and get the cable anchored. I may well try that mechanics wire idea. I like that. Thanks for the kind words and for sharing how you did yours. I think when I do a thread on installing the Greyhound it would be good to show alternate ways people have hooked up the throttle. May I share your approach and pictures when the time comes?
SB
 

silverbear

The Boy Who Never Grew Up
Jul 9, 2009
8,325
670
113
northeastern Minnesota
That's a nice straightforward setup, Elmo. The old Schwinn doesn't have a spot for a rear caliper brake to fit , but if I stare at my junk long enough there will be something that works on the same princple as an anchor point. Something from all my brake junk should work. I like the simplicity of your mechanic's wire soldered to the cable directly. Is that like bailing wire? A stiff wire made of steel? I must have something. I suppose coat hanger is too thick and a pot metal. I'll be scouting around. And then I guess the spring could be pretty much from anything so long as it is strong enough to pull the throttle back and not too stiff. That's what I like about the way you do things... straightforward, simple and using what you've got. Once I get the motor on the bike I'll figure the best way to route things and get the cable anchored. I may well try that mechanics wire idea. I like that. Thanks for the kind words and for sharing how you did yours. I think when I do a thread on installing the Greyhound it would be good to show alternate ways people have hooked up the throttle. May I share your approach and pictures when the time comes?
SB
___
 

Elmo

New Member
Sep 3, 2009
748
4
0
Mississippi
May I share your approach and pictures when the time comes?
SB
Sure SB you may use them any way you please. Glad to be of some help.
 

silverbear

The Boy Who Never Grew Up
Jul 9, 2009
8,325
670
113
northeastern Minnesota
The motor mount is done and is solid. I have every reason to believe this is going to work fine. I have taken pictures of two different possible "stops" a person could use under the rear mount. My understanding is that under torque it is possible for the motor to get pulled down a bit, especially if the motor mount is not really tight. One of the "stops" is a stay for a seat post. I've shown how I spread them using two claw hammers so they can go around the frame. Then use vice grips to pull it back in and finally with a bolt you can snug it up against the frame. Now your mount cannot ride down. I've shown a second kind of "stop" that occurred to me this morning as I was rummaging through my bike junk for a seat post stay. It is a hardware item used to connect a ground wire to a ground rod. You'll find them in the electrical department. I don't see why this won't work well and have placed that one under the rear mount and the seat stay under the front one. I don't know that I need one up there, but call it an insurance policy. I emailed Jim Davis last evening to see how high or low his mounting plate was. It seemed to me that I had mine too low since when I sat the motor in place the pedal was running in to it in spite of the extra wide crank. Jim used the same motor with the same frame design, also a Schwinn cantilever. He measured his from the underside of the lower bar along the seat post to the back edge of the mounting plate and came up with 8 1/2". Mine was 2 " lower. Jim suggested a compromise since he has difficulty changing his spark plug and wishes now that his was a bit lower. So that is what I did today, drilling new holes in the mounting plate so that the angle iron underneath could move out to each end of the plate. The measurement for mine is 8 1/2 inches. Much higher and you have clearance issues with the spark plug. Lower you run into the pedal. Goldilocks would say this one is jes right for this cantilever frame, which I think is a perfect candidate for the Greyhound. The plate itself measures 6" X 9". An inch longer would be better. One thing I would do differently next time is to use angle iron a little bigger. It would make it possible then to use a socket to tighten down the lock nuts and speed the installation up. As it was I had to use a wrench going a quarter turn at a time. That's it. Time and mileage will determine how good this mount is. If you come up with improvements I hope you'll come back to this thread and share them. Thanks again to whoever it was who thought to use a hockey puck on a China girl in the first place.
SB
 

Attachments

Last edited:

silverbear

The Boy Who Never Grew Up
Jul 9, 2009
8,325
670
113
northeastern Minnesota
Thank you, sir. I'll like, too, so long as it works. The price is right and I think the same idea could be used with any frame, changing things to suit different dimensions. This evening I removed all the external aspects of the governor junk and it sure looks better. The challenge now is to use a couple bits of hardware I removed in improvising a setup for the throttle. Elmo has inspired me to keep it simple. Tranny should be here in a couple of days... getting anxious. Quenton has modified it so that it is optimized for the Greyhound. I think this old Schwinn is going to be the cats meow. While I wait and rain keeps me indoors I need to figure a way to mount a front caliper brake. Tomorrow's challenge along with the throttle. I think improvising and figuring out solutions to problems is great fun, especially when others here share ideas and experiences. What a great forum. This is the bike I'm planning to take east with me and one day when there's a break in the weather this winter or early spring I want to drive up to PA to see you and your brother... maybe go for a ride! I want to thank both of you in person for your kindness to me, also look over your cool Whizzers. I'm glad you like the mount.
SB