


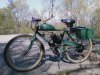
Hello to everyone. i just built my first moto-machine and i'm digging the whole package. the build was like a big ol' pile o' tinker-toys (way fun!), and i enjoyed all the little puzzles of fitment, clearance issues, adjustments, fine-tuning, and problem-solving. okay, maybe i am masochistic. i am at least honest about it! the donor bike is (approx.) 20-year old Diamondback Ascent mt. bike. chromoly steel frame with the long chainstays and laid-back angles of seat and head tube, which was characteristic of mt. bikes back then. i believe these old style frames are perfect for the added stability the frame angles give you at 30+ miles per hour. also the seat and down tubes were a perfect fit for the radii of the motor mounts. heres a few the problems i encountered and my solutions for them.
i noticed right off that all the fasteners were of low-quality. too soft and phillips-head screws are susceptible to getting buggered up. i replaced all these with socket-head cap screws. allen keys make for a much smaller on-board tool kit, anyway, eh? i replaced all the nuts with nylok locknuts, also. now i find far fewer loose fasteners after a long ride.
the only major failure i suffered was when the front bracket on the chain guard cracked, i believe from vibration fatigue. this allowed the guard to tilt in toward the chain. the thin edge came into contact with the bottom run of the chain right behind the counter-sprocket. the thin edge of the guard then caught the clip of the master link, stripping it off the chain. the master link then quickly exited the scene of the crime. the chain then seperated and wrapped itself around the rear axle, effectively locking the rear wheel and i was left to clear the jam and pedal my (now) 50 pound bike home. i fashioned a stronger front bracket by folding a piece of steel (2" x 5/8" x 3/32") around the remainder of the front bracket. i packed it with epoxy to hold it in place. (no welder). i then rolled the front edge of the chain guard out away from the chain. this is working well, and i no longer feel the need to stare down between my legs when i'm going flat-out. this is a good thing.
i noticed during tear-down (between mock-up and final build) that the tunnel of the gas tank had worn down to bare metal. as this would eventually result in gas leaking onto a hot exhaust, i thought it wise to wrap an old piece of inner tube around the top tube of the bike to cushion the tank and provide some protection. this has also worked well, and the tank doesn't slip or move at all as i feared.
on the chain slack adjuster roller thingy i noticed that the chainstay angle didn't allow the roller to be in line with the chain. i bolted the roller bracket to a piece of pipe and was able to give it about a 10 degree twist. now the roller is square with the chain and i think the wear will be a little slower this way.
angling the clutch arm in toward the cable mount resulted in easier effort at the lever.
i bolted a couple of army surplus ammo cans onto my rack for saddle-bags. naturally, i then had to paint the thing military green for a consistent theme! i didn't research the paint, though, and i find the rust-oleum brand i used is blistering from the gas drips. i guess i'll just have to be more careful at filll-ups! any advice on fuel-resistant brands would be welcome here.
i now have about 500 miles on my machine since the final build, and they've been mostly trouble-free. i got my motor kit from bikeberry. the "80" cc in black. its proven to be one sweetheart of a motor, too. it starts easily every time and runs very consistently. when warmed up, it seems to start on the first revolution!
at every stop, i get compliments and lots of questions. lots of thumbs-up from onlookers when i pass by, too.
okay, thats enough typing for now. the sun is shining. time to ride!
Attachments
-
 247.5 KB Views: 410
Last edited by a moderator:

