Cannonball Goes Totally Insane And Buys a CG!

GoldenMotor.com

cannonball2

Well-Known Member
Oct 28, 2010
3,682
221
63
Colonial Coast USA.
Posting this here because this is kinda gonna be a DIY CG. I bought several of these things when they first showed up in the US market and little was known about them. Im sure I must have gotten the worst of the worst as I found them to be miserable(but cute) little monsters and soon eliminated them.
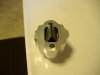
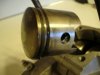
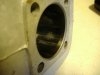
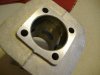
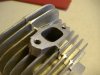
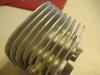
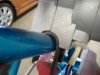
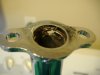
Fast forward 7 years(wow!) and Im willing to gamble these things have improved, and I can work out any kinks. So yesterday I received a 66cc Flying Horse. My fisrt impression was it has improved a bit but the castings are still second rate(or worse). Things were totally assembled and torqued where it mattered and I didn't have a hole in the cylinder like one of the first. Still theres flashing in the ports and the hardware is crappy.

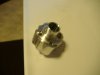
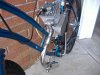
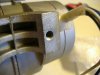
So how to make it my own? I want an engine for reliability(I know thats not a word associated with the CG). So on the critical fasteners I am installing helicoils and SAE hardware and will re-tap the rest likewise. I also bought a reed intake because I want good low end operation. I am targeting a 20- 25mph speed for cruise to stay in the smoothest zone of the band. Bought a 12v output mag. If it will fit I plan on installing a pop up compression release to make starting easier. Im also not opposed to lowering the compression a bit.
Will run the NT carb because they work and its all I need. This engine is going the opposite direction of most CG modding.

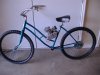
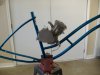
Was gonna install this on my 1953 Scwhinn Meteor frame but it just doesn't fit.
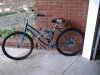
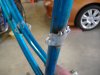
It does however fit my 1970 Western Flyer step thru like a glove, so the build will base around this bike.

Wish me luck!!
 

Attachments

cannonball2

Well-Known Member
Oct 28, 2010
3,682
221
63
Colonial Coast USA.
So delving deeper into the kit I find nothing much has changed. Check the exhaust at the head flange. Doesn't really matter as I probably cant use it as is anyway.

Will weld the mounting U clips to the frame to positively keep the motor in position. Will use a strip of tough leather strap in the front mount(upper only) to take up the space allowed for a bigger frame tube. A lot of folks miss that the mounts must sit square to the frame, other wise it stresses the mounts, studs, and the cases to some degree. These areas will receive Helicoils and 1/4 20 SAE hardware, as well as the head bolts(5/16) and exhaust studs.

Am in the middle of another one of lifes curve balls so the thread may progress slowly, plus still working/riding the Maytag.
 

Attachments

Ludwig II

Well-Known Member
Jul 17, 2012
5,071
783
113
UK
Thinking a bit more, can you shave the bottom of the barrel to lower the ports a bit as well as fit a low comp head, move the "power" down the range?
 

cannonball2

Well-Known Member
Oct 28, 2010
3,682
221
63
Colonial Coast USA.
Could eliminate the base gasket and use a good sealer. That looks like it would lower the jug .010"(sorry for not being raised metric) would that have any effect?
 

Ludwig II

Well-Known Member
Jul 17, 2012
5,071
783
113
UK
Ten thou on a small engine = 1/100"; 1mm =40 thou. What's the stroke? 38mm? I don't see it making any noticeable difference.
 

cannonball2

Well-Known Member
Oct 28, 2010
3,682
221
63
Colonial Coast USA.
Got to work a bit on the Gambler today. Sad fact about using 1/4 helicoils is there is not enough metal around the existing holes to install a coil. So, I re-tapped the 6mm to 1/4 20. The advantage is a bigger bolt by some .020, that allows the tap to completely remove the 6mm threads, not just recut. The major advantage is you can cut deeper threads into the hole. For what ever reason the Chinese only threaded half the stud holes leaving half the threads to the shoulder unused and un-bottomed. This is the biggest reason these studs pull/break. See the pic of the stud, you can see that only the bottom half of the threads was used. I will have almost .5" more thread in the hole than originally.
The Chinese also never cut a lead in chamfer to the bolt hole making it hard to start threads. I cut a lead in and the bolts start very easily.
Last to do is the exhaust, which will be done when the jug is off.
 

Attachments

cannonball2

Well-Known Member
Oct 28, 2010
3,682
221
63
Colonial Coast USA.
Set the engine square in the frame and welded the mounts. Before welding even with the clamps tight you could force the engine out of alignment. With the clamps welded the engine doesnt move. With enough force the frame flexes slightly, so its solid. I hated the way the engine would move out of alignment from pedal starting over time on my first round of the CG experience. The CDI is going to mount under the engine just fine. Am trying to keep the top frame bars totally clean. Will run my "bean can" fuel tank mounted behind the seat.
This frame couldn't have been any better suited for mounting the engine. Whats cool just about any operation short of splitting the cases should be able to be done with the engine in the frame, not that its an issue to remove.
 

Attachments

cannonball2

Well-Known Member
Oct 28, 2010
3,682
221
63
Colonial Coast USA.
Thanks IWW! Hopefully I can finish the engineering/manufacturing of this engine to have a reliable pleasant little power unit. I believe the basics are pretty good, but the devils in the details as they say. Hopefully it will happen.
 

cannonball2

Well-Known Member
Oct 28, 2010
3,682
221
63
Colonial Coast USA.
Got the reed assembly. Its a beautifully made part, by RSE. This one is for 32mm bolt spacing on the intake. They also make 40mm. In theory this should smooth up the lower half of the engines operational band with some sacrifice in the upper end which I could care less about.
While I applaud and am amazed at the hiperf mods that are made to these engines, the reality is they are a cheap means to power a bicycle for the masses and I intend to treat it as such.
After much reading on the proper fuel/ oil mixes for the Maytag and other ancient engines, I have concluded that I will run 30wt ND motor oil in the mix.
This goes against my affection for synthetic oils. What is pointed out in my research is the 2cycle synthetics are made for the newer high rev engines and are quite thin in composition. Granted this is a roller bearing engine(so they promised) I believe the benefits of the basic motor oil will extend longevity, especially to the bore/piston. This engine design comes from the tail end of the ancient era and will benefit being treated as such.
Its known that the motor oil is very sticky/wetting to the parts and stays with them during operation. I have opened many well running little 2strokes running modern oils and they are basically dry looking inside. Obviously the oils are doing their job as the engines run well, but the newest oils have succumbed to the EPA to an extent.
I am aware of the potential coking/carbon issues, but feel its a small thing to clean the upper end occasionally. Probably the ultimate oil for protection might be castor, but boy is it nasty to deal with!
I will let yall know how my thinking works out.
 

Attachments

Last edited:

cannonball2

Well-Known Member
Oct 28, 2010
3,682
221
63
Colonial Coast USA.
Well I knew it wasn't gonna be pretty. Got around to pulling the top end. Just amazing! The engine was test fired, and in the short run the cylinder acquired a nice assortment of vertical scratches from debris in the engine. The pic of the piston(kinda hard to see) shows a flake of metal sitting on the ring, and there were other particles present. The cylinder also has pitting in the bore in several places(pic). The ports are all loaded with flashing that needs to be removed. The base gasket obscures a large % of the transfer ports, and the exhaust gasket does likewise to its port. The rod has quite a bit of side to side rock. It is a full circle ball bearing/needle roller crank on the + side.
This engine comes from a well known seller that I wont mention as they are a supporter here(thanks). Their hype though is they insure the strictest quality control. Whatever.
Its really what I expected and I wasn't disappointed. I view these engines as kind of a bunch of parts with the permission to see if you can make a viable motor out of it.
Don't think Im upset or mad, its actually better than I thought it might be. Just reporting that over the years since I have had hands on with one of these not much has changed in the execution/manufacture. I like a challenge and I think I will have a good runner when its all over. Bathing this little fella in the 30wt ND oil/fuel mix is sounding like a great idea at this point!
 

Attachments

cannonball2

Well-Known Member
Oct 28, 2010
3,682
221
63
Colonial Coast USA.
Got the cylinder processed to my liking. Cleaned the flashing from the ports and chamfered them a bit to ease ring travel. Decked the head on our perfectly plane granite counter top(wifes at work hehe) just enough to insure its perfectly flat, it wasn't. Did likewise to the intake/ext ports. Filed the cylinder fins flat removing the badly cast outer part. Looks more finished now. Cut the cylinder stud threads to 5/16. Will make a set of studs. 2 of the 4 original studs were bent making it difficult to remove the jug with out removing the studs first. Flushed the crankcase. Its now ready to reassemble.
The base gasket fits better when its not on backwards. Guess people just dont know or don't look at what they are doing.
 

Attachments

cannonball2

Well-Known Member
Oct 28, 2010
3,682
221
63
Colonial Coast USA.
Got a great deal of work done on the build. The pic doesn't tell the whole story. This thing is made from left overs from other builds, guess I should call it Scraps. Front wheel and the tires are from a MB, the rear wheel was laced from stuff found in the parts pile as was the frame.
I have been through the engine to my satisfaction. All the hardware(with the exception of the case cross bolts) has been re-tapped to SAE and socket head screws used. The cylinder studs are 5/16-18 red Loctited into the case and tightened on to hardened washers by the popular threaded rod coupling nuts. I decked the cylinder and the heads sealing band the minimal to insure they were plane. I don't want to raise the compression. I torqued the head to 144 in/lbs. 25 at a time in a cross pattern.
A thought on the design of this head. These seem problematic judging by the problems seen here on the forum. Its critical to note this head seals by embedding the raised sealing band/ring into the solid aluminum head gasket. The cylinder surface and the heads band must be perfectly plane. The head must be tightened carefully and evenly a small bit at a time as the forces are bearing on the band. Its not like a head that is totally flat and will tolerate initial uneven tightening forces. I imagine its very easy to warp this head by uneven tightening. This brings to point that I bet a small percentage of owners posses an in/lb. torque wrench. Its a must to get this right.
Also the Chinese have set the stage for failure using the hardware they do. Using acorn nuts and LOCK WASHERS!!. I have never seen a lock washer under a head bolt/nut. Always a flat washer, usually hardened. If the proper torque was achieved upon assembly with the prone to bottom acorn nuts then squirmy lock washers wont hold it long.
We will see if my thoughts are correct as there is no sealer used in the head/cylinder joint. I will of course re-torque after a heat cycle. Lets see what happens.
This build is really a test bed for the CG engine to see if I can live with it. I also want a simple lightweight bike to carry on my cars bike rack into the S. Ga. back country for some riding solitude. Its gotta be reliable!
 

Attachments

Last edited:

MotorBicycleRacing

Well-Known Member
Jul 28, 2010
5,844
109
63
SoCal Baby!!!
www.facebook.com
Well I knew it wasn't gonna be pretty. Got around to pulling the top end. Just amazing! The engine was test fired, and in the short run the cylinder acquired a nice assortment of vertical scratches from debris in the engine. The pic of the piston(kinda hard to see) shows a flake of metal sitting on the ring, and there were other particles present. The cylinder also has pitting in the bore in several places(pic). The ports are all loaded with flashing that needs to be removed. The base gasket obscures a large % of the transfer ports, and the exhaust gasket does likewise to its port. The rod has quite a bit of side to side rock. It is a full circle ball bearing/needle roller crank on the + side.

This engine comes from a well known seller that I wont mention as they are a supporter here(thanks). Their hype though is they insure the strictest quality control. Whatever.

Its really what I expected and I wasn't disappointed. I view these engines as kind of a bunch of parts with the permission to see if you can make a viable motor out of it.
Don't think Im upset or mad, its actually better than I thought it might be. Just reporting that over the years since I have had hands on with one of these not much has changed in the execution/manufacture. I like a challenge and I think I will have a good runner when its all over. Bathing this little fella in the 30wt ND oil/fuel mix is sounding like a great idea at this point!
Was that one of those Made in the USA motors? :D

I assemble and quality control my motors and I have to scrap some cylinders
because of bad chrome, bubbles, etc.
Occasionally I part out a motor because it has assembly problems.
You gotta check to catch everything,even little stuff like a key stuck to the magnet.
 

cannonball2

Well-Known Member
Oct 28, 2010
3,682
221
63
Colonial Coast USA.
No MBR another vendor.
I found a vendor offering a build it yourself engine that is totally unassembled. That would save the time of disassembly but theres no promise the parts are any better, could be worse!
The thing I cant figure is how the disposable hand held equipment from China manufactures is of such better quality and costs less. I can only assume the US companies that are selling/distributing the products have quality control staff on site. The little $79 trimmers and blowers are pretty trouble free at least mine have been. I converted several for R/C use and found them pretty well made for the price. Id be happy to have a CG made to the same standards.
 

cannonball2

Well-Known Member
Oct 28, 2010
3,682
221
63
Colonial Coast USA.
More progress. Its basically done except Im missing two chains and bottom bracket parts, thought I had one more set. This thing wasn't content til it had a custom fabbed exhaust. The extra bottom tube on the step thru conflicts with the stock exhaust. Good thing is the muffler/smoke/noise is much closer to the ground. Made a swoopy mount for my bean can tank from a bracket from an old fireplace andiron, never throw away metal! This thing better run good!
 

Attachments

Citi-sporter

Active Member
Jun 16, 2014
206
43
28
North Bend, Or,
Subscribed, ( and where is the riding the motorized bike while eating pop-corn smilie?..)

I like where this build is going, as I too have plans for a alternate CG bike engine conversion. I guess this means I'm gonna go insane with you.

Coupla thoughts on this: Could a largish chainsaw pumper carb be used with the reed valve assembly? It seems that your tank position could possibly cause lack of gas to the carburetor on steep hills with low fuel levels. The reed block looks like it's designed for the NT clamp-on carb though, so probably not. I'm looking into doing a shift kit of sorts with my CG build, and the reducing the power levels so I can link it through a vintage Sturmey-Archer 3 speed hub.