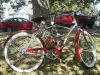
Last month I was invited to a friend of mines (three-wire) house for a summers end BBQ and while I was there I noticed that he was putting together one of these MotorBikes. After one look at the project I new I had to build one myself. I ordered my Grubee Gt5 kit that Monday and bought my Cranbrook on Wednesday of the same week. Because of the person I am I didn't want my bike to look like anybody else’s Cranbrook so I decided to do a bit of paint work. I think the colors turned out looking pretty good.
On to my build:
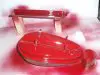
Stripping the bike down and painting
I started by stripping the bike down and wet sanding (scuffing) the parts I would be painting. I decided to raise the handle bars up so I wouldn't be hitting them with my knees. Painting the parts was easy but time consuming. I decided to use put a couple extra coats of clear enamel over the paint for a bit more protection.
What to do with that dust guard
While the paint was drying I built the rear wheel. I have a coaster break and ran into the same problem most have with the dust guard. Instead of opening up the hole on the sprocket, I just ground down the dust guard so it would fit in the sprocket.
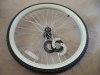
Putting the sprocket on the rear wheel
Putting the sprocket on the rear wheel was probably the toughest part of the project. Took me about 4hours in total by the time I got everything tighten up, lined up, and squared up. I then took it all apart again and lost the flat washers but kept the split (lock) washers.
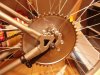
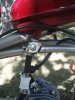
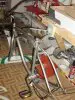
Installing the motor and making a motor mount
Once the rear wheel was built and the paint dry I could now put the motor on the bike. This proved a bit tough. I didn't like the way they told me mount the front lugs by drilling a single hole through the frame so I made my own front engine mount using a piece of 1/4inch steel and a muffler bracket I picked up at the local automotive store. Took me about 45 minutes to cut, drill and make sure everything lined up correctly. Once it all squared up I took it back off the bike and painted it.
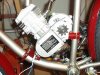
The peripherals
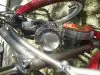
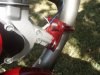
Next I installed the throttle cable, clutch cable and brake cables. I have both front and rear brakes on my bike along with the coaster break. I have plenty of stopping power which I like the thought of. I figured if I would be doing 30+mph I would need at least that much stopping power.
I ordered a dual break throttle set up when I ordered the engine kit. I like the set up a lot and was able to adjust the break pressures to the front and rear breaks mechanically.
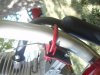
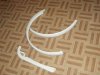
Now that all the peripherals were on the bike I could put the fenders, chain guard and front wheel back on the bike. I was really happy to see the bike start to look like a bike again.
Installing the Chain and idler pulley
This was a bit tough, but not as tough as I thought it would be. I decided to use the chain idler so that as the chain wore out I could tighten it back up. I read a thread about a guy who had his rear wheel destroyed by his chain idler pull slipping and going into the spokes. That terrified that S_it out of me so I decided to just drill a hole through the whole assembly and frame to put a bolt and nut though that hole. I don't think it will slip into my spokes now. After cutting the chain to length there was very little adjusting needed. The chain does rub my finder so I believe I will have to grind away some of my fender. I'm not happy about it, but I will feel safer not having the chain rub the fender at 1000rpm.
Gas TankPutting the gas tank on was a bit of trouble. I soon found out that my tank would not fit on the bike due to the fuel valve hitting the two small chassis tubes. I first tried drilling a hole though the tube but the valve was to long so I just cut 1.5inches out of the frame so the valve and gas take would fit correctly. I'm not sure if this was the best idea or not.
Let’s go riding
Per the instructions I mixed my fuel (91octane) at 16:1. Filled the gas tank up 1/2 way and started peddling. I peddled that bike up and down my street 3time before giving up, changing the spark plug and making sure my kill switch was wired right. After all that I tried again and nothing. With the help of a few good guys from this site I learned that 16:1 is just too much oil to gas and that I needed to go to a 24:1 fuel oil mixture. I remixed my fuel to that mixture and it fired up in 40 feet. I will burn a gallon at this ratio then move on to 50:1 using synthetic 2cycle oil.
Finishing up
The last thing I need to do is work with the idle. The engine won't idle worth a darn. All in all I really enjoyed the 2week build. It was something different to do and it challenged me a few times. I'm considering building a bike for my wife, but I think I'll let her ride mine first before I make the investment. I think I'm going to build a mini-bike next. Always wanted one a kid, but never was able to have one. I forgot to mention that I will be adding a set of 13.5inch hanger handle bars next week. I really look forward to those!!!!! Maybe even a layed back seat post.
Pictures
On to my build:
Stripping the bike down and painting
I started by stripping the bike down and wet sanding (scuffing) the parts I would be painting. I decided to raise the handle bars up so I wouldn't be hitting them with my knees. Painting the parts was easy but time consuming. I decided to use put a couple extra coats of clear enamel over the paint for a bit more protection.
What to do with that dust guard
While the paint was drying I built the rear wheel. I have a coaster break and ran into the same problem most have with the dust guard. Instead of opening up the hole on the sprocket, I just ground down the dust guard so it would fit in the sprocket.
Putting the sprocket on the rear wheel
Putting the sprocket on the rear wheel was probably the toughest part of the project. Took me about 4hours in total by the time I got everything tighten up, lined up, and squared up. I then took it all apart again and lost the flat washers but kept the split (lock) washers.
Installing the motor and making a motor mount
Once the rear wheel was built and the paint dry I could now put the motor on the bike. This proved a bit tough. I didn't like the way they told me mount the front lugs by drilling a single hole through the frame so I made my own front engine mount using a piece of 1/4inch steel and a muffler bracket I picked up at the local automotive store. Took me about 45 minutes to cut, drill and make sure everything lined up correctly. Once it all squared up I took it back off the bike and painted it.
The peripherals
Next I installed the throttle cable, clutch cable and brake cables. I have both front and rear brakes on my bike along with the coaster break. I have plenty of stopping power which I like the thought of. I figured if I would be doing 30+mph I would need at least that much stopping power.
I ordered a dual break throttle set up when I ordered the engine kit. I like the set up a lot and was able to adjust the break pressures to the front and rear breaks mechanically.
Now that all the peripherals were on the bike I could put the fenders, chain guard and front wheel back on the bike. I was really happy to see the bike start to look like a bike again.
Installing the Chain and idler pulley
This was a bit tough, but not as tough as I thought it would be. I decided to use the chain idler so that as the chain wore out I could tighten it back up. I read a thread about a guy who had his rear wheel destroyed by his chain idler pull slipping and going into the spokes. That terrified that S_it out of me so I decided to just drill a hole through the whole assembly and frame to put a bolt and nut though that hole. I don't think it will slip into my spokes now. After cutting the chain to length there was very little adjusting needed. The chain does rub my finder so I believe I will have to grind away some of my fender. I'm not happy about it, but I will feel safer not having the chain rub the fender at 1000rpm.
Gas TankPutting the gas tank on was a bit of trouble. I soon found out that my tank would not fit on the bike due to the fuel valve hitting the two small chassis tubes. I first tried drilling a hole though the tube but the valve was to long so I just cut 1.5inches out of the frame so the valve and gas take would fit correctly. I'm not sure if this was the best idea or not.
Let’s go riding
Per the instructions I mixed my fuel (91octane) at 16:1. Filled the gas tank up 1/2 way and started peddling. I peddled that bike up and down my street 3time before giving up, changing the spark plug and making sure my kill switch was wired right. After all that I tried again and nothing. With the help of a few good guys from this site I learned that 16:1 is just too much oil to gas and that I needed to go to a 24:1 fuel oil mixture. I remixed my fuel to that mixture and it fired up in 40 feet. I will burn a gallon at this ratio then move on to 50:1 using synthetic 2cycle oil.
Finishing up
The last thing I need to do is work with the idle. The engine won't idle worth a darn. All in all I really enjoyed the 2week build. It was something different to do and it challenged me a few times. I'm considering building a bike for my wife, but I think I'll let her ride mine first before I make the investment. I think I'm going to build a mini-bike next. Always wanted one a kid, but never was able to have one. I forgot to mention that I will be adding a set of 13.5inch hanger handle bars next week. I really look forward to those!!!!! Maybe even a layed back seat post.
Pictures
Attachments
-
 52.9 KB Views: 454
 -
 39.9 KB Views: 313
 -
 37 KB Views: 320
 -
 39.1 KB Views: 328
 -
 30.7 KB Views: 320
Last edited: