2nd build - Older Worksman

GoldenMotor.com

WaterDries

New Member
Apr 5, 2011
23
0
0
Utah
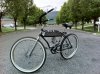
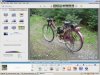
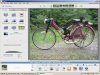
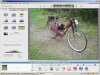
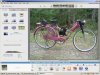
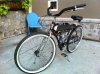
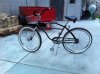
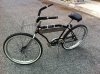
I'm getting started on my second build. I found a worksman in good condition in the local classifieds. Took all the hubs apart and cleaned/regreased them. They roll great and don't have any play in them.

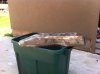
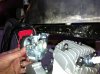
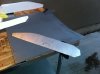
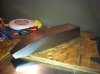
I have a new motor that came in last Saturday and have been building a tank. I don't have any experience welding but am getting better fast. I need to seal it but am not sure how large of pinholes some of the tank liners can fill. I tend to burn larger holes trying to fill smaller ones. Right now the pinholes I have are quite small. I made the filler and petcock out of brass plumbing parts soldered in after welding. Looks pretty good for an amateur.

The biggest thing I learned building the tank are get it to fit tight before starting.

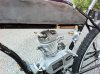
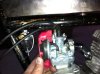
Next step is figure out how to mount the motor and get a bolt on sprocket. I would also love to put internally routed throttle but may wait on that one.
 

Attachments

WaterDries

New Member
Apr 5, 2011
23
0
0
Utah
Thanks guys. I do like how it turned out. It isn't ready for gas just yet. I'm going to get it all sealed up this week and hopfully can get it fuel proof.

Tinsmith - I was thankful for your extensive documenting of your tanks. That helped immensely. I'm sure the next time I make a tank it will take much less time and be easier. The only was to get better at welding is to weld. I have another project that I'm going to have to weld and I'm looking forward to it now rather than fearing it.
 

Tinsmith

Well-Known Member
May 15, 2009
1,056
259
83
Maryland
Water, I welded up my first tank a little while back and had a few small leaks. My soldering abilities are much better. It's good that the tank building thread helped, and you have the famed "Motorbike Documentarian" Silverbear to thank for that. I can't even download pics off the camera let alone post them without help. SB's desire to show others how things can be done has benefitted us all over the past couple years. Good luck with your next project. Dan
 

silverbear

The Boy Who Never Grew Up
Jul 9, 2009
8,325
670
113
northeastern Minnesota
Dan,
Thanks for your nice comments, my friend.
Water,
What a nice looking tank you made. Makes me wish I could weld. And that's your first? Awesome!
SB
 

Allen_Wrench

Resident Mad Scientist
Feb 6, 2010
2,784
26
36
Indianapolis
That's his first tank? Holy crud! That's good for a first anything. I'm inspired. Next income tax refund I'm gonna get an inexpensive welding outfit and teach myself to weld. If I get any better at it, I'll upgrade the equipment. Then I might make something. I don't know why I've waited so long. Actually, yes I do - it's not cheap. But, with an income tax refund, it should be feasible.
 

WaterDries

New Member
Apr 5, 2011
23
0
0
Utah
It took plenty of trial and error. I know I would weld, grind, weld, grind, weld, grind etc. but I think it was worth it. I just picked up my welder second hand in the local classifieds. I've been watching them and it only takes a few minutes for someone to snatch them up. Just last week there was a lower power Lincoln mig with gas fittings for $50! I called within 5 minutes and it was gone.

Having all of the photos really helped me feel like I could do it. Once I started cutting with my little jigsaw I realized I could do this. Another thing I learned: ear protection when grinding. That bugger is loud. My neighbors must love me.
 

WaterDries

New Member
Apr 5, 2011
23
0
0
Utah
I put the tank liner in tonight. It's drying right now and I'll put another coat in it when I wake up. It was a messy process but I think it might just work!

When I filled the tank with soapy water for step one it ran out like crazy. I knew I had holes but not that many! It looked like an upside down fountain. I filled it with the acid etch suspended in a giant rubbermaid container after adding tape to the seams. The instructions said it wouldn't do anything and they were right. I was able to keep it on for about 4 hours. Refilling the acid occasionally. Added the part b drying solution and then the liner. It was much thicker and seems to have filled in the holes nicely. Took the tape off part way through and the outside of my tank is going to need a good polishing. It was etched nicely and coated with some of the liner. I'm optimistic that it might turn out fine. Can't wait to see what happens.
 

WaterDries

New Member
Apr 5, 2011
23
0
0
Utah
Got a little more done today. Two steps forward but have another step back.

For the forward I got the tank all cleaned up and mounted. I think the liner will work great. It is airtight now. I used the Kreem kit and still have enough to seal at least one more tank if I ever build another one.

I also figured out some options for the tank outlet. I made the mistake of putting the fitting too far forward. I was afraid it would run into the frame where the tank tapers and of course it hit right where the cylinder head is highest. I added a few elbows and with different pipe nipples I can put it just about anywhere I want.

The motor fits in the frame but it's tight. When I went to put the carb on I found there just isn't any room. The linkages on the top are obstructed by the lower horizontal bar and tank. I'm wondering if I could make a new intake that angled up and out to the side enough for the carb to clear? Will I be creating more problems by extending it? Here are a few pictures from today. I know the carb cover is busted. I have a replacement but haven't put it on. Not sure if I am going to do something different yet.
 

Attachments

silverbear

The Boy Who Never Grew Up
Jul 9, 2009
8,325
670
113
northeastern Minnesota
Water,
Your bike is coming along nicely. I had the same problem fitting a PK-80 engine into my Worksman NB frame last summer. While I like the way the frame looks, there's very little real estate for a motor. I ended up getting an offset intake from I think it was Spooky Tooth for around ten bucks. Someone else may have them. It is like a Z shape (roughly) and worked fine. Below are some screenshots I took of my Velocipede while fitting it up. You can see how the intake jags around next to the seat post. At first it looks odd, but then you get used to it. It will allow me to set the engine as low as possible which will give me a slot to slide my foot through the frame while mounting the bike. The air cleaner, by the way, comes from Sick Bike Parts. I hope this helps.
SB
 

Attachments

darkhawk22

New Member
Aug 17, 2010
733
8
0
Acworth, GA
If you can't find the offset intake let me know. I have one that wouldn't work on my bike and I would be willing to sell, just shoot me a PM. Build looks good so far!
 

WaterDries

New Member
Apr 5, 2011
23
0
0
Utah
It's been a little while but I had a good weekend.

I spent the past week or 2 fighting the carb on this. It's the CNS2 and I've looked up everything I could and was determined to figure it out. I ended up putting the old NT carb from my other bike on to make sure it would even run. Purred like a kitten with that one. I still wanted to get the CNS to work and drilled, sealed, tightened and everything else but still wasn't having much luck. In the end I probably overdrilled the jet but I can fix that. It was so frustrating but I found a thread (can't remember which one) that mentioned the float. I was bogging with WOT no matter what and finally adjusted the float to fill the carb a little bit more and it is working now! Still sitting on my first bike but still working. I wish I would have checked the float first. Hindsight.

After putting all the copper fuel line and sediment bowl back on the worksman I took it down to our little city celebration on Saturday. I was putting around and getting tons of thumbs up. Even waves and looks from the police but it doesn't go fast and I shut it down and pedal powered when around all the crowds. Had to run home and make a quick weld on the motor mounts and fix a fuel drip. When I returned downtown I stopped at the car show and parked it next to a 1928 Model A Ford while I went to the candy shop with my daughter. When we came back people were standing around it asking questions. Got lots of compliments. One guy said he hadn't seen one of these in decades and asked how long it took me to restore it! It was great.

This is so much fun! I wish I had taken a few photos at the car show. Here is one of the later ones I have.
 

Attachments

harry76

Well-Known Member
Apr 16, 2011
2,557
47
48
Brisbane, Australia
Congratulations Waterdries, looking good and its good to see its a hit at the carshow. Im really loving your tank. You did a really good job..... what you building next? CMon you know you wanna.... lol, these things are addictive!!!!

I noticed you said you had enough tank liner to do another tank, you may wanna check that with the directions. I was led to believe that once you open the container for the sealer you MUST use it all as it starts to go off...... Is this true? Does anyone know if you seal it back up, can you reuse it? Anyone know?????????
 

WaterDries

New Member
Apr 5, 2011
23
0
0
Utah
Harry. So true. It's like you are a mind reader. My next one might be a 4-stroker. I wish we had the variety of engines in my area like you do. I would love an old motor brought back to life. I may cut up bike #1 and stretch the frame. I already have 20 feet of 1" tubing waiting for the right idea to come.

I saw someone selling 4 bikes and 2 motors today for $450 about 60 miles away. Had to tell myself that it's ok not to have them myself right now.

Thanks for the compliments on the tank. It really does look nice. It's the thing that people see first. I'm not sure how long the sealer will work. It may have a skin on it but below that it should be fine. The air was what was drying it out. I think the unused portions of the acid and alcohol should be fine.
 

harry76

Well-Known Member
Apr 16, 2011
2,557
47
48
Brisbane, Australia
Yeah the other 2 solutions are meant to be ok, but the sealer is not meant to be used again.... id really like to know if you can reuse the sealer.... id hate for you to build another tank only to have the sealer not work, and that would cause a whole lot of issues. You may well be right, and maybe you can reuse it, im not sure.......... Anyone actually done it and it was fine?
 

WaterDries

New Member
Apr 5, 2011
23
0
0
Utah
I think it should be OK. The instruction say to pour off the excess back into the bottle for later use. I would love to try again but I need a frame to build the tank to. I was eyeing my first bike tonight thinking about getting out the grinder and cutting it up. Now that I have the idea I'm sure it will happen sometime soon. They are never done. Just waiting for the next step in the transformation.