Excalibur ‘09

GoldenMotor.com

Mr.B.

Well-Known Member
Oct 21, 2008
1,329
559
113
Upper Mississippi River valley
10-28-10 IMPOSSIBLE RUST

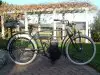
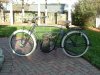
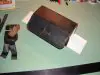
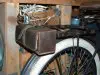
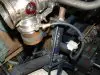
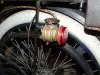
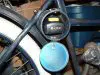
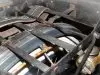
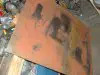
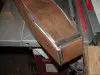
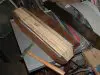
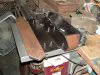
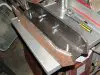
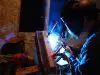
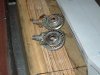
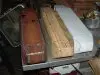
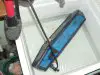
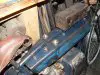
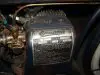
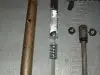
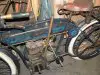
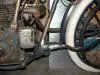
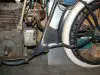
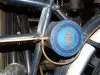
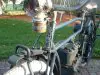
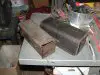
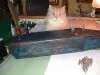
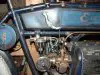
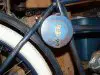
I painted covers for the battery box, added the small badge logo and made them to look rusty and crusty (they’re aluminum duct caps).

Also added a retainer strap so it looks like the box is clamped to the rear stays.
 

Attachments

  • Like
Reactions: Tom from Rubicon

Mr.B.

Well-Known Member
Oct 21, 2008
1,329
559
113
Upper Mississippi River valley
10-31-10 PICS

Outside photo shoot today...

A newer exhaust system with the original crusty muffler that came with the motor has been finished.

Front fender & stays are finished.

And a new dark gray foam air filter, it doesn’t show as much as the previous lime green one did since I decided to remove the old drain cover.

The new white “Dura” brand tires are an Ebay find.

These replace some white Kenda’s, even though both sets were labeled 26 x 2.125 the Dura’s have a nicer, larger profile.

Perhaps the Kenda’s will be used for a Excalibur ‘03 someday!

Happy Halloween!
 

Attachments

Mr.B.

Well-Known Member
Oct 21, 2008
1,329
559
113
Upper Mississippi River valley
2-27-11 HEADLIGHT

Finished modernizing my antique Solar headlight.

I used a 12v “GX5.3” LED sealed beam replacement bulb for a tungsten house lamp and a home made holder created from a old chain link fence post cap.

I found the proper 2 pin socket on line and attached strips of brass to bend over the front of the bulb and simply hold it in place.

A hardware store lamp switch was put where the Solar’s reservoir cap originally was. (knob to be covered with a brass tube later)

All wires connecting it to the battery box are hidden in a rubber hose & brass tube to appear to just be an old gas system.

The rubber hose is actually a heavy cord from a old dead power tool-

Ha, easy, it came with nice wires already inside :)

OK, so Solar's were originally self contained, but still I think it has a believable antique feel to it...
 

Attachments

Mr.B.

Well-Known Member
Oct 21, 2008
1,329
559
113
Upper Mississippi River valley
3-6-11 NEW TAILLIGHT, YES

New Taillight:

I wasn’t happy with using a miners helmet lamp for a taillight because, well...

It still looked like a miners lamp...*

For the actual light I’m using a semi-truck LED side marker- Bicycle Bill’s idea from way back.

Considered using another fence post cap to replicate some cool little aluminum Indian re-pop's I saw at the Davenport show, or parts from a Ebay antique flashlight find, and even parts from a antique toilet flush valve.

I finally just decided to reconfigure the miners lamp. The little cupola was made from parts from the old junk box. I’m not sure what the decorative button topper was originally used for, but it’s old (1901 pat. date) & nickel plated.

Experimented with 12v, 14.4v and 18v portable drill batteries.

The 14.4 was a little weak and the 12 wouldn't even light all of the taillight LED’s. The 18v works well, but is is probably a little too hot.

Oh well, they’re very bright... in fact the headlight is “hurts you in your eyes” bright!!!*

Funny thing about the 18V battery though, I have to press the charge level tester button before it will work...?

Kind of negates the off/on switch since l have to open the battery box cover. Weird.

Added a little brass clip to the rear fender stay to help secure the brass tubing.
 

Attachments

Mr.B.

Well-Known Member
Oct 21, 2008
1,329
559
113
Upper Mississippi River valley
3-14-11 BUNGS OF BRASS

For the gas tank bungs I’ve cut up old nickel plated brass bath tub faucet.

The “caps” have a nice shape and I’ll fill the holes with stainless carriage bolts. One side will be drilled for a vent.

I decided to cut a step into the “filler tube” side so I could easily solder it into a hole in the tank later.

I had a cutting blade but no lathe so I jury rigged my own using a drill & vise. I used a locking pliers to hold the blade and a chunk of tube to steady it while I made the cut.

Pretty sure this trick wouldn’t work for precision steel cutting! Ha!
 

Attachments

  • Like
Reactions: Tom from Rubicon

Mr.B.

Well-Known Member
Oct 21, 2008
1,329
559
113
Upper Mississippi River valley
3-25-11 BUCK

Today I finally built a wooden buck for forming the gas tank.

I added a small radius all along the outside edges.

I just couldn’t help but to set in the frame for a quick look-see... Ha!

The little knob on top is a old snare drum part and is meant to look like a through-the-top gas shut off valve, or perhaps a mechanical oil pressure pump that a lot of antique motorcycles used.
 

Attachments

Mr.B.

Well-Known Member
Oct 21, 2008
1,329
559
113
Upper Mississippi River valley
5-11-11 GAS TANK

Finally I’ve finished the long awaited gas tank fabrication!

In order to keep the old rusty theme going I’m using actual rusty 20g sheet metal. However, the inside surfaces were thoroughly sanded bare!

It’s made in 4 carefully cut parts, a top & bottom, and 2 sides.

The sides wrap around the edges of the buck about 3/4 of inch, this was done by carefully hammering them over the radius.

Not hard to do but surprisingly slow to get them smooth & flush. A lot of back & fourth passes!

To get the sides to stay in place I drilled two holes in each and secured with screws. To be filled with weld later.

The top & bottom pieces simply overlay the edges of the sides.

Small wood screws were driven into the overlapped areas and will be used to later reassemble all the parts for indexed square and true welding.

All the necessary holes were then drilled.

Bosses for the tank straps and other attachments are rod connector nuts held in place with screws from the outside and the opposite ends welded shut.

I’ve made a careful guess for the left side shift gate location, but since I haven’t actually designed the final drivetrian yet this may be a risk?

Now awaiting welding.

This is a milestone step!

I also reworked a double gear speedometer driver into a single. This will work better with the rockers and having the brake lever on the left side.
 

Attachments

Mr.B.

Well-Known Member
Oct 21, 2008
1,329
559
113
Upper Mississippi River valley
5-16-11 TANKED

Today Big J welded the tank,

Yea!

Here’s a picture of him at work!

This thin metal was a bit of a challenge to weld and we got a little bit of warpage in the larger flat areas.

But because of my barn found aesthetic I’m actually quite pleased with this happy accident!

However in the future if I want a perfect tank I will have to use a heavier gauge metal.

Also welded the speedometer driver and a chainring made from early 10 speed front cluster.

Another big day!
 

Attachments

Mr.B.

Well-Known Member
Oct 21, 2008
1,329
559
113
Upper Mississippi River valley
5-20-11 GRINDING IT OUT

Finished grinding the tank welds smooth today and did a leak test by plugging the holes and pumping it full of air via a sports ball needle through a cork plug.

Submerged it in a utility sink and I’ve got major bubbles. :-(

Apparently I’ve ground a little to close to the seam along the top upper right-hand corner.

I think I’ll use a tank sealing epoxy system but I better have a new bead of weld run on that corner anyway.
 

Mr.B.

Well-Known Member
Oct 21, 2008
1,329
559
113
Upper Mississippi River valley
5-30-11 FIXED

Big J welded the tank corner today and unlike his usual very fine looking “stacked coins” bead he laid it on plenty thick in regards of my recent grinding skills.

He was then embarrassed to learn I intend to leave it un-ground for the looks of a ancient repair one might actually find on a 100 year old tank.

Sorry J!

Ordered some tank sealer today, a product named “Kreem”.
 
  • Like
Reactions: Tom from Rubicon

Mr.B.

Well-Known Member
Oct 21, 2008
1,329
559
113
Upper Mississippi River valley
6-27-11 BRIAN STORM

Bicycle Bill stopped over tonight for the first time in awhile.

I pointed out that I thought the big red Wisconsin on the engine shroud clashed with the Excalibur logo on the tank. And he agreed

He suggested adding a thin aluminum plate that folds over Wisconsin’s existing spec plate and adding a Excalibur logo to that...

Genius!
 
  • Like
Reactions: Tom from Rubicon

Mr.B.

Well-Known Member
Oct 21, 2008
1,329
559
113
Upper Mississippi River valley
7-30-11 LEVERAGE

I’ve fabbed a clutch lever (slip belt) with push button release and cut a ratchet gate.

In my wife’s aunt’s garage I found a perfectly rusted tube with a crimped and drilled bottom end already included.

I think it may of been part of a children's swing set at one time?

I reinforced the area below the spring by pounding a oak dowel into it.

Started the linkage to nowhere too.
 

Attachments

  • Like
Reactions: Tom from Rubicon