


First of all, this forum freaking rocks. Before even joining i've been able to get to the bottom of several problems and questions i've had. For now my bike is running great. I'm not quite through my 2nd gallon of fuel yet, so i'm running 24:1 and as far as my plug looks it's about just right for now. I'll probably try to go more lean after this gallon. I've been topping out at about 22mph. I have had a couple times where all of the sudden the compression (or something) fell into place and the rpm's dropped while going the same speed and i all of the sudden moved up to 26-27mph but as soon as i'd slow down, i'd top back out at 22. I'm assuming everything will seal and fall into place over time.
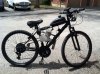
I got the 66cc Flying Horse engine from bikeberry (i won't go through them again, but i'm up and running now so its all good). I decided to upgrade to the nt speed carb with the red filter cap, which i painted black, just because. lol. i also put an extension on the intake to add a little low end power, and so i could fit it on my bike. I'm using the stock crappy tensioner but i drilled a hole through the grip and the frame and put a bolt through it so it doesn't move. I'm still thinking I may mod it and add a spring to it sits tighter after starting up. hmmm, what else? I made my own gaskets on everything except the head gasket and intake gasket, i just put a light layer of high-temp permatex (red) on those toreenforce them and to make up for the imperfections on how the engine was cut. I know the red stuff is 'not to be mixed with gas' but i read a couple places that people have had some luck with it staying in tact on a two stroke because it's not 100% gas, time will tell if that's true. I switched out the plug for a BH6S, which is much better then the stock plug. i cut and rethreaded the plug cable. i got rid of the little wire clamps and twisted, soldered and heat shrinked the cdi to mag wires. I put a few layers of soundproofing material around the frame where the engine mounts, which reduced that butt-liquifying, hand-numbing vibration by probably 70-80%. One of the best things i've done so far. AND I painted my entire bike and gas tank satin black, because its awesome. lol
Let me know what you think! I'm looking forward to joining you all the endless pursuit for MORE POWER!!
Peace,
FoCoMoTo
Attachments
-
 147 KB Views: 337
 ing is a great option if you can, but my advice would be to get rid of it, if you can and go straight chain...and from ur pic it definitely looks like you could stand to lose a link or two...goods luck and as 2door said, theres lots of denver guys, and theyre mostly great builders
")