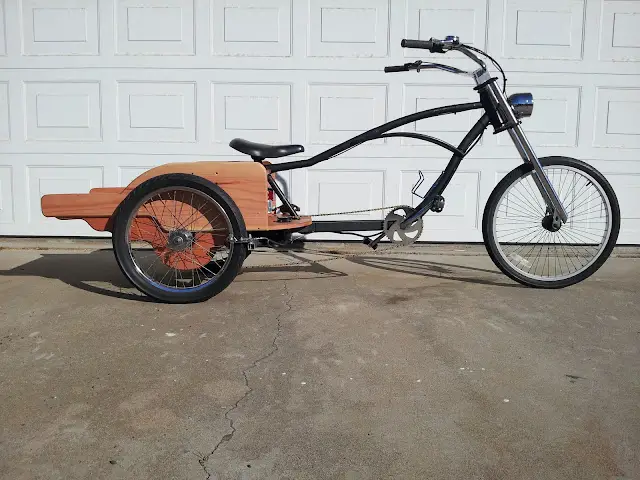
My 1st bike/trike/moped project ever

GoldenMotor.com

vsavoldi

New Member
Jul 24, 2012
78
0
0
Monterey Bay California
Thanks for the information and the links! I am off to go read a bunch..

Here's a copy of my specs from an earlier message... Edits/changes are italicized .

36v 750w Motor - from Ebay http://www.ebay.com/itm/26106290873...NX:IT&_trksid=p3984.m1439.l2649#ht_500wt_1414 I am not sure if it is brushed or brushless.
Controller from http://www.electricscooterparts.com/ Item # SPD-36750A
Throttle from http://www.electricscooterparts.com/ Item # THR-68
Batteries are 35ah SLA in Series.
30a breaker on 36v+
50a Key Switch on 36v-

12v+ lead coming off of one of the batteries to power 12v lighting.
15a fuse on 12v+
12V- Shares 36V- ground battery and key
 

zabac70

New Member
Mar 17, 2010
204
0
0
54
Belgrade , Serbia
I would say brushed , because of the number of the pins in the connector... Brushless had to have more pins to controller (usually five) , because of hall sensors (one for each phase) . Also , seller mentioned that it can serve as windmill generator , which also lead me to brushed version conclusion (I don't see a port for external excitation , which is needed if it isn't brushed motor) . Basically , it's easy enough to find out what type the motor is: if it has removable posts for the brushes, or one side is easily removable (to change brushes when spent) - it is brushed motor. Otherwise - it's a brushless one (it's hard to tell from the picture and there is no description about it , accept mechanical parts and dimensions). Price also tells that it is a brushed one. The only thing that is of any importance - seller wrote that it can endure 24 Amps continuous (torque isn't mentioned anywhere) , so now we know that motor pulls much more (continuously) than your controller is capable to offer (15 Amps at best , they say 30 Amps peak , and the motor probably pulls 50-60 Amps peak).
Before I pile up some more technical data on you , you'll need to explore some more , and get back here with some conclusion (if any) , regarding your setup. However , I'm fairly confident that you'll achieve good performance (well, satisfactory at least) only with different controller and with one more battery in series (48 V system). You can keep the motor (tough - not the best choice) and it doesn't mind overvolting (to 48 V) , as long as you keep continuous current at 24 Amps (peak up to 50 Amps , not more than 30-45 seconds - when starting from a dead stop) , which can be achieved with smart controller (i.e. Kelly). See what Kelly offers in terms of motors and batteries (it is just an example - by no means I'm saying that you need or have to buy any product from Kelly - just use it to compare with others - price wise and technical data included in offers).
 

vsavoldi

New Member
Jul 24, 2012
78
0
0
Monterey Bay California
Yes I have confirmed it is a brushed motor.

The final parts for my jackshaft should show up tomorrow so I can really start nailing down the design and layout.


I have been scouring and have come up with a controller that I believe will work for me once I get the gearing sorted out. And that is presuming I would still need a new controller with proper gearing.

http://kellycontroller.com/kds36100100a24v-36v-mini-brushed-controller-p-269.html I had a nice email conversation with a Fany from Kelly Controllers and was recommended the one above since I do not want or need reversing. The part that surprised me the most was they recommended the low cost version. It's possible that I may upgrade to the better quality versions if/when I need it.


A question for your electric pros... What gauge wire should I use? There would most likely never be 36V 100A but lets say it's possible for up to 1 min. I would think that under load I would not even hit 75A since the motor is only rated 750W. It appears the controller has 10g so I presume I should just use that?
 

zabac70

New Member
Mar 17, 2010
204
0
0
54
Belgrade , Serbia
Use one gauge thicker wire , just in case...That is , if you have the room for it and it's convenient enough. If Kelly employee recommends that controller - go for it , because I've heard only positive feed back about their customer support... Controller of the choice has 40 Amp continuous rating , which is almost three times of what you have right now :) Hope that you've told them how much your trike weighs. Good luck with the rest of the build !
 

vsavoldi

New Member
Jul 24, 2012
78
0
0
Monterey Bay California
Oh yeah, pointed them to all my images and this forum. With all the specs including potential weight. I even asked about reverse and regen braking. One of the reasons I may go with the upscale controller just to add the regen braking.

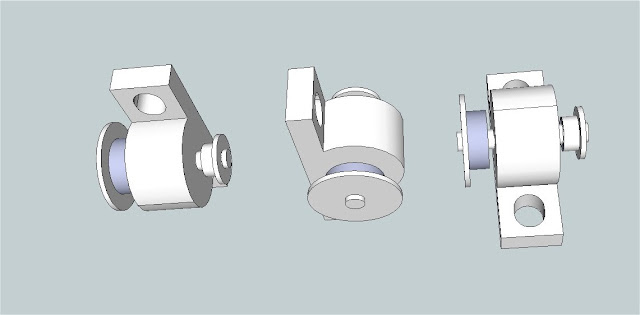
I spent some time trying to work out the placement and design of my Jackshaft. I came up with a very small package that is going to make mounting and adjustments pretty easy.


The pillow block bearing is really heavy duty and this design will work with my existing motor location.

And yes, I agree their customer support is awesome. 3 email replies in a single evening. Thanks Fany!
 

vsavoldi

New Member
Jul 24, 2012
78
0
0
Monterey Bay California
The build went pretty well this weekend till the end..

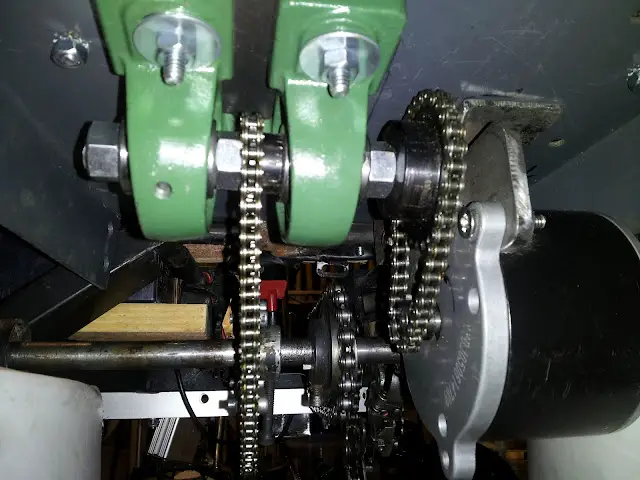
I was prompted to use dual pillow blocks for the jack stand so I modified my design. I was able to make a real solid plate for mounting, it's a little overkill and adds about 3lbs of extra weight but I can eliminate it in the future if I ever rebuild.

I have about an inch of adjust-ability in both the jack shaft and the motor. The jack shaft assembly seems to be causing a little resistance but I think it will smooth out with usage. Note to self: consider a freewheel bearing for the motor chain system. The motor causes quite a bit of resistance to pedaling.


I made a nice wire harness, wish I would have taken images before I mounted it - sorry, I will document it when I do the tear down for final paint and/or powder coating.

Here where the snag comes in...

So that all seemed to go pretty well, I hooked up the batteries, everything looked good, hit the throttle and nothing. D'oh! So I open everything back up double check all connections, looks good. The power meter LED's on the throttle report good power. I started checking voltages and it seems that the voltage supply line is not putting out the 4.5v for the throttle. Even if I take the red from the Controller (throttle 4.5v)and touch it to the green from the controller (throttle Signal) I get nothing. or do I need to go signal to ground?
So it seems like my controller is bad, I was hoping to be able to test my gear ratios with this controller and then order the new one if I still needed it, but alas it looks like I need it now :(

I am going to wait at least a day before I order it, just in case one of you guys (do we have any gals here?) have something for me to try.
 

zabac70

New Member
Mar 17, 2010
204
0
0
54
Belgrade , Serbia
It could be simple thing , or it could be gone...Since your controller has protection (it disengaged earlier , when you tried to run it it with other gear ratio) - it could be that protection is stuck in "off" position or something similar ... Multimeter would help , just to see if you have any juice flow trough the bridge or other components in controller. Touching wires under potential isn't a best idea (components in that area of controller aren't that much resilient to shorting). On the other hand , since you have power LED's lit , check the throttle - whether signal is coming out of it (maybe pot in it died). Unfortunately , I'm not an electronics expert , so if you find one - he/she might be of some real help (local radio shack might be a good place to look for one , if you don't know anybody). Definitely , it's worth a try to fix it , because , even if you upgrade (buy different controller) you can sell this one...
BTW - you did great job with jack shafts - looks very professional :)
 
Last edited:

vsavoldi

New Member
Jul 24, 2012
78
0
0
Monterey Bay California
Wow, it's been a while... lets see..

The original controller is still not putting out the 4.5-5v for the throttle so I ordered the low cost Kelly 100a controller I was looking at.

While waiting for the parts...

The last week or so I have re-organized my garage. It has been a typical garage with storage shelving. I finally removed the wall shelving, created a dividing wall and turned the space into a real workshop with plenty of floor space. It's very nice but still has a ways to go.

A bad side effect of this garage re-organization is I broke my Galaxy S2 Skyrocket while moving my air compressor. I pay for insurance so instead of $450 to replace it I only have to shell out $200 for a replacement. It should be here tomorrow.

The parts for the trike came in this past Friday and I have been working on it like crazy.

I discovered/realized that the new controller really needs to be affixed to some sort of plate to hold the various items. In order to make the plate I needed to make the chariot bed and battery cover. To make the chariot bed and battery cover I had to also make a lower strut support for the bed.

So I have spent the last 3 days making the chariot I got the 1st coat of sealer on the main parts when I stopped tonight for dinner. I expect I will go back out tonight for a few min and assemble the chariot for a 1st look.

Since my phone got broke I couldn't take any pictures, so I will take pictures and a video tomorrow or Wed. evening.
 

vsavoldi

New Member
Jul 24, 2012
78
0
0
Monterey Bay California
Here are the 1st look pics of where I finished tonight. Still a lot of work to go but it would be time for a test ride if my rs232 to usb adapter would have worked but it was broken so I had to order a new one to be able to program the controller. I don't want to fire it up without configuring it 1st.

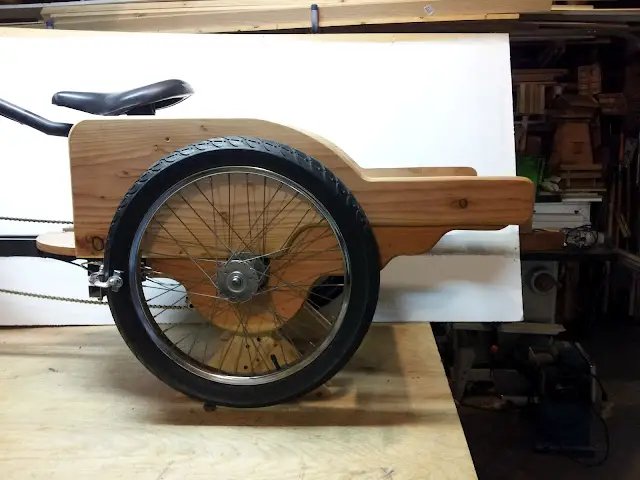
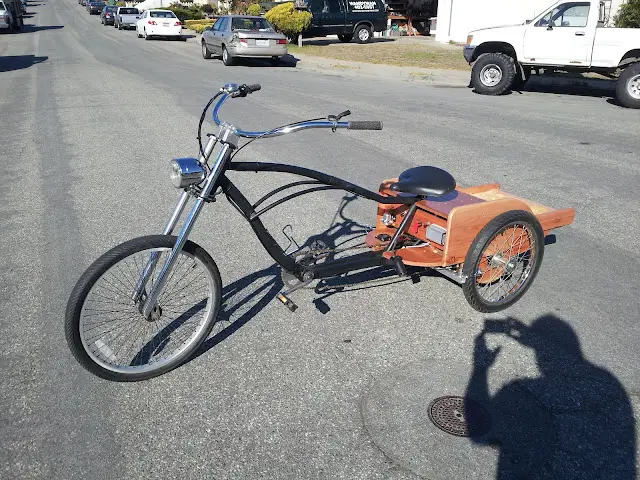
Anyways , on with the show... The glory side shot...

The brakes are not adjusted and there are some screws missing for dis-assembly but basically this is the look I had in mind.

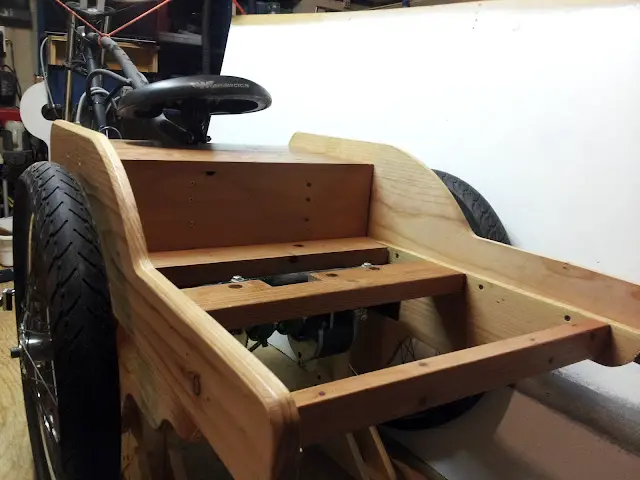
The Chariot Bed frame.


I will apply a thin light weight plywood with carpet so my dog has some traction. I was going to make it so the entire assembly tilted to get to the batteries but I realized it gave me nothing except cool factor and added more weight. I still need to install the tail light assembly when I add the 12v lights and sound system.

The Power Center / Battery Box

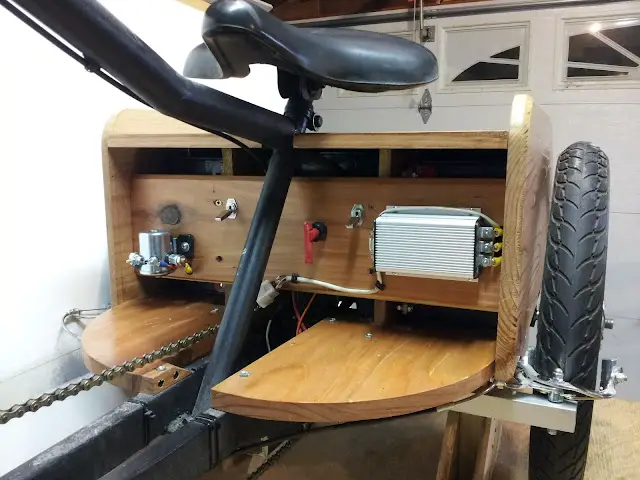
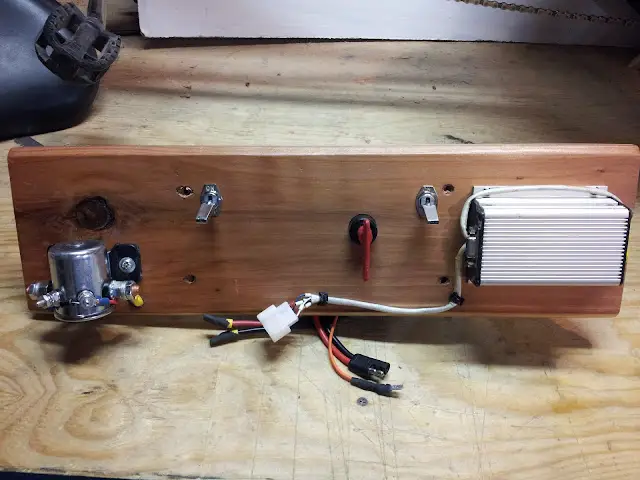
The controller on the right, the contactor (solenoid) on the left. The 2 toggle switches are 15A 36V and 15A 12V as the main power disconnects. The red key switch has 2 functions. It is the 36V ground disconnect and the programming adapter blocking device. With the key in place either on or off I can not attach the programming adapter to the controller, this means I can not oops and plug in the controller while under power. I will be attaching a cable to this switch to hold the key so it can not be lost and make it easy to hit the cable to switch off power in a hurry (possibly a rip cord idea if I can work it out).
Eventually this area will be covered by two hinged doors with a bow and a tilt..

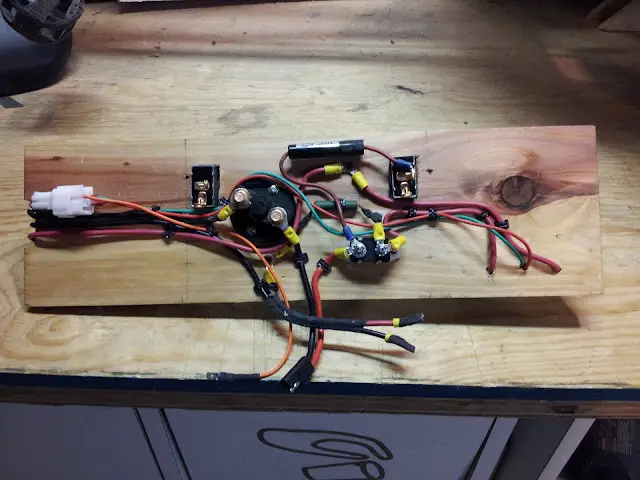
Here's the back side of the power center


Sure got messy but it is easily removable, 4 connectors and 4 screws and it slips right out. While looking at this I found an error, I missed something, can you find it?
Edit: Actually There are 2 errors thankfully I am not an electrician, I keep running out the circuits to make sure there are no other mistakes/misses. Lucky for me both were easily fixable and didn't require much dis-assembly.

Front side of the Power Center removed


I was going to add another image of the battery box opened up for access but the forum told me nope! - lol no worries, all my images and video are available in my Trike folder from the link below.
 
Last edited:

zabac70

New Member
Mar 17, 2010
204
0
0
54
Belgrade , Serbia
Fine looking thing and good job (since I'm carpenter - I must appreciate it :) ). Tough , I think that you could've saved a few pounds if you used aluminium (aluminum ? ) sheeting for panel/sides construction and wooden veneer with some lacquer (if pursuing "wooden" look) , but never the less - it's looking very cool ...
 

paul

Well-Known Member
Dec 23, 2007
5,547
44
48
66
Kalamazoo, MI
are you a wood craftsman? that really looks nice. great lines and very professional looking. yes i agree about weight however to me looks are important and that looks phenomenal
 

vsavoldi

New Member
Jul 24, 2012
78
0
0
Monterey Bay California
Yeah I like to think of myself as a Carpenter and I'm trying to be a Wood Craftsman but really I'm just getting started with quality woodwork.

The design is 100% redwood, I have had it in my garage for a few months so it is very dry and really light weight. If I were to guess I would say that the entire wood structure is under 10 lbs and the best part is that there has been no out of pocket expense for the wood. It was mostly scraps left over from a fence job.

I thought about using aluminium and wood veneer but that's pricey and I'm not sure it would save me much in the weight department. That and I don't have the know-how or the tools to weld aluminium.

The finish so far is hand rubbed Shellac and still needs about 10 more coats, I am debating to give it an old world distressed look like a working chariot, or to ornament it like a show Chariot of the day and leave it pretty.

I really wish I was an artist and could really decorate it I have an idea using a wood burner for lines and perhaps an eagle head on each side with a little Gold leaf or Brass trim around the edges.

Any ideas and all comments are greatly appreciated...
 

zabac70

New Member
Mar 17, 2010
204
0
0
54
Belgrade , Serbia
Heh , I'm very sorry to bring the bad news , but you've made a mistake...Shellac is natural wood resin and it isn't , by no means, suited for outdoor use or for to much exposure to the sun :( I've restored in a past real antique furniture (100 , 200 years old and some even older) using all the available technology from the era of certain piece . That included use of glue made of rabbit and other animals bones and use of shellack for finish. Shellack WILL crack on the sun and get pale if water gets to it - that is probably the reason that you can't see real antique furniture exposed to direct sun light , or in use as ordinary furniture (glasses and cups are ALWAYS used with coasters under and that furniture is always and very often polished with carefully selected wax products for maintenance ...). You would be better off with polyurethane coating (UV resistant and water resistant). My advice is to use belt sander to remove shellack (as much as it possible) and than to prepare wood in a way that you imagined (aging wood effect , gold leafs or whatever you've had in mind...) and than to use transparent insulating primer (the stuff that is used when one wants to switch colors of different chemistry) and than to spray few coats of clear PU.
Now , I'm aware that this is waaay off topic , so if You need any help regarding wood working tricks&tips - just send mi message with your e-mail address and I'll be happy to help if I can. As for "I wish I was an artist..." - the only limit is your imagination - all the rest are techniques , since you've already proved that you're capable for creation and good with hands. When you grasp how to do something , you just need practice (I used to make wood carvings to relief myself from stress).
 

Attachments

Last edited:

vsavoldi

New Member
Jul 24, 2012
78
0
0
Monterey Bay California
Yeah I know Shellac has it's issues but I am under the impression that I can overcoat it with Poly. I'm pretty sure I read that somewhere but since you brought it up, I will go do some research and try to find what I saw before.

Well I got the trike fully assembled tonight, a little too late for images. It's really hard to not plug it in and go for a jaunt. I really want to program the controller first but I'm waiting on an adapter.

I spent some time this evening making a battery connect/disconnect/charging plug that a friend of mine designed.

I'm using a 7 prong trailer wiring harness connector plug (the round ones Like this).
Basically each battery terminal goes to it's own prong on the base connector.
I have 2 plugs for it, A Charging plug and a Running plug.
Charging plug - each of the (3) chargers goes to it's own set of prongs. When plugged in the 3 smart chargers each have a single 12v battery to charge.
Running plug- This plug takes battery #1 pos (pin 1) and battery #3 neg (pin 6) out to the system. The other prongs are used to wire the batteries in series by crossing pin 2-3 and 4-5. (genius pure genius)

Amazingly simple, and the best part is that if I take the running connector with me , no one can ride off on the trike even if they have time to figure out how to hot wire the switches. bwahahaha (evil laugh)
 

zabac70

New Member
Mar 17, 2010
204
0
0
54
Belgrade , Serbia
Cool solution ! Once in a while switch battery order in a rack or try to equalize the charge (batteries tend to discharge differently and usually one in the middle get weaker than the others first).
 

vsavoldi

New Member
Jul 24, 2012
78
0
0
Monterey Bay California
Cool solution ! Once in a while switch battery order in a rack or try to equalize the charge (batteries tend to discharge differently and usually one in the middle get weaker than the others first).
Yep, this is why I am separating the batteries for charging. That is supposed to stop that from happening. Only time will tell and I will for sure be keeping an eye on it. Excellent tip either way

I am hoping in the near future to buy or assemble a LiFoPo4 battery pack. I am starting with lead acid due to cost restraints and the presumption that I will be needing a lot of battery. Once I figure out the range of freshly charged 36v 35AH SLA setup I can calculate just how much battery I really need to use when I design the new pack.

I have had many suggestions to take the trike to 48v so that is an entire different set of tests if I find that the 36v is not enough.

I have actually garnered a lot of local interest and may actually start making e-bikes for other people. I just need the first customer! It's really too bad that the local bike shop wants nothing to do with motorized bikes of any type, I was trying to make a consignment deal with him but he's like "no way, we promote healthy biking". He's also worried about liability issues.

Are there any serious liability issues? A properly assembled bike should be fine with the minimal amount of weight added due to electric motor. I would expect a gas engine to cause some extra vibrations so nut and bolt maintenance would be increased, any other worries??
 

zabac70

New Member
Mar 17, 2010
204
0
0
54
Belgrade , Serbia
There are no liability issues, if bike is (conversion) designed and assembled properly (using proved components). Of course , there is a matter of including "idiot proof" planning , because potential customers can abuse , or inadequately use certain product (bike) , in a sense : they can run it off road (if the bike isn't intended for that) , or put too much weight on it , or overload it in steep hills , or neglect basic maintenance (proper charging and conditioning of batteries , or miss to tighten the loose nut...) etc... Actually, the only thing that needs very careful approach and thinking ahead is choice of components , especially choice of controllers (manufacturer) and peripheral stuff (throttle , connectors...) - those are most sensitive things on the whole bike and because you'll need to rely on manufacturer's warranty (and speed of response if problem occurs) , because (as I've understood) you aren't much of "electronics guy" ... The rest of needed things is a matter of experience and research (batteries , motors , adapters). My advice is to build at least one more bike and use it as tester for different components and systems (and get more experience while at it), before you start building bikes for other people . You can disregard this , if the potential first customers are nice people and if they will not make a fuss , if something goes wrong and you correct it (presuming that the cause of problem is your fault). I'm very conservative and rigid about making stuff for other people for money - professionally (talking about vehicles) - because I have a lot of experience with that (customers) and I currently make some aftermarket car parts (namely - suspension components), which bring great deal of responsibility (morally , not just lawfully, which isn't much of a concern where I live, comparing to USA). This is only my opinion on the matter , and you'll decide , because you know circumstances in your surroundings better than I. I believe that local bike shop owner has the same concerns about this matter , as I have (though , he could help with his knowledge , as I would do , if I was in his place).
Talking about gas engine - sturdy and heavy frame is all that one needs (mass of the frame helps to damp vibrations and occasional maintenance is needed , like with everything else).
BTW , I also like idea of 48 V system , but wallet has final say in that matter :)
LiFoPo4 is the way to go (if possible) , and later you can experiment with LiPo's and try to build your own packs , with BMS included. Some people I know use only LiPo batteries (they are skillful with electronics) , because those are cheaper and lighter , but one must know how to handle them , because those can explode in certain conditions..
 
Last edited:

vsavoldi

New Member
Jul 24, 2012
78
0
0
Monterey Bay California
I pulled the trike off the bench and took a walk around video and took some outside pics.

Click here for the Video


I pedaled it around quite a bit and it's riding pretty nicely. Easy to pedal on the flat and the low gear pulls it up hill just fine.

The adapter I need for programming should be delivered tomorrow so if everything goes well I should be able to power it up.