Chain and Cog Clearance

GoldenMotor.com

gshock300

New Member
Sep 3, 2011
15
0
0
Brisbane
Hey guys,
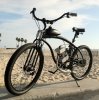
Ive just started my first build with a Huffy Mambo 26" beachcruiser and a 66cc 2 stroke kit. I bolted the rear drive cog on with the teeth pointing inwards toward the tyre and spokes so the chain would run closer to the wheel as per the instructions. Now I find that I dont have enough clearance between the drive chain and the side of the tyre. Is this pretty common with beach cruiser builds?
Im thinking about flipping the cog around so the teeth point away from the wheel so I get abit more clearance between the chain and tyre wall.

Problem two, after installing the rear cog, I find that the coaster brake arm is now interfering with the nine bolt heads as the wheel spins around. Again, is this pretty common? I will try giving the brake arm abit more of a kink so it will clear the bolt heads on the rear drive cog.

Any advice would be great, thanks.
 

glennbo

Member
Aug 24, 2010
347
13
18
HAMMOND
you are on the right track flipping the sprocket around. you can also put shims/washers inbetween rag joint and sprocket. put coaster brake arm in vice custom bend to clear the head of the bolts. but the best fix is to purchase a spocket adapter from pirate or sportsman witch allow you to move the sprocket in or out with ease plus thier sprockets have a bigger bore to give more brake arm clearance. hope this helps..
glenndnut
 

UriDead

New Member
Nov 21, 2011
83
0
0
Madison, IN.
I had both take off the coaster arm to heat and bend it for bolt clearance AND replace the 9 bolts with a rounded head set from Lowes. Problem solved but took a bit of doing. I looked high and low for some flat/flush allen type bolts but none in my small town.
 

Les Yee

New Member
Feb 29, 2012
8
0
0
Belmont, CA
I'm troubleshooting similar problem. I have 24" x 3" kenda Flames on a Kustom Kruiser with Shimano CB 110E. I have pushed out the rear sprocket by doubling the rag joint and flipped the sprocket outward to clear tire. I tried bending/hammering the brake arm with no success.

I'll try the round bolts idea, and perhaps expand the sprocket hole--hopefully i'll get it centered. I have a spare sprocket, so I can match the new one to get the hole centered. But I'm still afraid of alignment problems with the drive sprocket--it's a Grubbee Starfire 80cc, I think. Anyone know how to adjust the drive sprocket out to align (it's a 415 thicker chain)? Should be concerned with the double rag joint on the sprocket side re. movement, etc?

Thx, anyone.

Les
 

Les Yee

New Member
Feb 29, 2012
8
0
0
Belmont, CA
OK, I finally ordered Pirate's hub adaptor with 36 teeth sprocket. However, I anticipate chain alignment issues eventhough I can clear the tire. Open to ideas there, too.

Thanks, happycheapskate for your encouragement to switch the rag joints to the hub adaptor--I'm sure it will be much stronger and more convenient whenever I may have to switch or adjust in the future, too.
 

Dogtown Burner

New Member
Sep 15, 2011
349
3
0
Los Angeles
OK, I finally ordered Pirate's hub adaptor with 36 teeth sprocket. However, I anticipate chain alignment issues eventhough I can clear the tire. Open to ideas there, too.

Thanks, happycheapskate for your encouragement to switch the rag joints to the hub adaptor--I'm sure it will be much stronger and more convenient whenever I may have to switch or adjust in the future, too.
dont get pessimistic on us just when we are getting proud of you for switching to the adapter! lol. and HCS is right; the pirate is cool, but Sportsman Pat makes the Shizzzz.. the 2.125 tires do give you the opposite problem that the original china folks must have ran into. had me scratching my head for a week. but seriously, if you need to address your worry, the next step is adjusting the 10t engine drive sprocket outwards. that helps in extreme frame situations but you really shouldnt need to. good luck!
 

gshock300

New Member
Sep 3, 2011
15
0
0
Brisbane
Managed to bend my brake arm and the drive cog is lined up to clear frame and tyre now so the rear end is all good. My latest issue is the front Monark II springer forks I bought. I had problems getting the bolt heads on the rocker plates to clear the disc hub on the new disc brake wheel I bought. Ive had to get rid of the quick release axle and replace it with a standard rear axle to get extra length. Ive used spacers on the longer axle to push the forks out to give me clearance. With the standard quick release axle that came with the 100mm hub wheel, the fork rocker bolt heads touched the spokes on the right side of the wheel and on the left side, they touched the disc hub where the disc rotor would mount against. Now I have to fine tune the adapter bracket for the disc brake caliper so that the caliper is aligned properly with the rotor.
 

Dogtown Burner

New Member
Sep 15, 2011
349
3
0
Los Angeles
Managed to bend my brake arm and the drive cog is lined up to clear frame and tyre now so the rear end is all good. My latest issue is the front Monark II springer forks I bought. I had problems getting the bolt heads on the rocker plates to clear the disc hub on the new disc brake wheel I bought. Ive had to get rid of the quick release axle and replace it with a standard rear axle to get extra length. Ive used spacers on the longer axle to push the forks out to give me clearance. With the standard quick release axle that came with the 100mm hub wheel, the fork rocker bolt heads touched the spokes on the right side of the wheel and on the left side, they touched the disc hub where the disc rotor would mount against. Now I have to fine tune the adapter bracket for the disc brake caliper so that the caliper is aligned properly with the rotor.
ya man, I had the FIRST one!! (I live 1/2 mile from the manark production shop) very tricky to get it to work!!. the thing is still perhaps too much spring. too stiff. and I had to put the plates on the outside of the forks and get creative with spacers, but you have to be careful with a quick release (if you were to use one), as it needs a bushing to fill the dropout. and a spacer will reduce contact area in the dropout. and the skewer can bang around in the dropout due to mismatched size. I am currently dealing with this issue, and I want to change to the solid axle. can you tell me how you replaced the skewer setup to a solid setup?
 

Attachments

happycheapskate

New Member
Nov 26, 2009
1,989
3
0
Rockwall TX
You should be able to contact a bike shop and determine the thread pattern of your QR axle (there is only 1 or 2), and order a solid axle of the same type (usually people replace the solid axle with a QR axle though, but you are doing something different).
Just get the solid axle really clean, and swap all the parts over to it. (need cone wrenches, an axle vise or bench vise, metric wrenches or crescent wrench).

After the swap, cut the axle to the new length, and round the edges a little with a file to prevent cross threading later.
 

Dogtown Burner

New Member
Sep 15, 2011
349
3
0
Los Angeles
You should be able to contact a bike shop and determine the thread pattern of your QR axle (there is only 1 or 2), and order a solid axle of the same type (usually people replace the solid axle with a QR axle though, but you are doing something different).
Just get the solid axle really clean, and swap all the parts over to it. (need cone wrenches, an axle vise or bench vise, metric wrenches or crescent wrench).

After the swap, cut the axle to the new length, and round the edges a little with a file to prevent cross threading later.
thanks cheapie, I think with the lack of specialized tools and experience I am going to take it to my guy at the bike shop. seems like the easiest way to do it at this point.
 

gshock300

New Member
Sep 3, 2011
15
0
0
Brisbane
Hey Dogtown,

Its pretty easy, I just took the skewer out of the hollow quick release axle. Then I unscrewed the locknuts and bearing cones out of the axle, this allows the whole axle to pull out of the hub. Depending on what kind of hub you have, you will have loose ball bearings rolling around inside the runners or fixed balls in a ring frame. Either way, you can just leave them in because when you buy a solid axle kit, they come with bearings and cones so you dont need to use the new bearings. Just leave the old ones in the hub and put the solid axle through and screw the new cones back on. Lock them in place with the lock nuts and use spacers if you need to. I had to use spacers on both sides, abit more on the brake rotor side but its lined up beautiful now.
I had to use 3 M6 stainless washers on each bolt of the adapter bracket of the brake caliper to offset the caliper away from the wheel to get it to line up with the brake rotor. Another thing I noticed with my Monark II forks, the dropouts werent perpendicular to the fork yoke. When I had a wheel locked in, the wheel would point off to the right by about 10 degrees. Looks like the fork legs werent welded into the yoke square, both of them were welded rotated off to the right. I had to put each dropout in a vice and twist them straight again one by one. Looks like thats sorted my problems :)
 

Dogtown Burner

New Member
Sep 15, 2011
349
3
0
Los Angeles
Hey Dogtown,

Its pretty easy, I just took the skewer out of the hollow quick release axle. Then I unscrewed the locknuts and bearing cones out of the axle, this allows the whole axle to pull out of the hub. Depending on what kind of hub you have, you will have loose ball bearings rolling around inside the runners or fixed balls in a ring frame. Either way, you can just leave them in because when you buy a solid axle kit, they come with bearings and cones so you dont need to use the new bearings. Just leave the old ones in the hub and put the solid axle through and screw the new cones back on. Lock them in place with the lock nuts and use spacers if you need to. I had to use spacers on both sides, abit more on the brake rotor side but its lined up beautiful now.
I had to use 3 M6 stainless washers on each bolt of the adapter bracket of the brake caliper to offset the caliper away from the wheel to get it to line up with the brake rotor. Another thing I noticed with my Monark II forks, the dropouts werent perpendicular to the fork yoke. When I had a wheel locked in, the wheel would point off to the right by about 10 degrees. Looks like the fork legs werent welded into the yoke square, both of them were welded rotated off to the right. I had to put each dropout in a vice and twist them straight again one by one. Looks like thats sorted my problems :)
Thanks! Wow I'm printing this one out for the shop. And yeah, haha the alignment on these isn't "all that". Mine has maybe 3* left cant (twist). I did the washer boogie as well. And was so relieved to discover I could loosen the caliper and re align it crooked to match wheel orientation. Still a touch of toe in, but not horrific. But wow what a production when you grab a handful of brakes! Jiggly wiggly wonky town. I think the solid axle might reduce some of this behavior. I'm gonna ride over and see Dave and grab some of those brass bushings this morning and see what that does, shortly before getting the solid axle;)
 

Les Yee

New Member
Feb 29, 2012
8
0
0
Belmont, CA
Hy Dogtown Burner,

I'm attempting to make my own offset mounts from a free bar of aluminum at the local machine shop. However, your suggestion of adjusting the 10t sprocket seems a whole lot easier. But I haven't a clue how to do that. About to give up making my own mounts--just takes way too much time given my limited tools and knowhow. I was about to get the pricey offsets from Pirate but they're out of them and closed for inventory a while.

Assuming that I can adjust sprocket, is there any affect on the motor functioning?

I did finally get my Pirate sprocket & hub adaptor on and got the 3.1" tires on and managed to whack the heck out of the brake arm to fit!!! So I'm eager to put it altogether.

Thanks anyone for the help.
 

Dogtown Burner

New Member
Sep 15, 2011
349
3
0
Los Angeles
Hy Dogtown Burner,

I'm attempting to make my own offset mounts from a free bar of aluminum at the local machine shop. However, your suggestion of adjusting the 10t sprocket seems a whole lot easier. But I haven't a clue how to do that. About to give up making my own mounts--just takes way too much time given my limited tools and knowhow. I was about to get the pricey offsets from Pirate but they're out of them and closed for inventory a while.

Assuming that I can adjust sprocket, is there any affect on the motor functioning?

I did finally get my Pirate sprocket & hub adaptor on and got the 3.1" tires on and managed to whack the heck out of the brake arm to fit!!! So I'm eager to put it altogether.

Thanks anyone for the help.
Hey Lee, I have NOT adjusted the 10t sprocket out personally, but I read about it somewhere in a thread. perhaps a quick look around the forum. also, a friend of mine suggested welding another sprocket directly to the existing one, doubling it up. but that sounded like a lot of work, what with having to build a custom clutch acutator arm cover and all... I am about to face the same issue with some still-in-the-box felt fat bricks. I will dig for the thread, as i seem to remember it sounding like the more simple option to just adjust it out on the spline. good luck!
 

Dogtown Burner

New Member
Sep 15, 2011
349
3
0
Los Angeles
Well, I changed to a solid axle, and then I changed the solid axle back to quick release. the axle nuts were just too wide for the dropouts which are OUTSIDE of the fork tines, btw. the qr slips in with only a washers width clearance, which is on the brake side for rotor bolt clearance. works great again.