help a guy out

GoldenMotor.com

doubledice

New Member
Nov 6, 2009
130
0
0
california
Hey guys if anyone would be so kind to give me some dimensions to work with so i can weld up my own board tracker, I would extremely appreciate it! we just got a new pipe bender and very very soon to be plasma cam at my school so its on :D but i need your guys help and advice first
 

42blue15

New Member
Sep 18, 2008
136
0
0
St Louis metro, USA
what kind of tires would be realistic then? and those are very nice bikes thanks for the info
Short answer: the realistic tires are not practical.

;)

Long answer: Coker Tire sells reproduction motorcycle tires in the original board-track era (1900-1925) sizes. These are rim sizes of 24, 26 and 28 inches, and tire widths of 2-1/4, 2-1/2 and 3 inches.
28x3 CL COKER CLASSIC CYCLE BUTTON TREAD ALL BLACK - Coker Tire
28x3 CL COKER CLASSIC CYCLE BUTTON TREAD ALL WHITE - Coker Tire

They're kinda expensive, but that's not the only snag.

These tires will not fit on modern bicycle rims at all; the diameters are wrong, and the beads are different also. These are "vintage" clincher tires with CORD beads, these are not the drop-center steel-bead clinchers that bicycles and motorcycles use now. You would need to get the proper rims for them (Timeless Motor Company/Classic Antique Vintage Street and Board Track Motorcycles is one re-constructor who can get you rims, there is another guy also). You just make sure to get the rims drilled for 36 spokes (a common number for both motorcycles and bicycles) and lace it to whatever bicycle hub you want.

....but there is even more to it than that.....

Vintage clincher tires used cord beads (beads made of cotton rope, not wire--they hadn't figured out wire at that point in time). These tires depended on the air pressure to partly keep the tire's beads hooked onto the edge of the rim. You may have noticed on the Coker specs that the rated pressures for these tires are kinda high, at 65 PSI. At lower pressures and common road speeds, the beads can slip off the rims while you are underway. A lot of people (even in the last few decades) have been killed riding vintage motorcycles with these types of rims and tires, when they got a tire puncture, the tire pressure dropped and the tire came off the rim at speed.

With many vintage motorcycles, owners will choose to switch to a drop-center style rim so they can use reproduction tires that use steel beads, that are far more resistant to this problem.

-----

Aside from the Coker tires, you could use 29" MTB rims and tires if you really wanted.... but the difference is not that severe, and there's not very many tire choices in 29" anyway. And the motorcycles were made with 26" wheels and tires; that size was very close to modern 26" MTB rims and tires.

There are also some 26" bicycle tires that look antique-style. None that look perfect--none that match the exact treads and colors--but at least one person is working on that issue too. :)
~
 
Last edited:

42blue15

New Member
Sep 18, 2008
136
0
0
St Louis metro, USA
Back when I looked into if it was possible to use the "real" tires at all, there was two different places I knew of who were building board-track-style replicas: Timeless Motor Company was one and Antique Motorcycle Works was the other.

I emailed them both at one point and asked where I could get rims for the Coker tires, and both said they'd sell the rims individually. They both gave me prices, but I think that was back in late-2006 or early 2007 that I asked--so the figures I have may not be accurate now.
~
 

dmar836

New Member
Jun 23, 2009
166
3
0
KC
BTR has a good knowledge base of board track racing history as do quite a few on this forum. But what about those crash bars you mentioned? What did you mean by those?
Dave
KC
 

dmar836

New Member
Jun 23, 2009
166
3
0
KC
Double,
I'm sorry I got sidetracked trying to decipher the mumblings of the other member.
I didn't respond initially as it is difficult to give "dimensions" of a BTR. The question was just too broad.

Most who scratch build frames scale them from pics and line drawings to use commonly available 26" wheels. If you start with a bicycle frame, you just have to mock it up to look like you want it to look.

One might give measurements for an original frame but it would look really funny using all the other parts commonly used here..... especially one of those Chinese 2 stroke engines! It all really needs to be scaled down starting with what you are emulating.
Board Track Racer and I approached our projects very similarly doing this. If you don't start with an image of what you want, you will likely end up with a flat black cantilever frame with flipped bars and white walls(IMO, not for this forum but who am I?).
Need more ideas of how to scale down?
JMO,
Dave
KC
 
Last edited:

42blue15

New Member
Sep 18, 2008
136
0
0
St Louis metro, USA
Board-track motorcycles (which were racing vehicles) didn't have crash bars.

crash bars motorcycle - Google Images

Crash bars are loops of pipe that stick out sideways around the engine. The original purpose of crash bars was to protect the cylinder heads of motorcycles that had "flat" engines with the cylinders sticking out sideways (like flat-4's). If you had a flat-four motorcycle and it tipped over and rested on the engine, the cylinder head heat fins /spark plug would get broken off.

They are used to offer some protection from hitting objects on the road (like smaller animals suddenly running across the road) but won't really do much in a real crash--they usually bend/break off.

Now cycle engines are designed with more logic to them, they usually won't damage the engine drastically from just tipping over but people with flat-engined cycles still buy the bars to add the protection:
Motorcycle Crash Bars
~
 

dmar836

New Member
Jun 23, 2009
166
3
0
KC
Blue,
I know what crash bars are, I have an old BMW and we avoid them as they often help flip a bike rather than limit damage. I'd rather have a skinned valve cover. I asked him to flush out the questionable "historical data" being offered. I have yet to hear or read about such things on the board tracks, dirt tracks, or concrete speedways - even to this day. His info is random and, in this case, bogus and I wanted to know why he would even say that.

This was what I meant - we got side tracked.

Double,
Tires are not what sets a board track racer replica apart from a "flat black cantilever frame with flipped bars and white walls". Oh and add that HT engine. I appreciate the efforts of anyone wanting to locate of make correct looking tires but there are many, many things that can look "not the part" even if the tires look correct. To get a different look - one that makes people draw closer to see what you have - is to follow the path you are on. Start from scratch rather than using a bicycle frame. We have all used bicycle parts here and there but don't look at a bike frame as your base. You can use the head tube and rear stays if you want but don't let a preexisting pattern(from a bicycle) force you to compromise the shape you are after. Use it only if it fits into your plan. Doing this, you will want to learn some basic bicycle geometry principles like the head tube angle and bottom bracket height. Grafting in a bike with top and down tube still attached can cause you to alter these critical dimensions. It's not difficult to learn so keep it in mind.
Do you have a bike you want to replicate? That's where to start. That's your plan. You can like the aspects of many but you really need to settle on a particular one.
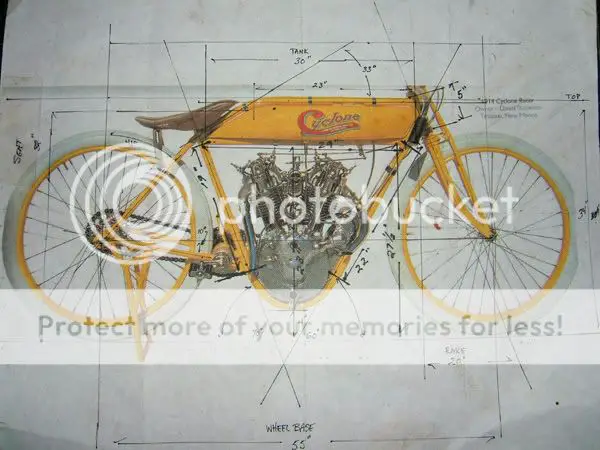
This is a great site but I can seldom get it to link. This will give you an idea of the best pic to start with.


After than, print a side view and draw a 1" grid over it. Using this you can estimate, assuming it had 28" wheels, what you would need to do to every other critical measurement you take from the pic. More on that later. Remember there is distortion in most every photo(my wheels were different sizes in the my pic).

Here, I was checking some angles with an overlay but the grid is still visible on the pic(BTR did a much nicer job of this on his project).
Since the 28" wheel size on mine was the only known factor, I started there. 26/28 = .92857 (1:.92 scale or 92.8 % of the original). Most of that is just to let yourself know what scale you are in.

Now about the grid. Pretend you are now looking at a pic of a 26" wheels BTR - the proportions will be identical regardless of size. Get some $15 digital calipers from HF. Start by accurately measuring the wheel diameter. Since you applied a 1" grid, jot down the measurement of the wheel. Mine was 2.961". So that's 2.961" for a part that has a 26" span. 26/2.961 = 8.78. This is the MAGIC NUMBER. You will use it to scale up your frame from the drawing. Any measurement you take(in inches) will be multiplied by 8.78 to come up with a real size in .92 scale.
I used calipers to measure head tube and other tube lengths, bottom bracket height, wheelbase, etc. Every measurement must be multiplied 8.87. If the head tube to seat tube was 3.5" in the pic, then that's 31.045" in my scale size.
You can use these numbers to build a full sized plan on cardboard. This will give you a visual check to see if things look right.
You can see how using a set tube length from a bicycle will throw the appearance and plan off very quickly.
Did I confuse you? At least we are back on topic.
Dave
KC
 
Last edited:

doubledice

New Member
Nov 6, 2009
130
0
0
california
Thanks a ton and alittle bit but ill have my math teacher help me or something and i got you guys if i get stuck. I want to build a 1920 indian board-racer like that one you have on that time line.

.bf.
 

dmar836

New Member
Jun 23, 2009
166
3
0
KC
Do you need a pic to start with? I can email you one or two if you do.
Don't worry, you really don't need to know what scale you're working toward and you could even skip the grids. These, to me, just set the groundwork and help keep it in perspective when you start looking for correctly sized seat, etc. The ratio from 28" to 26" or whatever sizes is what gives the magic number and that you do need. $15 calipers are something you will be glad you bought for many, many reasons. Trust me - it's a simple tool that no one on this forum should be without. You'll eventually wonder how you managed without one.

BTW, I know things were different when I was younger but did you ever do the grid trick on a small picture so you could enlarge it square by square into a bigger version.... like onto a wall? It works really well. That's the kinda stuff we did in the early 70's before Nintendo and texting.
I think maybe a teacher might like to help you. I know I would......... but I'd make you work for it!
Dave
 

doubledice

New Member
Nov 6, 2009
130
0
0
california
yes please a good pic would be nice and ill be sure to go to HF and get calipers like you said.
ill have my math teacher help me and hey i wouldnt mind working for it haha i have to work for what i want
thanks for all ur help so far
 

SCUBA Steve

New Member
Sep 14, 2009
19
0
0
Calgary
This was picture with dimensions was posted by a member on the jockeyjournal forum (the thread is called "winter project"):


I believe that the cyclone uses 28" rims (correct me if I'm wrong), so like mentioned before, you'd have to scale everything down to make it look good with the 26" rims. Best of luck with your build!
 

dmar836

New Member
Jun 23, 2009
166
3
0
KC
That post was from Board Track Racer. His is the one I was talking about though his ended up more with an Indian look and mine ended up staying like a Cyclone.
His is posted elsewhere here - lots of cool details.
Dave
KC