Latest build, 29er with J-shaft

GoldenMotor.com

killercanuck

New Member
Dec 17, 2009
1,748
6
0
47
Wallaceburg ON
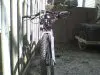
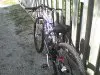
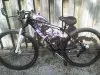
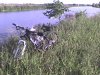
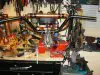
Hey all! Just got my latest build running and out for a boot.


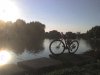
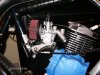
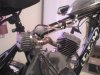
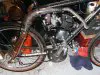
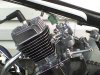
She's a 29er with F/R discs, a chrome Daemon 66 kit(even the case is chrome), and SBP J-shaft, head studs, front mount, hardware kit, and air cleaner soon. I'm running a Pirate shorty intake I got from another member at the moment. But have no room for ANY air cleaner with that setup due to the frigging frame only being 18". D'oh! So I had to order an offset intake from GasBike for my clearance issues,[since sbp didn't have one :(] It'll be here tomorrow. But I just had to get out for a run today, dang tornado watch/warnings, lol.


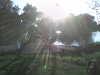
At least I didn't have to find a new head too...

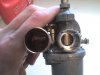
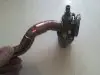
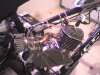
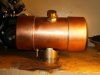
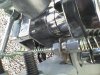
I have the newer style clutch-cable-to-case mount, the cast one, so I can't just hack off 1/2" off it without a mill and a lathe. lol. So I fab'd this mount that worked great with a j-shaft mount hole. And a Valve cap fit in the case hole perfectly!

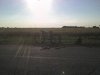
Thanks for checking her out. More pics when its sunny(and finished) to come! :D

Just have to add, hm, about the J-shaft....


WOW! OMG!!!


Had to get that out of my system, sorry. :p

Have a good one!
 

Attachments

Last edited:

killercanuck

New Member
Dec 17, 2009
1,748
6
0
47
Wallaceburg ON
Thanks guys! Yea she's way faster than the old 42T on a wrag joint on 26"ers. surprisingly smooth too. still have to mod the offset intake to get it so I can use the new air cleaner. ah well, if it was simple everyone would drive one. :p will go for a run with the gps once its all buttoned up. :)

Heya Wildy, long time no see!
 

killercanuck

New Member
Dec 17, 2009
1,748
6
0
47
Wallaceburg ON
So I've had no luck with the offset intake. I even cut off one of the bends to no avail. That was after filing out the holes on the mounting plate to get it to twist nowhere near enough. Either way, the carb was still at a harsh angle worse than the shorty Manic intake. Since there's no room for an air cleaner, I'm thinking just leave the manic shorty on and oil up a kitchen sponge and zip-tie it on, and adjust the float till its right. I wonder if a kitchen sponge will hold up to gas... I may have to harvest a chunk from the lawnmower, lol.

So I just got back from the first speed run, had the gps strapped onto the handle bars. There's a nice stretch of barely used asphalt nearby to do runs on without the Fuzz.

Get this, I hit 36Mph(60Km/h) both ways. And the engine isn't even fully broken in(or fully tuned) yet. ie. -Still on break in gas 20:1, running the clip at "smoke screen" setting(2nd from bottom) so the oil permeates anything and everything very good. The spare china plugs kicking around can foul all they want 'till I drop in a BH6S, heh heh!

It's cool to know that with a few tweaks I'll be able to clear 40Mph(65Kmh), but I'm more into the mileage. In top gear, at barely 1/4 throttle I was still doing 40Kmh(25Mph). That at least triples my range per tank of gas, and I was already at $0.03 per Km before the shift-kit(I'm not converting that, sry). Before(-66/42T-rag), I could get to Chatham(a city'ish place nearby) and back twice, almost 89Km(55Mi) on $1.50 of gas and maybe .50c of oil(Castrol mineral)

This SBP shift-kit is turning out to be a great investment I should've done along time ago.

Have a good one, I'll post more when I have more data :D

P.S. all the converting provided by The Master Unit Converter (Great link to have handy!)
 

Acraze

Member
May 13, 2011
231
0
16
Tuscaloosa
Your baking want the shift kit more now. Ive kinda wanted it but feared I would snap the smaller bicycle chain when the torque transfers. Maybe in a few months.
 

Nikko

New Member
Jun 23, 2011
138
0
0
So Cal
make your next upgrade the sickbikeparts expansion chamber man, im running a shift kit on my 26" mountain bike and once i put the expansion chamber on the power became unbelievable i can pop wheelies in first gear and hit 40 flat ground in 7th
 

killercanuck

New Member
Dec 17, 2009
1,748
6
0
47
Wallaceburg ON
Yea, super tight fit, dang 18" frame >_< lol. Awesome Nikko, it's on the wishlist. I was thinking of a cheapy Banana pipe for the interim. I was thinking the same thing at first Acraze, but with a new chain it should hold up a while. Figure if a 300lb guy can hammer the pedals up a hill, that's way more torque than our little HT's, heh heh. I'm only 150 soaking wet, so that helps too I guess.

So, couple more pics after inverting the bars and gooseneck, spring gel seat swapped off old bike = way more comfortable now. Mirror, lights, little things...

Oh, and I found out 3/4" copper elbows fit perfectly on the NT carb! Whoo! Should get to use my new air filter after all!
 

Attachments

Acraze

Member
May 13, 2011
231
0
16
Tuscaloosa
Man I want that shift kit. Are you using the u bolt type front mount? Also does that light make the way bright? I have a 4500 lumen I want to mount towards the ground. I need to YouTube how to mount the shift kits.
 

killercanuck

New Member
Dec 17, 2009
1,748
6
0
47
Wallaceburg ON
Yea I had to use SBP's fat tube mount, my front tube was fatter than the stock U-tube mount. They'll hook you up with whatever size you need.

Lol, at the moment, those lights are just bolted on, not working yet. I still have to build a regulator for the white wire and get a battery pack. At least with them bolted on, the fuzz can't bug me, (as long as I don't ride at night, lol!)

If you're thinking of a kit, start reading this 'by the letter' now:
http://www.sickbikeparts.com/Manuals/SBP2 Manual001 Rev A.pdf
That way you have a good idea of what you'll be getting yourself into. :D
 

Nikko

New Member
Jun 23, 2011
138
0
0
So Cal
yea it took me about 5 hrs the first time i put my shift kit on because i reread every step to make sure i didnt do anything wrong, considering it cost more then the engine lol. but yea definately worth it in my opinion, its so cool being able to take off in 1st gear and still hit your top speed without screaming the engine, and when the expansion chamber makes so much difference in power once you put it on. wheelies all day!
 

killercanuck

New Member
Dec 17, 2009
1,748
6
0
47
Wallaceburg ON
\,,/

Just got back from a cruise, took some pics,(sorry, crappy cam, still decent)

Yea, took me about that long too Nikko, triple checked everything, for sure. Apart from being able to take off in 1st, I love that it freewheels on deceleration/downhill. Still getting used to speed vs "gear I'm in" to ease back onto it. I don't like slamming the freewheel when getting back on the gas. But I'm getting the feel of it.

I think that's where alot of people are killing their freewheel, by just hammering back on the gas, ignorant of speed... know what I mean?

Getting my speed shift dialed in, on gas, off gas, shift, back on gas -ie. Braaah-chk-braaah-chk-braaaaah-chk-braaaaaah!
 

Attachments

5-7HEAVEN

Well-Known Member
Aug 2, 2008
2,661
240
63
yea i bent my rear axle doing that, now i ease that gas more after takeoff nice bike tho
Yeah, I've ruined my cassettes slamming gears too. Now, when I'm about to shift gears, I pedal for a few seconds, slack gas while still pedalling, shift gear and resume the throttle.

Smooth as butter now.dance1
 

FarRider

New Member
Jun 8, 2011
134
0
0
Brooklyn N.Y.
I like it! Very nice build.
Ya gotta love the new 29er frame geometry, but they do have clearance problems.
Before the good folks at Garry Fisher invented the 29er,
(slightly wider 700c rims, lets call a spade a spade here)- that very same geometry was big news on the good old 26" wheeled bikes. So much so that other frame manufacturers copied the same shorter head tube/more severely angled down tube type of set up, which was great... until you add a china girl engine with a SPB shift kit and presto! clearance problems.
Ive had the same clearance problems on other Garry Fishers, Treks and IronHorses from the early 2000s.

I had to put my air cleaner on the carb first before installing the entire intake assembly. There was just no way to bolt the air cleaner on once the carb and intake were bolted in place.
I also like your repositioned clutch cable holder, check mine out. im now using a rollamajig instead of a j noodle.
(see pic)

But dont despair, it seems these little beauty's like a longer intake tract anyway.
Just search "Longer intake manifolds" these mount the carb behind the seat tube off to one side, ive even seen one that wrapped around the seat tube and exited between the seat stays! Get ready for a major torque boost!

You will need access to a welder, some 1/4 plate to act as the flange, and some old handle bars to cut up for use as a runner.
OR you could fabricate something that will fit out of sheet metal.
I also agree, that you might like to try the SPB expansion chamber, be ready to re jet the carb if need be. Those exp. chambers REALLY wake these little engines up.
I'd like to see what you come up with.
Again, very nice looking ride,
FR
 

Attachments

killercanuck

New Member
Dec 17, 2009
1,748
6
0
47
Wallaceburg ON
Nice FarRider, you've got tonnes of room in there :p

Got my elbows soldier'd up and mounted. Can't test it now because of rain, grr. Friggin torch was empty, so did the 'ol "crank the stove on high, throw on some leather gloves and get out the flux" , heh heh.

Should look okay once its painted black, eh? (Gotta get some black zip-ties too)
 

Attachments

FarRider

New Member
Jun 8, 2011
134
0
0
Brooklyn N.Y.
That is one very nice looking piece of work canuck...
Me likey.
Gotta love the old stove trick, I pulled the same trick when soldering my 4" copper water pipe gas tank, even though i was using MAP gas and a good torch head i couldn't seem to get the entire end cap hot enough at the same time.

Then I remember my grand father telling me how "furnace brazing" worked, how to prep and flux the joints first then using special flat ribbon solder to wrap the part, then assemble it then put it in the oven...
Old tricks are the best tricks, I did it almost exactly as the old codger described accept for the ribbon solder, which of course i had no idea of even were to begin looking for.

I bought the assembly up to full temperature , then using a pair of "ove gloves" I put it on a steel plate on my bench and fired up the torch and using regular silver solder got the entire thing sealed up in only a few minutes including my home made gas filer neck and the 1/4"NTP bung for the fuel valve.
After it cooled over night some elbow grease with a file and various grades of sand paper got it ready for a good buffing with jewelers rouge and of course a final polishing with good old Mothers Metal Polish.
I think copper parts on a moto bike are way friggin cool...
check out my over sized "super hush" muffler and my light bar.
Ok, the tank is a bit heavy at around 6 pounds empty but its unique and will last forever, the muffler is re packable and you can use a shorter pipe if you wish, and the light bar is for the WOW factor, I can burn the paint off the back of a ford van at 100 yards with that thing, its also removable, and i use a motorcycle 12 v battery and military grade switches for it.
I say polish that intake, be proud of the work and ingenuity that went into it.

Heres a few pics...
FR
 

Attachments