New Build, relatively new to the Forum...a few questions (Pic heavy)

GoldenMotor.com

Brassneck

New Member
Oct 30, 2015
72
0
0
Seattle, WA
Hey all,

I introduced myself a few weeks ago (http://motorbicycling.com/showthread.php?t=60233), and now I figured I would actually post a build thread now that I have my parts and have started down the road. My ultimate plans are to customize this into a board tracker... custom gas tank, modified seats, handlebars, grips, pedals, etc... for now, I'd like to get the bike built as is and see how it comes together, rides and performs.

As mentioned in my intro, I'm looking for this to help inspire me to build full board tracker motorcycle...but limited funds, time and mostly Space is problematic. Thus, this bike is going to be built in my basement and we'll see how things come along. Super excited, nonetheless!

So, I picked up a Micargi 26" Pantera 7sp on Amazon...and have paired it with a Mega Motors 66/80cc (from Amazon as well...although shipped by BikeBerry). I don't expect perfections from any of these...we're not talking high-dollar purchases. But I do hope to be able to enjoy them enough to goof around with for a bit (And have my kids be part of the build process).


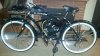
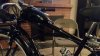
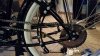
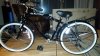
The parts came in earlier this week. The Bike had a bent rear fender and the mount for the derailleur was crooked right out of the box. Fortunately, both were easily remedied. Bike build took 30 min. tops... I've left the front fender off for now....still not sure if I'm going to keep them or ditch them (I've read horror stories about them coming loose). Yesterday, I rode the bike around and tuned up the gearing, shifts great! I also spent about an hour true-ing up the wheels...they were close but had obvious wobbles, but that was sorted and all is good now. (Pic 1: As I put the bike together Wed night)

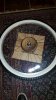
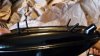
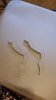
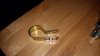
As for the engine... I got those and everything is in the kit (I think). The tank was scratched and had bent rear studs...fortunately, the seller (BikeBerry) replaced at no cost and the new tank arrived today. Looks great! (Note, I don't plan to use this tank long-term, but I'm happy they made good on the tank as I do plan to use it to get the bike up and running.
(Pic 2: tank damage)

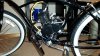
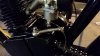
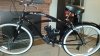
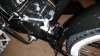
So today, I started the mock-up stage. Note: I will be tearing the engine down and getting things checked/torqued etc...soon enough...but I wanted to see how it was going to fit into the frame and if there was any major fabrication for the mounting of the bike. (This forum is great! I read some threads of previous builders using my frame and found some solid advise on mounting)... so I simply copied what seemed to have worked. (Pic 3: Mocked up Engine in Frame)
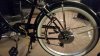
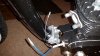
(Pic 4: Front Mount)
(Pic 5: Rear Mount)

More to come!
 

Attachments

Brassneck

New Member
Oct 30, 2015
72
0
0
Seattle, WA
Oh... on to a few questions. I found these parts in my kit, and really don't have any idea what they're for. Any help would be appreciated:

The first pic is TWO of the same kind of metal strap...both have the same bends and one arm is shorter than the other. There are holes at each end and in the center along that flat section.

The second pic, brass/clamp thingy looks like perhaps it's an exhaust clamp to help hold the muffler to the frame or engine? But if so...how does it attach?

Thanks!
 

Attachments

2door

Moderator
Staff member
Sep 15, 2008
16,302
175
63
Littleton, Colorado
Photo one is the straps given to attach the CDI, ignition module, to the bike frame. The second photo is to hold the muffler. You'll need to use some imagination as to how to use them for their intended purpose. The kit instructions are usually a little vague in this area.

Tom
 

Brassneck

New Member
Oct 30, 2015
72
0
0
Seattle, WA
Hmmm...ok, thanks Tom.

So for the CDI, mine also came with a little bracket and screws built into the unit. Do these need reinforcing, or are they typically ok without these?

I'll see about the exhaust mount...looks doable.
 

Brassneck

New Member
Oct 30, 2015
72
0
0
Seattle, WA
So I have done a little more work....got the rear sprocket mounted... it wasn't as bad as I thought to get it on. I just took my time and went around every other bolt until the whole thing clamped down on the spokes evenly. Put it back on the frame and it still spins true. I assume that's a good sign. :)

I also mounted the exhaust to see if it would clear the frame... and it looks pretty good. (Still not sure about the brass mount, but I'll worry about that later).

Finally, I started to look at the electronics, and after reading up on the quality of the plug/wire and cap... I decided to swap them out. I got a NGK plug to replace the chinese one that came with the kit...and I happen to have a few quality spark plug wires lying around from previous motorcycle builds... (I don't recall off hand the brand, but they work great on my motorcycles...I assume they'll do alright in this application). Plus, the plug wire is long enough to let me move the CDI box in a more hidden spot.

Also, I mocked up where I'm going to put the CDI unit. I haven't really seen many people put the box in this location, and I'm wondering if there's a reason for that? Heat/air/weather?

Anyone have any thoughts/reasons why it wouldn't work in this spot? (See pic #3)

Thanks!
 

Attachments

Brassneck

New Member
Oct 30, 2015
72
0
0
Seattle, WA
A bit more progress today... motor is still just mocked up to gauge it's fitment and associated parts. Still need to go through it, loctite the bolts, etc.

I reversed the handlebars for a lowered looks...I think I like it. I received my dual brake lever and swapped over the brake lines, as well as swapped over the gear shifter to the left side, and installed the clutch lever there as well.

Finally, I took off the stock kick-stand and received a dual stand (Amazon) which seems to work ok. It hangs a little lower than I would like...but seems to be OK. I did have to do a little modification to get it to fit my frame... nothing a little cutting wheel to the kickstand mount to make it fit right.

Question: Anyone have an opinion on the location of the CDI underneath the motor? Other than needing to extend the wires to the kill switch, I think it would be OK...but open to feedback if anyone has had that location be an issue for them.

Thanks!
 

Attachments

kevyleven007

Active Member
Sep 25, 2008
1,217
8
38
texas
Oh... on to a few questions. I found these parts in my kit, and really don't have any idea what they're for. Any help would be appreciated:

The first pic is TWO of the same kind of metal strap...both have the same bends and one arm is shorter than the other. There are holes at each end and in the center along that flat section.

The second pic, brass/clamp thingy looks like perhaps it's an exhaust clamp to help hold the muffler to the frame or engine? But if so...how does it attach?

Thanks!
The first pic is the muffler clamp, The larger curve clamps to the muffler and the smaller to the frame and the two pieces are bolted together. second pic looks like a coaster brake clamp but its probably to hold on the chain gaurd
 

2door

Moderator
Staff member
Sep 15, 2008
16,302
175
63
Littleton, Colorado
Brass,
Your CDI location is just fine. Keep in mind that moisture and electronics don't get along well so you'll want the spark plug wire sealed into the CDI for that reason. A little black silicone will suffice.
As for your plug wire, if your motorcycle wire has a metallic conductor, that's good. Resistance wire, like most auto parts store sell today isn't the best choice for our weak little ignition systems. Getting rid of the kit spark plug boot is a wise choice. They are responsible for lots of headaches and frustration.

You might want to do a little research here and read some on fenders and their potential hazards. There are some good suggestions for mounting and reinforcing them for safety. The factory fender mounts can get you into trouble. Be careful.

So far your bike is looking good. Keep us updated on your progress.

Tom
 
Last edited:

Brassneck

New Member
Oct 30, 2015
72
0
0
Seattle, WA
Brass,
Your CDI location is just fine. Keep in mind that moisture and electronics don't get along well so you'll want the spark plug wire sealed into the CDI for that reason. A little black silicone will suffice.
As for your plug wire, if your motorcycle wire has a metallic conductor, that's good. Resistance wire, like most auto parts store sell today isn't the best choice for our weak little ignition systems. Getting rid of the kit spark plug boot is a wise choice. They are responsible for lots of headaches and frustration.

You might want to do a little research here and read some on fenders and their potential hazards. There are some good suggestions for mounting and reinforcing them for safety. The factory fender mounts can get you into trouble. Be careful.

So far your bike is looking good. Keep us updated on your progress.

Tom
Thanks Tom, I am debating on the fenders...I like their look, but i had heard of issues...I guess I'll read up on their integrity with other builds...I was thinking acorn nuts/bolts for the top mounts...those seem weak, and thread lock for the base mounts...but perhaps more is needed?
 

Brassneck

New Member
Oct 30, 2015
72
0
0
Seattle, WA
If you can, and have a welder- go to my safe fenders album to see what I do to keep fenders safe on ALL my bikes.
http://motorbicycling.com/album.php?albumid=1277
Wow...ok, that's some serious reinforcement. I was more concerned with the fender struts as the weak point...but is that the major breaking point for most fenders? I'm trying to picture how the stock hanger mount breaking would allow the fender to drop and connect with the wheel, if the struts support most (if not all) of the weight and keep it off the tire? I'm just curious...(I haven't really started reading up on the concern yet).

Thanks,
 

allen standley

Well-Known Member
Oct 22, 2011
1,126
238
63
Bangor, Maine
It will vibrate down, swing around and convert your wheel into a ski; then kill you in that same 3 seconds!
So many woeful stories on the forum here of stock fender tabs breaking.

Metal too thin-- Vibration and stress. Also if you do re tab fit your fenders so they relax into position. Bending up or down to "make it fit" adds stress . It will fracture across. Concerning fender fit stress + vibration = BAD! at every attachment point.

Be safe.
 
Last edited:

Brassneck

New Member
Oct 30, 2015
72
0
0
Seattle, WA
Got it...so my front fender has two sets of struts, plus the top mount...the top mount is weak...guessin the struts are cheap as well...will look into reinforcing those, but if the top mount were to break, the two struts would limit the rotation I think...either way...good advise!!!
 

Brassneck

New Member
Oct 30, 2015
72
0
0
Seattle, WA
Damn...that's serious. Do you have a pic of the bike prior by chance? I'd like to see how the bracing looked and compare to what I have...
 
Last edited:

Brassneck

New Member
Oct 30, 2015
72
0
0
Seattle, WA
A little more work done today...Nothing major, but progress.

I painted the engine mounts. Got the engine back on the bike and tightened up well. Sits solid, and based on what I've read...I don't see any gaps on the engine-to-frame issues, studs all with loctite, locking nuts/washers, and torqued to about 60 inch pounds. I'm feeling good on the frame mount, but I haven't started it up yet...so I guess we'll have to see how that goes.

I also painted the newly arrived Chain-tensioner to replace the one in the kit. I'm not of fan of the look/style of the one the kit came with and I saw a few bikes on here with this style...not sure what it's called, but I found it easy enough (Yes, Amazon...lol). I bought the 12" size (raw steel) and I think I probably could have gotten the 10" sized one...but oh well...I still think it looks pretty good, and maybe I'll move it more forward if needed.

I also mounted the tank (this is the replacement one that came in for the bent bolts/scratched one I got with my kit initially). I cleaned/flushed it, and checked for rust, etc...it actually looked fairly good but a few "things" came out of the flush...so worth the effort. I also pressure tested the tank making sure it would hold fuel without issue. Once that was done, I went to install the petcock, but I noticed that the petcock itself wasn't sealing well. I took it apart and found the cover plate wasn't sitting flush and the spring washer wasn't pressing the seal evenly...so a quick press to get the plate straight, and all is well.

I ordered up a speedo/odometer for the bike: Sigma BC8.12. I initially wasn't going to bother, but then I realized that I probably do want to keep track of mileage and speed, and because they're not expensive I finally bit the bullet. It came in today, so I quickly mounted it up and set it up for my wheel size, mph, etc...seems like a great little unit. Doesn't go with the classic lines of the bike...but oh well.

Next up I'll be addressing the wiring, clutch cable install, torquing head bolts, and installing the chain. This bike is pretty fun so far, I'm enjoying it.
 

Attachments

Brassneck

New Member
Oct 30, 2015
72
0
0
Seattle, WA
Spent a little time today with the bike.

I took off the head, inspected the gasket, piston/rings, etc. (The kit I got had all the hardware replaced) so I didn't bother swapping any of the studs out... but I noticed that the studs weren't seated very well, I literally twisted them out with my fingers...possibly they came out when I took the bolts off, but regardless I torqued them down, measured the head bolts for depth (So I know they're not bottoming out before torque value is met) and buttoned everything up. I was going to use gasket sealer on the head gasket, but I think I'll wait... let's see how it runs as is.

Next up I got the front sprocket cover off, inspected the rod/Bearing and also released the clutch basket on the other side... I found that the sprocket was locked up with the main gear, but that came loose with a quick turn of the holding pins at the clutch plates... freed up sprocket and while the clutch was out, I got the clutch cable connected the the arm and played around with the settings. Looks like everything is working as it should...however I'm sure I'll need to adjust the clutch as things start moving.

One thing I can't figure out is why the **** the kit comes with such a LONG tension spring for the clutch cable. I get the heat shield spring, but the tension spring is WAY longer than anyone could use... before I cut it down, I'm going to see if I even need it... With out the spring, the pull is fairly light..and the clutch plate spring seems to give it enough return as is... but maybe this will get weak over time and having a spring on the cable is warranted?? Not sure... I did see the mod with the pully concept for the clutch cable...and I'm intrigued, but I'm not a fan of the bulk. I may come up with a plan for a pulley, but utilizing the stock location for the assembly. But that's a project for later, I think...the pull isn't anywhere as hard as some of my previous motorcycles (Or maybe my hands have built up some strength after riding them around all these years...ha ha).

Finally, I got the chain out and did a test fit. In order to retain the rear faring, I needed to either cut or bend it back. I opted to bend it...and I still have about a 1/2" of clearance to the rear wheel...and the chain clears. I did have to repaint the bend areas as that stock paint is poorly applied and simply chips off with the slightest crease. Anyways, that was simple enough. I also needed to remove about 4 links of chain, and once that was done and with the tensioner adjusted, I got things lined up great. So far, the chain runs true...no jumping, no random rubbing and at full pedal (Forward and reverse with free wheel...all looks solid).
 

Attachments